How to create a video animation of a lunar eclipse

How to capture an entire lunar eclipse and create a flip-book style record from still frames.

Try out a subscription to BBC Sky At Night Magazine and pay just £9.99 for 6 issues today!
Published: May 4, 2022 at 9:00 am

Have you ever tried creating an animation showing every phase of a lunar eclipse?

The 16 May total lunar eclipse will be a good opportunity to do just that, and in this article we're going to show you how.

But you could use this technique - with some adjustments for timings etc. - to record any lunar eclipse.

Lunar Eclipse of 15 June 2011 by Yann, South Africa. Equipment: LX200 GPS 8 inches, Nikon D200, Photoshop CS5.

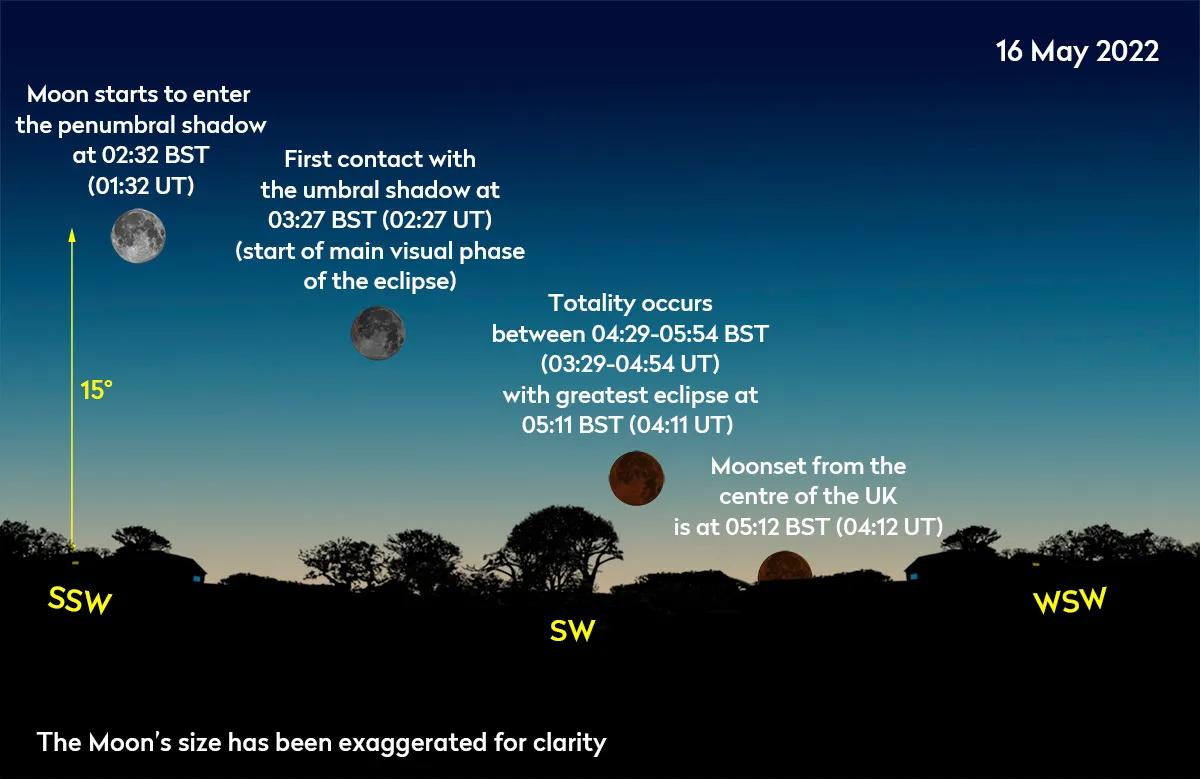
On the morning of 16 May the Moon will set around 05:00 BST (04:00 UT), just after the point of greatest eclipse and during morning twilight.

The first part of the eclipse begins at 02:32 BST (01:32 UT) as the Moon moves into Earth’s weak penumbral shadow, but this is hard to see visually.

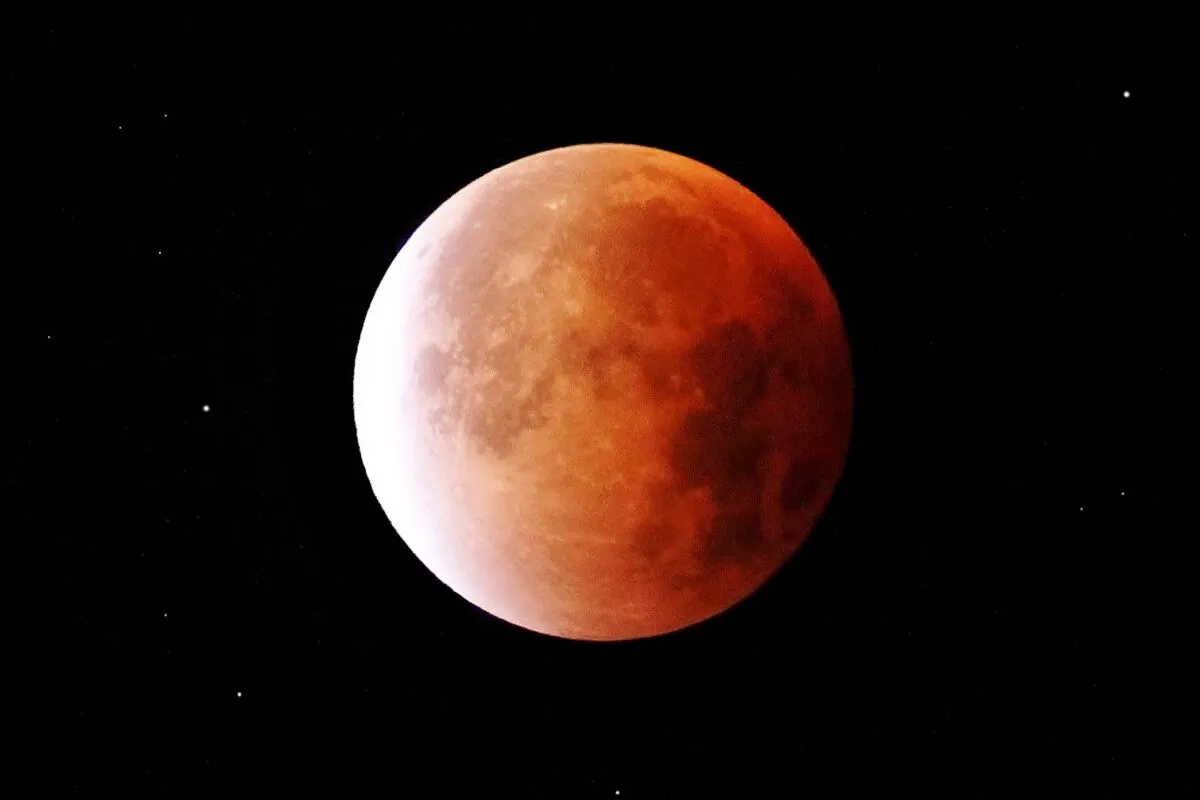
As the Moon progresses into the penumbral shadow, heading towards the outer edge of the umbral shadow, so the presence of the penumbra becomes more noticeable as a dark shading.

The geometry of this eclipse means the line of approach towards the umbral shadow is optimised.

Credit: Pete Lawrence

Recording the whole lunar eclipse

A good challenge is to record the entire lunar eclipse from just before the penumbral insertion, in the form of an animation.

For this to work, you’ll need a photographic setup, which can record the Moon as a demonstrable disc.

A 500mm-plus focal length will deliver this. Coupling your camera to a telescope with a focal length around the 1,000mm mark will be ideal.

Aim to take photos of the eclipse every 5–10 minutes over its duration.

Aim to take photos of the Moon every 5–10 minutes during the eclipse to create your animation. Credit: Pete Lawrence

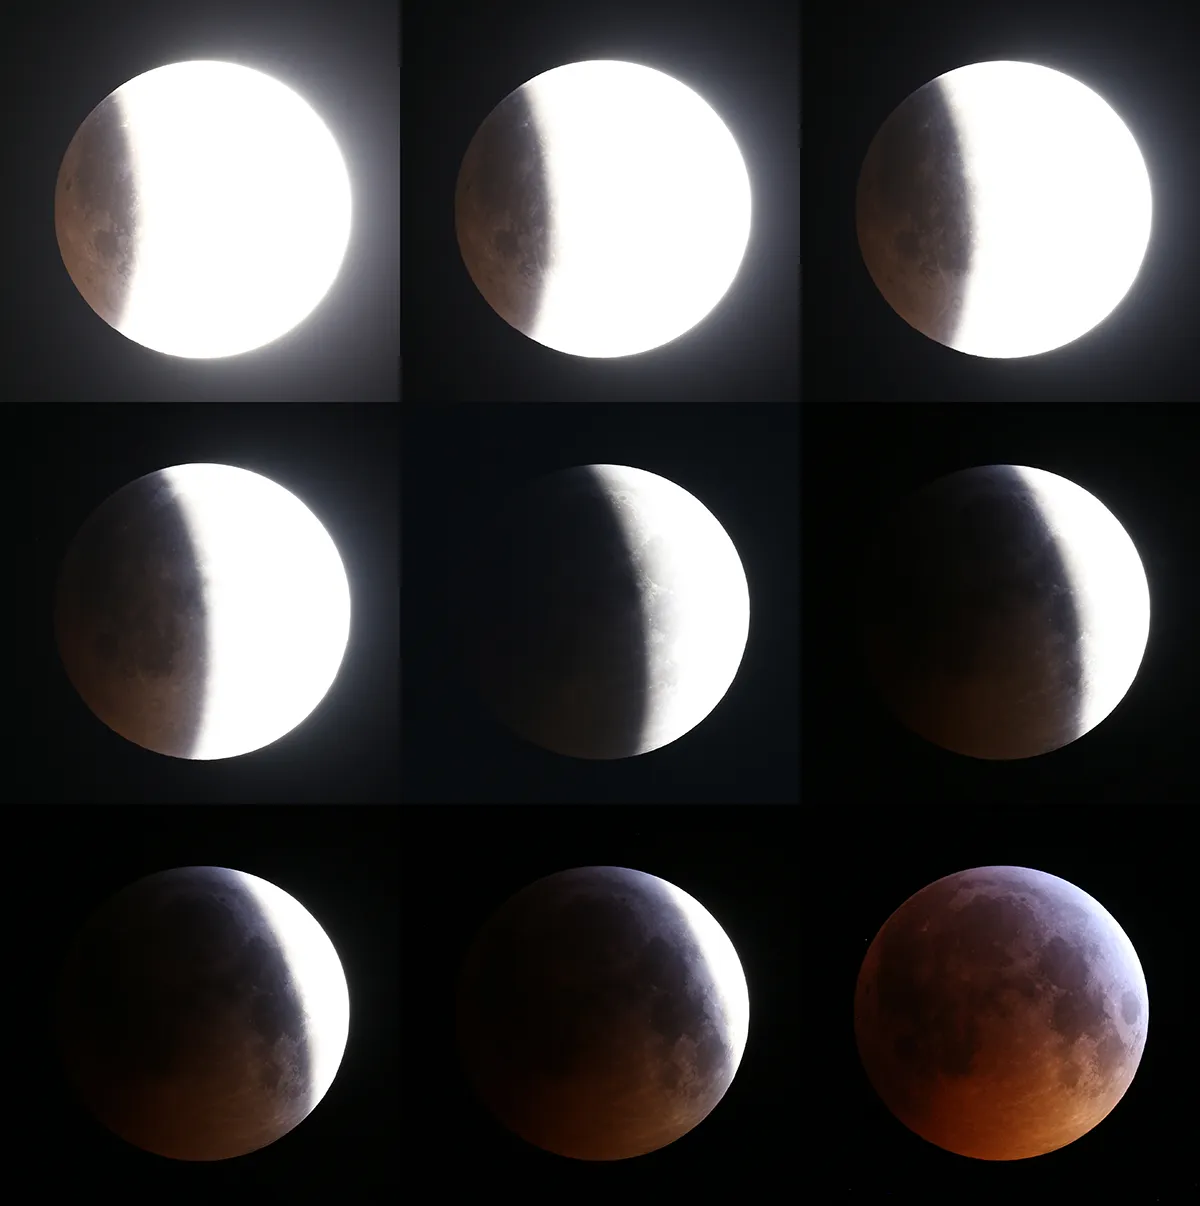
The brightening dawn twilight will need careful exposure adjustment to avoid overexposing the sky.

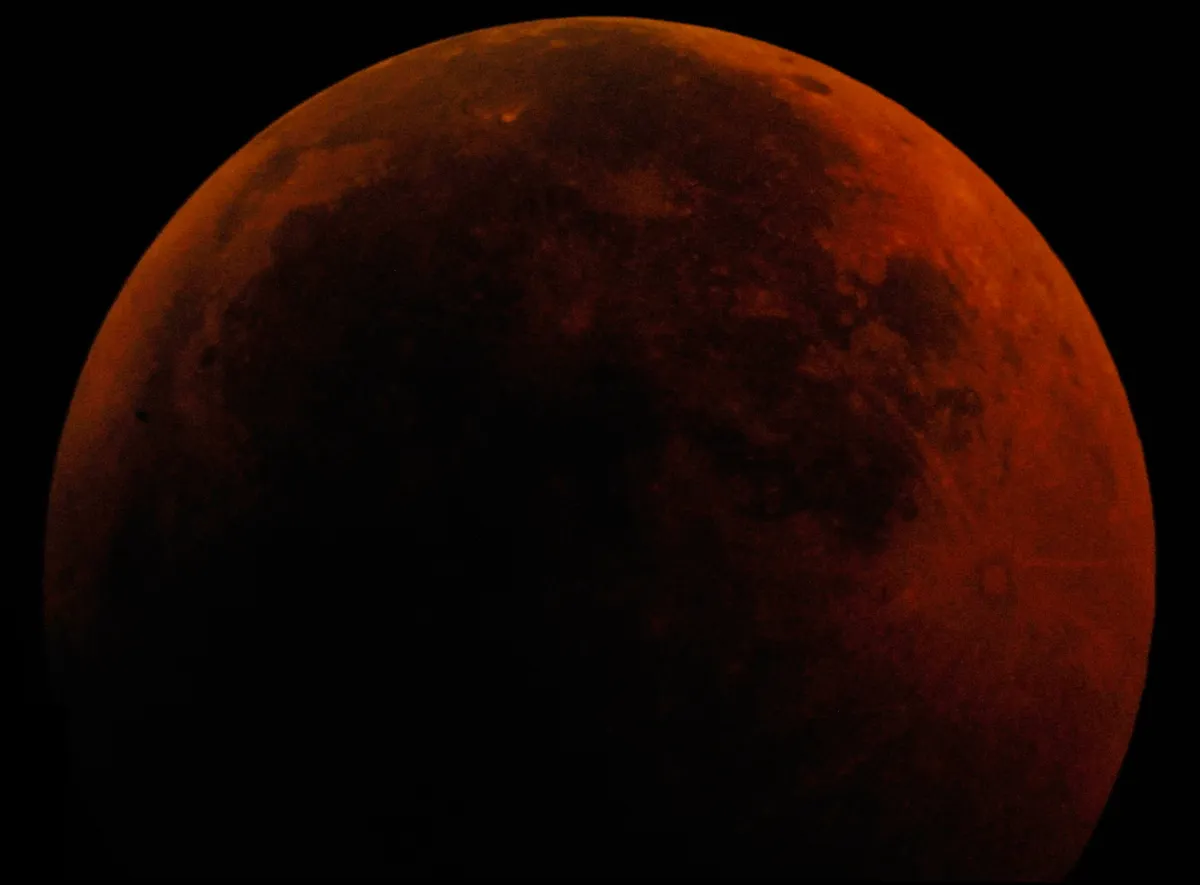
This is important when totality arrives, as the Moon will be darker and the sky will brighten.

Overexposing the dark umbral shadow brings out its colour at the expense of overexposing the penumbral eclipsed region.

Once the event has concluded, load each image into a layer-based editor, in time order, with the earliest image at the lowest level.

Lunar eclipse of 28 September 2015 by Sarah & Simon Fisher, Bromsgrove, Worcestershire, UK. Equipment: Canon 600D attached to Maksutov 127mm telescope, Prime Focus single shots

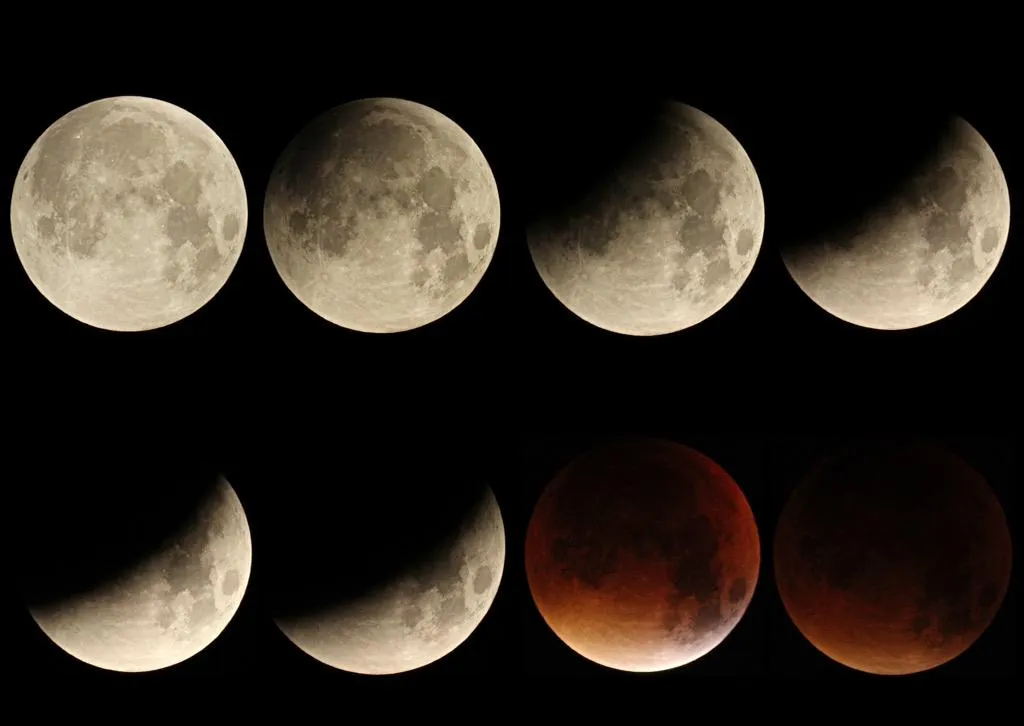
Working up from the bottom of the stack, adjust the position of each lunar disc so that the high contrast features align.

Next, it pays to check the edge space around each image in case the alignment process has brought the border of the image frame into view, creating a gap at the image frame’s edge.

If this is the case, fill in the gap. As a clean-up process, crop the image to chop off any excess bits, which may have become dragged off beyond the image border.

It’s a good idea to save this image stack and keep it to one side, opening a copy of it for further work.

In this way, if you do things to the image frames, for example by adjusting their brightness and contrast, and get it wrong you can always scrap the edit and go back.

If the original stack has a large frame size, you may need to reduce this for animation purposes.

Lunar eclipse of 28 September 2015 by Susan Snow, Bishops Cleeve, Cheltenham, UK. Equipment: Canon EOS 600D with a 300mm lens.

A smaller frame will work well on a computer screen, produce a smaller, more transportable animation file and play in a smoother fashion.

Keeping the large original safe will allow you to revisit it if the need arises.

Once you’ve created the master frame stack, you can make a ‘flick-book’ animation.

In our ‘Step by Step’ guide we look at using the freeware PIPP application (bit.ly/3x2vCJ3) for this task.

If it works, you’ll have an impressive animation to share with others.

Equipment

  • Colour photographic camera (eg DSLR or MILC)
  • 500mm or greater lens

Record a video animation of the lunar eclipse, step-by-step

Step 1

make animation of lunar eclipse step 01

  • Take full lunar disc images at regular periods, say 5-10 minutes from start of eclipse to moonset
  • An equatorial mount will remove frame rotation, which occurs when using an altaz setup
  • Camera adjustment is necessary as dawn breaks
  • Check the image histogram and avoid over-exposure of the sky

Step 2

make animation of lunar eclipse step 02

  • Upload your images to your computer
  • Open each shot, copy and paste as a separate layer into a master image, maintaining time order in the layer stack
  • Align, tidy the edges and crop the final layer stack
  • Save the stack under a master file name, before working on a copy

Step 3

make animation of lunar eclipse step 03

  • Follow instructions in the main article above and you should end up with a number of eclipse images in a layer stack
  • Resize a copy of the master file to, say, 600 pixels-wide and save each layer as a sequence-numbered single image
  • Open PIPP and add all images into the ‘Source Files’ list
  • Dismiss the ‘Join mode’ message that pops up

Step 4

make animation of lunar eclipse step 04

  • Ensure frames are shown in desired order, reflecting the sequence numbers given under Step 3: 001, 002 etc.
  • Make sure the ‘Planetary Animation’ option is ticked in the ‘Optimise’ panel
  • Under the ‘Processing Options’ tab, deselect all options
  • The alignment etc, will have been done building the layer stack

Step 5

make animation of lunar eclipse step 05

  • The ‘Animation Options’ tab allows you to adjust the playback, so you can decide, for example, if you want to pause and reverse the sequence at the end
  • The ‘Output Options’ tab allows you to select the type of file to generate
  • We recommend AVI format with a 10 frames per second playback speed
  • Adjust ‘Quality’ to ‘8’

Step 6

make animation of lunar eclipse step 06

  • A final function tab is ‘Do Processing’, under which you click on ‘Start Processing’ to generate your animation file
  • The process is quick so you can easily go back and tweak the settings until the animation runs as you want
  • If the final animation is too large a file, try to reduce the size of the frames you are using

This guide originally appeared in the May 2022 issue of BBC Sky at Night Magazine.

This website is owned and published by Our Media Ltd. www.ourmedia.co.uk
© Our Media 2024