An all-sky camera is an ideal tool for capturing the majesty of the celestial sphere turning silently overhead.
With it you can make timelapse videos that reveal the movement of the stars as well as record bright meteors and satellites.
Generally speaking, the all-sky cameras available to buy are contained within a weatherproof enclosure with a clear plastic dome, the camera inside fitted with a 180° fisheye lens pointing upwards.
The camera is linked to a computer to record images of the sky every few seconds and the resulting video is processed later to make a timelapse movie.
The complicated part of this arrangement, if you want to have a go at building one yourself, is the enclosure.
Consideration needs to be given to full weatherproofing and heaters need to be fitted inside the dome to keep it dew free.
We’re going to simplify ours by dispensing with the enclosure completely.
So long as you know it is definitely not going to rain during the night, you can still take great all-sky videos without it.
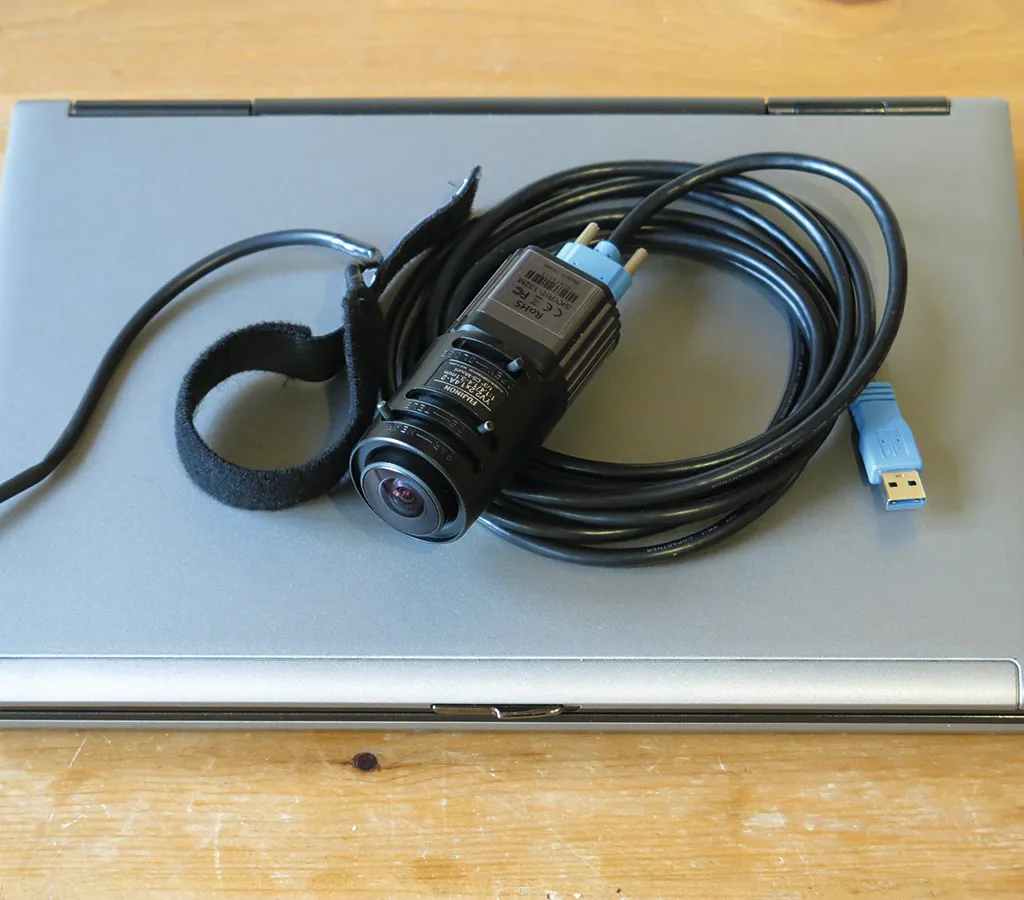
All you need then is a suitable camera with a 180° fisheye lens wrapped with a dew heater band to stop the front glass dewing up.
You want a high-sensitivity digital video camera, the type sold for Solar System imaging.
The limiting factor here is the size of the image produced, as the range of suitable fisheye lenses available tend to require camera chips with a height of around 4mm or larger.
Although that excludes cameras with 1/4-inch chips, the newer generation of cheaper 1/3-inch CMOS chip Solar System imagers are ideal: these chips are 3.6x4.8mm in size.
Various fisheye lenses can be used with these cameras.
Some are zoom lenses and generally need to be on the widest field setting, while others have a short and fixed focal length.
Tools and materials
Camera
A colour or monochrome digital video camera with 1/3-inch or larger chip and CS-mount thread at front.
Suitable models include the ZWO ASI120 MM/MC, Celestron NexImage Burst, Celestron Skyris 132 (all CMOS 1280x960 pixels) and the DMK 31AU03.AS (CCD 1024x768 pixels).
Fisheye lens
A suitable C- or CS-mount 180° fisheye lens.
Suitable models include the Rainbow L163VCS 1.6-3.4mm, Arecont Vision infrared-corrected 1.55mm and Fujinon YV2.2x1.4A-2 1.4-3.1mm.
Hardware
Two-inch dew heater band, tripod, laptop and connecting cables.
Software
FireCaptureandPIPP
Mono or colour?
If you use a colour camera at the heart of your setup you will record the hues of the brighter stars and the colour of the sky, especially at dusk and dawn, but also pick up the distinct glow of light pollution if it is present.
For a monochrome camera, light pollution won’t be so obvious and you can also use shorter exposures or lower the gain setting, as the absence of the colour filters will let more light onto the imaging chip.
Monochrome is the best choice for meteor detection, as you want the camera to be as sensitive as possible to pick up their fleeting trails.
, Canon 16–35mm lens, Manfrotto MT190CXPRO4 tripod")
Where to put your all-sky camera
When choosing a site for your camera, look for somewhere that offers the least obstructed view of the sky.
A consideration here is the length of your cables: you will need a 12V power cable for the dew heater and also a USB cable to connect your laptop
The longer these are the easier it will be to store them somewhere safe and dry during the night while the camera does its work.
You also need to think about your laptop’s power usage.
Will its battery last the whole night without additional power?
Once set up and recording, your camera should capture the night sky as you sleep.
With luck, in the morning you should have a video sequence you can process, compressing the whole night into a couple of minutes, speeding up the movement of the heavens by several hundred times and making a fascinating record of the sky.
Many amateurs add music to their videos to make them even more mesmerising, then post them on YouTube or Vimeo.