Refractor telescopes are a popular choice for viewing and imaging deep-sky targets. Relatively inexpensive refractors are ‘achromats’, so-called because of their achromatic lens, but these often suffer from an effect known as chromatic aberration.
This is where the focused light doesn’t quite bring all of the colours to the same point, resulting in slight colour-fringing around the stars.
Achromats are best used for visual observation, but some can also produce reasonable images.
Read more astro image processing guides:
- Enhance a galaxy's brightness without affecting stars
- How to use DeepSkyStacker for astrophotography
- Create a Milky Way mosaic
There are also refractors that provide colour-corrected images, and these are called apochromats.
These ‘apo’ or ‘semi-apo’ refractors often have Extra-low Dispersion (ED) glass in a doublet configuration or better still, a triplet arrangement that should eliminate colour-fringing.
The process we are looking at here is not a replacement for using an apochromatic refractor to get the best star images, but it can transform images produced with an achromat.
If you're completely new to astrophotography, read our guide on how to photograph stars.

All in a night’s work
Sometimes a little colour-fringing creeps in to images, be it from a change in the temperature or from perhaps not quite locking down the focuser, which allows a tiny amount of slippage.
The resulting shots may have some chromatic aberration present and you might be tempted to abandon them, but before you do so it’s worth trying out the ‘Chromatic Aberration’ tool found in most image-processing software.
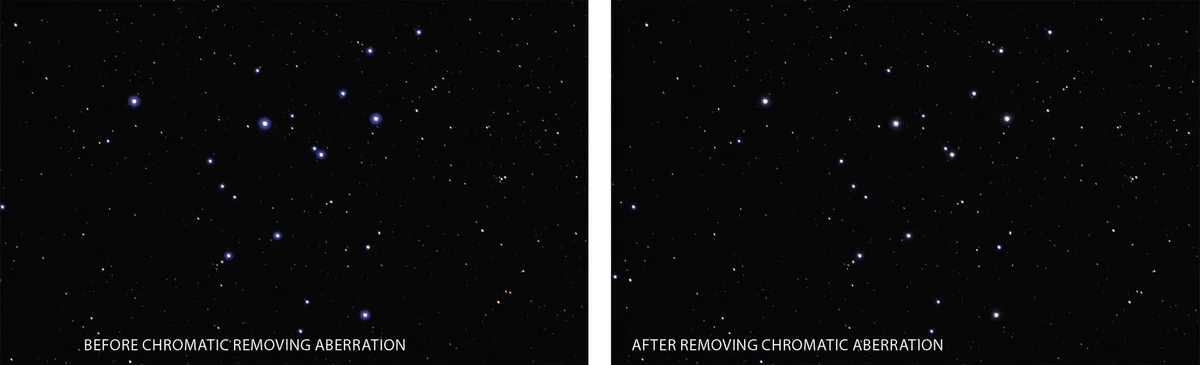
In our ‘before and after’ example of M39 (see at the top of the page), taken with a 5-inch achromatic telescope, we show how an image can be saved by using the popular PaintShop Pro 2019 software.
It’s well worth trying to salvage your image and save your hard night’s work.
First, use your favourite stacking software to produce the primary image (see Stage 1 above). Then load it into your image-processing software – in our case PaintShop Pro 2019.
In our initial image you can see the blue fringing around the brightest stars and this is where the magic begins.
Click on Adjust > Chromatic Aberration Removal to bring up the Chromatic Aberration Removal sub window (see Stage 2).
In the sub window we see a twin-screen view of part of the image. It is worth decreasing the magnification using the Zoom tool to see most of the image as this allows you to select a suitable star for you to work on.

Now use the Zoom tool again to magnify a star that exhibits chromatic aberration particularly well, making sure you keep it centred in the screen.
If you wish, and have a reasonably powerful graphics processor, tick the Preview on Image box at the top so you can see any changes you make on the main image, seen in this case to the left of the Chromatic Aberration Removal window.
At this stage, if this is the first time you have used it, the lower box will be blank until you make a selection box to sample the colour you wish to remove.
Now drag your cursor in the ‘Before’ window over the colour you wish to sample or select (see Stage 3) – helpfully it even tells you to do this.
Keep the Radius setting at 100. The sampled colour will appear in the small right-hand box and it will also appear as Sample 1 in the main centre box.
The selected box usually contains a range of the colours selected and you’ll have better control if you keep the numerical value range around 5 or 6, otherwise too many hues of the colour are selected and you can end up with grey stars.

Once the selection is made, the right-hand window shows the effect on the star, and you can use this as a guide to see how much you want to change the colour around the star.
As mentioned, if you use too large a range you can go overboard and ruin the stars making the image grey-scaled.
Instead, we note the effect and can, if needed, make multiple selections (as shown in the Stage 4).
It is down to personal preference how much adjustment you make, but be careful as too many selections can make the star look bland.
We prefer to leave a little colour around the star (as in Stage 3) which gives a more natural look.
Bear in mind that there could also be nebulosity present in your image, and be careful not to affect that when you remove the chromatic aberration colour.

If you are happy with the result click on OK to confirm the changes. Then you can either do a little more processing or save the image in whichever format you desire.
This technique is well worth trying if it helps to save your preciously obtained images and hard work.
Paul Money is an astronomy writer and broadcaster and is reviews editor for BBC Sky at Night Magazine. This article originally appeared in the April 2020 issue of BBC Sky at Night Magazine.