Ever seen the Moon looking enormous when it's close to the horizon?
This effect is known as the Moon illusion, and here we'll go through how you can photograph it.
For weekly stargazing advice and Moon phases delivered directly to your email inbox, sign up to receive the BBC Sky at Night Magazine e-newsletter
More on lunar photography

When the full Moon occurs near the horizon, it looks artificially massive.
Even if you’ve been into astronomy for a long time, this can still catch you out, convincing you that that low-down full Moon, or near-to-full Moon, is indeed larger than it should be.
But this is false, an illusion conjured up by our brains, and it's known as the 'Moon illusion'. Here we'll show you how to photograph the Moon illusion.

Photograph and debunk the Moon illusion
While our brains have trouble not seeing the Moon as huge when it’s near the horizon, a camera isn’t fooled at all.
This is especially true when you see a low full or gibbous Moon near the horizon and try to capture its apparently massive appearance with a smartphone.
The resulting image shows nothing particularly impressive. The camera can’t see the illusion, so it doesn’t record it.
In order to debunk the Moon illusion, you’ll need to attempt to photograph a regular full Moon high in the sky.
Devoid of any horizon references, this full Moon will provide the control image.
Then, you’ll have to attempt to capture the full or large waning gibbous Moon when it’s low down, either just after rising or just before setting.
Comparing the two images will give you the ammunition you need to debunk the illusion.
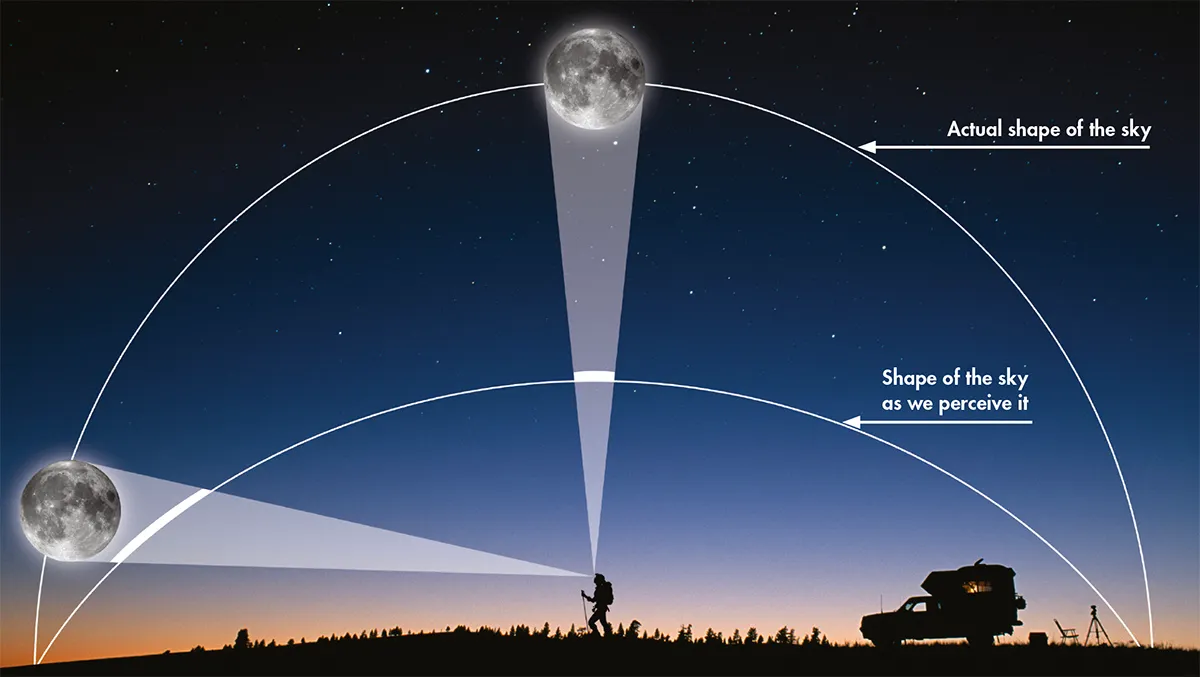
All things equal?
When the Moon is high in the sky and due south, this is when it’s closest to you on the surface of Earth.
The smallest distance occurs when there’s a straight line connecting the centre of Earth, you and the Moon.
When the Moon is low on the horizon, the distance is slightly greater, by approximately an Earth radius.
Consequently, the low ‘massive’ Moon should appear, if anything, a tiny bit smaller than the high-up ‘regular’ Moon.
Then there’s atmospheric refraction to take into account.
Near the horizon, this squashes the apparent vertical dimensions of an extended object slightly, so the full Moon looks like a squashed oval, as is also the case with the rising or setting Sun.

As well as the more distant low-altitude Moon having a smaller apparent size than one high up, it’s also squashed vertically too.
To take the comparison shots under fair conditions, it’s also important to try to capture the low and high Moon on the same night.
If not, there are also orbital variances that need to be taken into account, as a perigee full Moon has a larger apparent diameter than an apogee full Moon.
Of course, this experiment is at the mercy of the weather, but catching the two images within a 2–3-month period should be fine.

Image scale makes a big difference too, in your photograph of the Moon illusion.
A small scale, such as you’d achieve using a smartphone, allows you to generally show that the Moon illusion isn’t real.
However, a medium image scale, such as you’d achieve using a small telescope with a high-frame-rate camera, gives you enough information to directly measure the effects, making a measurement of the apparent diameter of the low and high Moons.
This will make a great record for when you next encounter the Moon illusion with someone who’s never noticed it before.
Now you can say with confidence that it’s not real!

Photograph the Moon illusion: step-by-step
You'll need any camera that can image the Moon as a disc.
Step 1

For the best photograph of the Moon illusion, catch the full Moon or the gibbous Moons that appear for several days either side of it.
Waxing gibbous Moons need to be caught before moonset in the morning, waning gibbous Moons just after moonrise in the evening.
The full Moon appears near the horizon in evening or dawn twilight.
Step 2

Plan how you’re going to capture the Moon. A low-tech option using a smartphone is okay, as long as you can show the Moon as a disc with some foreground in view.
Here, twilight conditions can help, making it easier to capture the foreground and the Moon in the same shot while avoiding over-exposure.
Step 3

If you use something with a bit more magnification, such as a DSLR or equivalent with a telephoto lens, if you’re quick you still can capture the Moon plus foreground.
August's very low full Moon should be ideal for capturing a photograph of the Moon illusion.
Step 4

Image the Moon so it appears bright but with no areas of over-saturation, avoiding any areas that appear pure white.
Wait for the Moon to fully rise then focus as accurately as you can as this will provide the best limb for comparison. Take several images in case poor seeing or wind causes edges to blur.
Step 5

Larger image scales can capture the entire Moon’s disc when it’s low down and again when it’s higher in the sky.
Use the same kit to take both shots and load the results as separate layers in a layer-based editor.
Align both images so the centre of each Moon is in the centre of the image and they show the same orientation.
Step 6

Alternatively, duplicate the base images as a second pair. Place the high-up Moon image on top and remove the upper-left and lower right quadrants.
This gives a result that allows you to compare the horizontal and vertical dimensions of both results. How does the apparently ‘massive’ low Moon compare now?
If you photograph the Moon illusion, get in touch and share your images by emailing contactus@skyatnightmagazine.com


