In this article we’ll show you how to build a rotating shutter to enable you to capture images that depict a meteor’s movement as well as potentially yield some interesting scientific information.
Meteor observations involve keeping a careful record of position, direction and rate of any meteors you see.
Photographs supplement these records, particularly as cameras record accurate times in their image data.
Download extra materials to help with this build (zip)

Some meteor photographers enhance their images of meteors by employing rotating shutters – devices that rapidly block and unblock the lens but have no obvious effect on background stars in the image.
If a bright, fast-moving meteor passes through the camera’s field of view while the rotating shutter is interrupting it, the meteor’s trail appears as a broken, rather than continuous, line.
By counting the number of segments the trail is split into it’s possible to tell how far the meteor travelled across the sky in the background – its angular velocity – during a known period of time, provided you know the speed of the shutter’s rotation.
This isn’t the meteor’s actual speed, as it’s falling downwards and its height is unknown. But if the same meteor is captured from two locations it’s possible to determine its speed using triangulation.
While single captures can’t determine a meteor’s speed, if the length of the trail sections varies in the image, that’s an indication of deceleration.
It’s also possible to examine variation in light intensity and colour along the trail.

The control unit
Traditionally, rotating shutters rely on electricity from the mains to make them spin at a predictable speed.
Synchronous motors rotate according to supply frequency, but mains power isn’t desirable in this instance, and isn’t available in remote locations, so we’ve designed our shutter to work from a 12V powertank.
To generate consistent output speeds we’ve used a stepper motor, which rotates in a series of small steps.
You can find them in old photocopiers but new stepper motors are cheap to buy and available from high-street electronics shops.
When a pulse of electricity is sent to the correct motor coils it moves one step, so a steady stream of pulses will turn it at exactly the desired speed.
To generate these pulses we’ve used an Arduino prototyping board (a small microprocessor).
These can be programmed to do a wide variety of tasks, including this one.
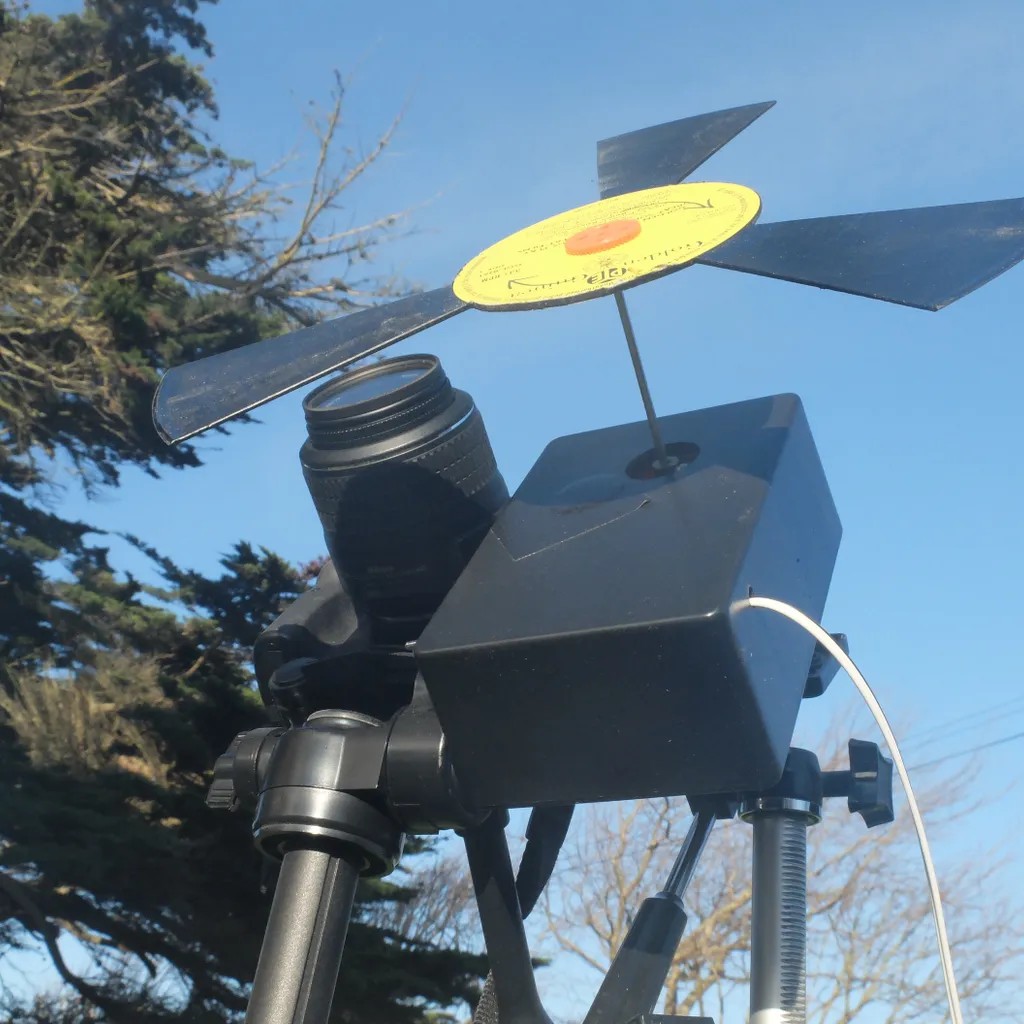
Stepper motors don’t like running fast so we’ve used two gears to speed up the revolution of the rotor, in this case an old vinyl record with three vanes cut into it (feel free to experiment with other light materials and designs for your rotor).
In use, the shutter device should be mounted on a separate tripod to avoid it transmitting vibrations to the camera, but positioned so that its vanes pass in front of the camera lens.
Give the rotor a spin to get it up to speed and then switch the shutter on, the motor will then keep it spinning.
There’s no need to learn any programming as we’ve created all the code for you (see the zip folder download link at the top of the page).
This code is easily customised to suit different motors, rotor designs and output speeds.
You simply have to upload the code to the Arduino using a USB cable, then see how it performs.
The Arduino ‘remembers’ the last code you sent it and will work without a computer the next time you switch it on.
This is definitely a project for people who like to experiment but should yield good results if you’re patient.
The motor mounting and gear drive, along with adaptations of the code are all areas for possible development if you wish to keep experimenting with the design.
If you want a setup that can provide full-sky coverage it might be possible to adapt the design to work with our multi-camera platform.
Tools and materials
Tools
Hacksaw, drill and drill bits (for small holes in the project casing), soldering iron, screwdrivers
Materials
Arduino Uno (Rev 3) prototyping platform, small breadboard, SPST toggle switch, small 12V Stepper motor, plastic gearbox with a 4:1 ratio (or build your own with Meccano), L293D motor controller
Sundries
plastic project casing (150x100x55mm min), jump wires, unwanted 12-inch vinyl record or thin card, 1/4inch-20 nut (or other suitable tripod fixing method), 5mm OD male barrel jack, cigarette lighter-style cable/plug to suit your powertank, offcuts of wood/small screws for mounting gearbox
 Use twin-core cable to make a power lead.
Attach a plug for the powertank, then split the other end and solder the positive to one terminal of the toggle switch and a short wire to the other terminal.
Solder short wires to the terminals of the barrel plug.
Use twin-core cable to make a power lead.
Attach a plug for the powertank, then split the other end and solder the positive to one terminal of the toggle switch and a short wire to the other terminal.
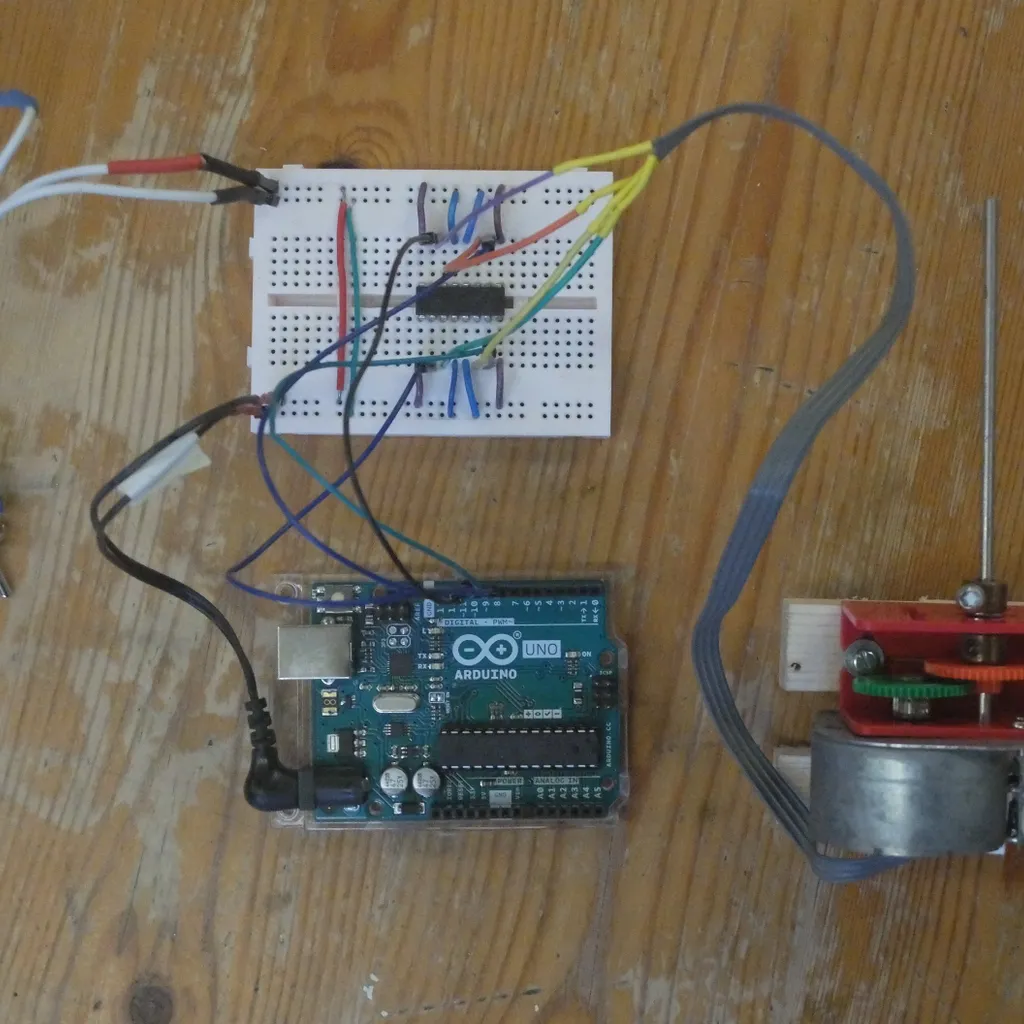
Solder short wires to the terminals of the barrel plug. Mount the L293D controller on the breadboard as per the diagram in the
  Connect the Arduino power cable to the breadboard.
Use jump wires to connect the Arduino to the controller and the controller to the motor. Refer to the diagram in the downloadable materials from the link at the top of this article and motor specification for correct connection to trigger the wires in sequence.
Connect the Arduino power cable to the breadboard.
Use jump wires to connect the Arduino to the controller and the controller to the motor. Refer to the diagram in the downloadable materials from the link at the top of this article and motor specification for correct connection to trigger the wires in sequence. Build your gearbox kit so that one revolution of the motor produces four turns of the output shaft.
Use an offcut of wood to support the motor and gearbox in the case.
Download the code, modify it if needed and upload it to the Arduino, then test the circuit.
Build your gearbox kit so that one revolution of the motor produces four turns of the output shaft.
Use an offcut of wood to support the motor and gearbox in the case.
Download the code, modify it if needed and upload it to the Arduino, then test the circuit. Mark out the record with two, three or four equal vanes and gaps in between but leave a wide central section.
Carefully cut out the vanes (use a hacksaw if you’re cutting vinyl).
Use a spare gear to make a mounting boss and glue it over central hole.
Mark out the record with two, three or four equal vanes and gaps in between but leave a wide central section.
Carefully cut out the vanes (use a hacksaw if you’re cutting vinyl).
Use a spare gear to make a mounting boss and glue it over central hole.
 Mount the motor and gearbox inside the lid so the shaft extends out of it.
Drill holes for the switch, cable and mounting nut, which you can glue into place.
Use Velcro to fix the breadboard and Arduino inside the casing.
Fix the rotor to the shaft for the final touch.
Mount the motor and gearbox inside the lid so the shaft extends out of it.
Drill holes for the switch, cable and mounting nut, which you can glue into place.
Use Velcro to fix the breadboard and Arduino inside the casing.
Fix the rotor to the shaft for the final touch.