Are you thinking of buying or building an observatory?
Well, don’t!
At least, not before considering our inexpensive alternative: a tripod mounted on retractable wheels that you can easily move to different parts of your garden to get the best views.
The advantage of an observatory, of course, is that it gives you a solid pier (base) on which to mount your telescope and a permanent home for your equipment.
But constructing an observing dome or shed can be difficult and long-winded.
They can also introduce unwanted thermal currents, leading to poor seeing, and will obscure part of the night sky.
Building a tripod is much easier and far less expensive.
And if the views from your garden are less than perfect, this wheeled design gives you a great deal of flexibility, which can come in handy for following objects in different parts of the sky.
Many tripods are fairly flimsy – they’re built that way so that they’re not too heavy.
But while they’re sufficiently portable, a heavy telescope mounted on a flimsy tripod will wobble around like jelly.
A heavy tripod has disadvantages too: its sheer weight is a severe disincentive to hauling it out of the box every time you want to observe.
That’s why we’ve chosen to construct our wheeled tripod out of wood.
It is, in many ways, the best material for a tripod.
Not only is it stiff, light, strong and easier to work than metal, it is also better at damping vibrations.
Our tripod is designed around three identical, vertical A-frames, joined together at their lower extremities by small, six-sided plywood footplates.
This tripod structure, constructed from triangles, is extremely strong.
On top of the A-frames, there is a chipboard platform that the mount head and telescope sits on. B
elow that, there’s a circular tray for spare eyepieces and other observing or imaging equipment.
The crossbars of each A-frame support a lower plywood platform, which can carry a power-pack or an extension lead with multiple sockets for the various power supply units your setup may need.
This can be plugged into the electricity socket indoors, with another extension lead if needed.
For safety, it’s a good idea to have an earth-leakage circuit breaker or residual current device fitted to the mains supply you’re using to power your setup.
Our wheeled tripod is carrying a Meade ETX-125, but it would be suitable for telescopes up to 250mm aperture.
Bigger telescopes would need a suitably scaled-up tripod with bigger wheels.
Here we’ve used 150mm-diameter wheels available from ironmongers and DIY shops.
What you need
Fixings
10mm pivot bolt with two nuts
Three 6mm levelling bolts with six nuts
Wood screws
Three 5mm bolts with spacers and wing nuts
Hardware
305mm-diameter circular tray
Four 150mm-diameter wheels
Matt black acrylic paint
Timber
12x12mm, 34x34mm, 18x44mm, and 44x44mm planed softwood sections
12mm-thick chipboard sheet
6mm-thick plywood sheet
10 and 25mm hardwood dowels
18x240mm disc for plinth (optional)
Tools
Measuring tape
Power drill and bits
Ratchet screwdriver
Set square
Spirit level
Tenon saw and mitre box
Workbench and vice
Observatory deployed
The photo above shows the tripod ready for observing.
The wheels have been retracted and the towing handle folded down to make a useful shelf for star charts.
The tripod is resting on the points of three 6mm-diameter bolts, inserted through the three footplates to provide fine adjustments for getting the tripod level.
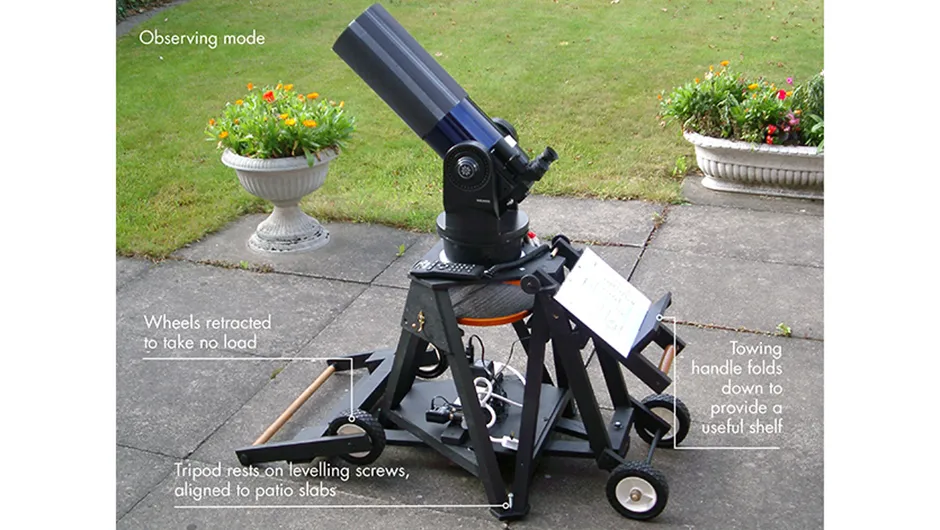
If you have patio slabs, you can place the levelling bolts in the gap between the slabs as shown in the photo above.
This enables the scope to be repeatedly put in its level ‘home’ position, ready to carry out Go-To alignment.
Alternatively, you can mark the position of the footplates to place the tripod correctly for alignment on future uses.
To make the tripod ready to be wheeled around, the towing handle is straightened out, pulled forward and locked in place with two pegs.
The rear wheels are lowered by raising the lower rear handle.
When raised, the weight of the telescope holds this handle against the tripod without the need for a latch, though a latch can be added for extra security if you need to pull the tripod over a low step, for instance.
In transport configuration, the tripod runs freely on its wheels.
It can then be easily rolled away and steered to its home, leaving the garden clear for daytime uses.

