Working within space outreach education, it is almost impossible to find anyone who is not fascinated by real rockets – whether that is because of their immense power, their sheer noise or simply the fact that they have opened up our ability to explore the Solar System and land astronauts on the Moon.
Firing rockets in workshops and at events captures an audience’s imagination like nothing else.
This is especially true for children, who not only find great delight in designing and making their rockets, but also by having the ‘responsibility’ for blasting them high into the sky, be it by air, water or fizzy tablet power!
As well as being great fun, it’s also a way of encouraging children to take an interest in STEM subjects – science, technology, engineering and maths – so that they can become the engineers, technicians and astronomers of the future.
The stomp rocket launcher (and rocket) we’re going to show you how to make this month is a great way to do just that.
It not only teaches mathematical abilities in measuring out materials but, with the development of a subsequent rocket, it illustrates the importance of good technical design and highlights the scientific ideas behind forces and motion.
Ready to rock(et)
All of the materials are relatively inexpensive and can be purchased from the plumbing section of a DIY store.
If you are making this project with kids, it is a good idea to have the PVC pipes pre-cut to length: that way they can put the launcher together themselves, with little or no help beyond the step-by-step guide given here.
The rocket itself is very simple to make and offers the opportunity to experiment with different designs and adaptations.
Using plain paper for the rocket allows it to be decorated with pens, crayons, paints, glitter and stickers.
Or, alternatively, it can be left white for a more ‘authentic’ look.
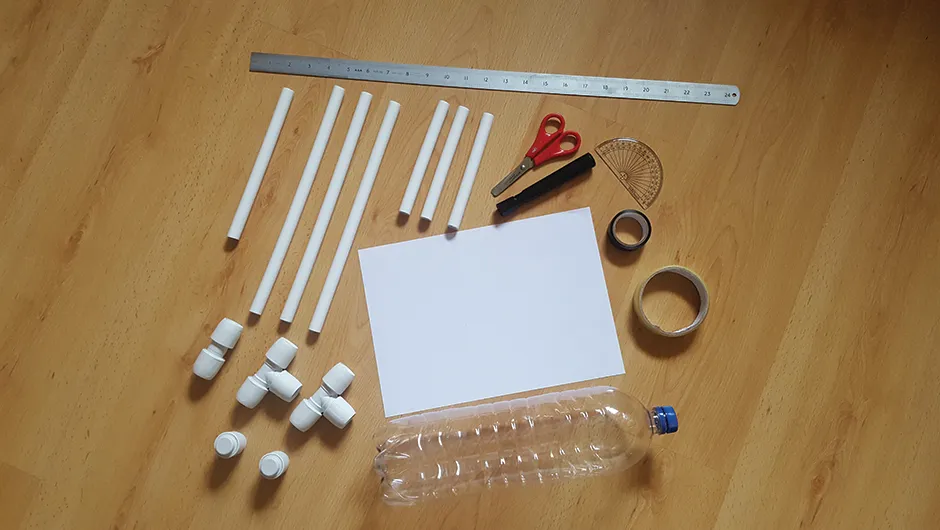
Materials - 2L plastic bottle, six lengths of 0.5-inch-diameter PVC pipe (three 12 inches long and three 6 inches long), two 0.5-inch PVC T connectors, one 0.5-inch straight PVC connector, two 0.5-inch PVC blanking end caps, A4 paper
Tools - Duct tape, sticky tape, ruler, protractor, marker pen, scissors
Here is our guide for the perfect rocket: using a spare piece of pipe both as a support and as a guide, roll a sheet of A4 paper and tape the seam carefully – this ensures the paper rocket is the right diameter for the plastic pipe that serves as its ‘launch pad’.
Do make sure there is still some movement between the pipe and the paper, otherwise it will not fire successfully when mounted.
This is also the point at which you can decide on the livery and add it to the rocket.
To make the nose cone, draw a semi-circle on a piece of paper using a protractor and cut out.
Roll it tightly into a cone that matches the diameter of the pipe, and tape the seam.
Attach to the top of the ‘rocket fuselage’ using sticky tape, ensuring there are no gaps that air can seep through.
You can always make a simplified rocket without a nose cone by just pinching the top of the rocket tube together and securing that with tape, again ensuring that there are no gaps.
Fins are traditionally triangular shaped, but you could try experimenting with different shapes to see if they affect the rocket’s flight.
Cut them out of the paper, fold as appropriate and affix to the bottom of your rocket using sticky tape.
Once complete, the rocket is ready to be fired from the launcher time and time again.


