Have you ever wanted to process your own images of space using data captured by professional telescopes and space missions?
You can, and the process is relatively easy when you know how. In this guide we'll show you how to do it.
We'll talk you through what data is available, how to get it, and what to do with it to produce your own images of space like those captured by NASA and ESA missions.
For more advice, read our beginner's guide to image processing
Getting the space mission data
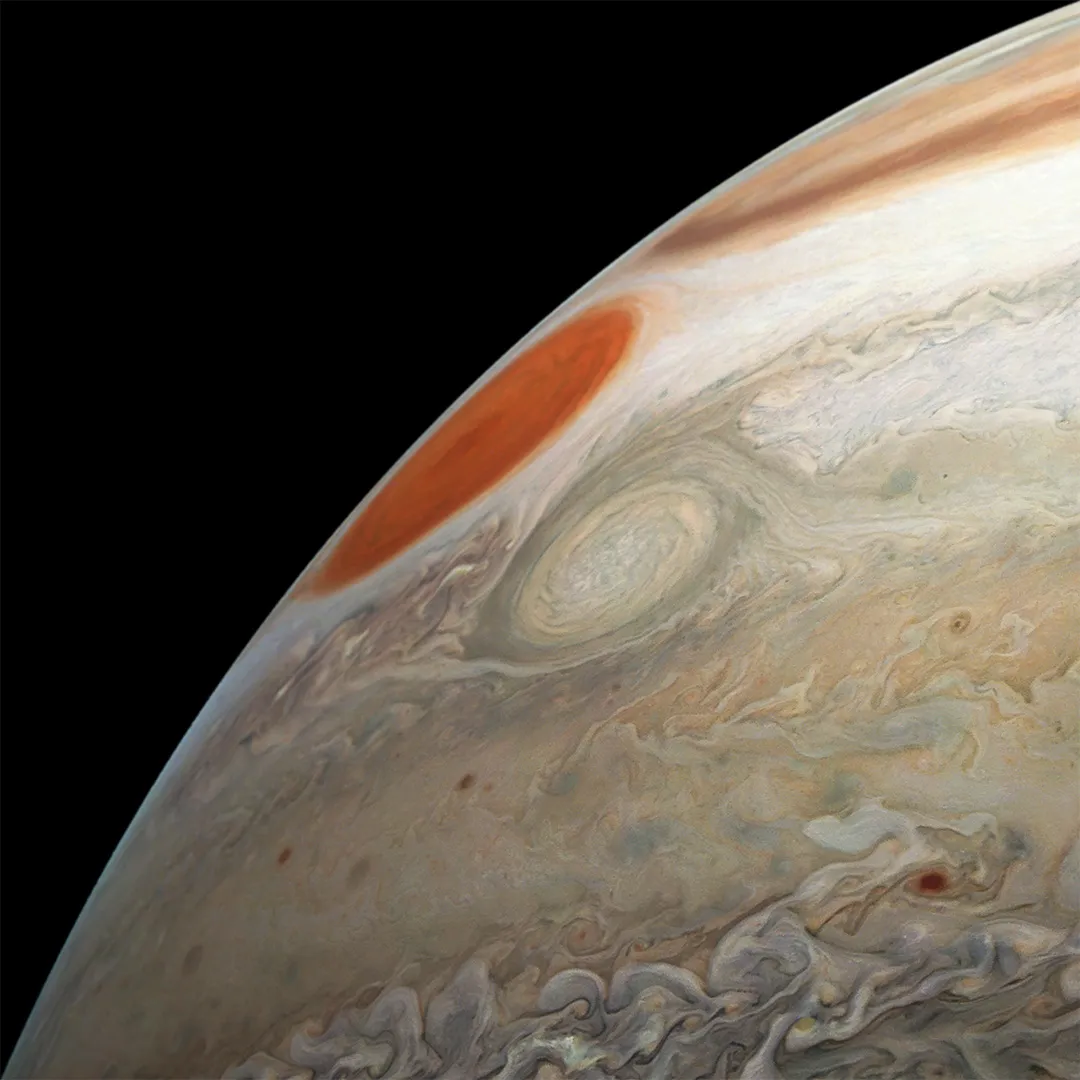
The images of distant Solar System worlds released from missions like NASA's Cassini mission, New Horizons or the many Mars orbiters and rovers, are a result of careful image processing of data captured by spacecraft in its RAW format.
This RAW data is publicly available online and free to download, meaning that processing images of our Solar System is not solely the privilege of NASA planetary scientists, but also that of anyone with a computer and internet connection.
It's just a means of knowing how to download the data, and knowing what to do with it once you have done so.
In this guide, we'll use RAW data captured by NASA's Juno mission at Jupiter to show you how to process your own space mission images, but the technique could be used to process data from any mission.
Scroll to the bottom of the article for a list of websites where you can download more data from other space missions.
If you do manage to create a beautiful image of Jupiter, Mars, Pluto or any other Solar System body, you might consider entering it into the Astronomy Photographer of the Year competition in the Annie Maunder Prize for Image Innovation, which will be awarded to the best image processed from publicly available data.
Getting started processing space mission data
NASA's Juno mission is equipped with a high-resolution camera for imaging Jupiter.
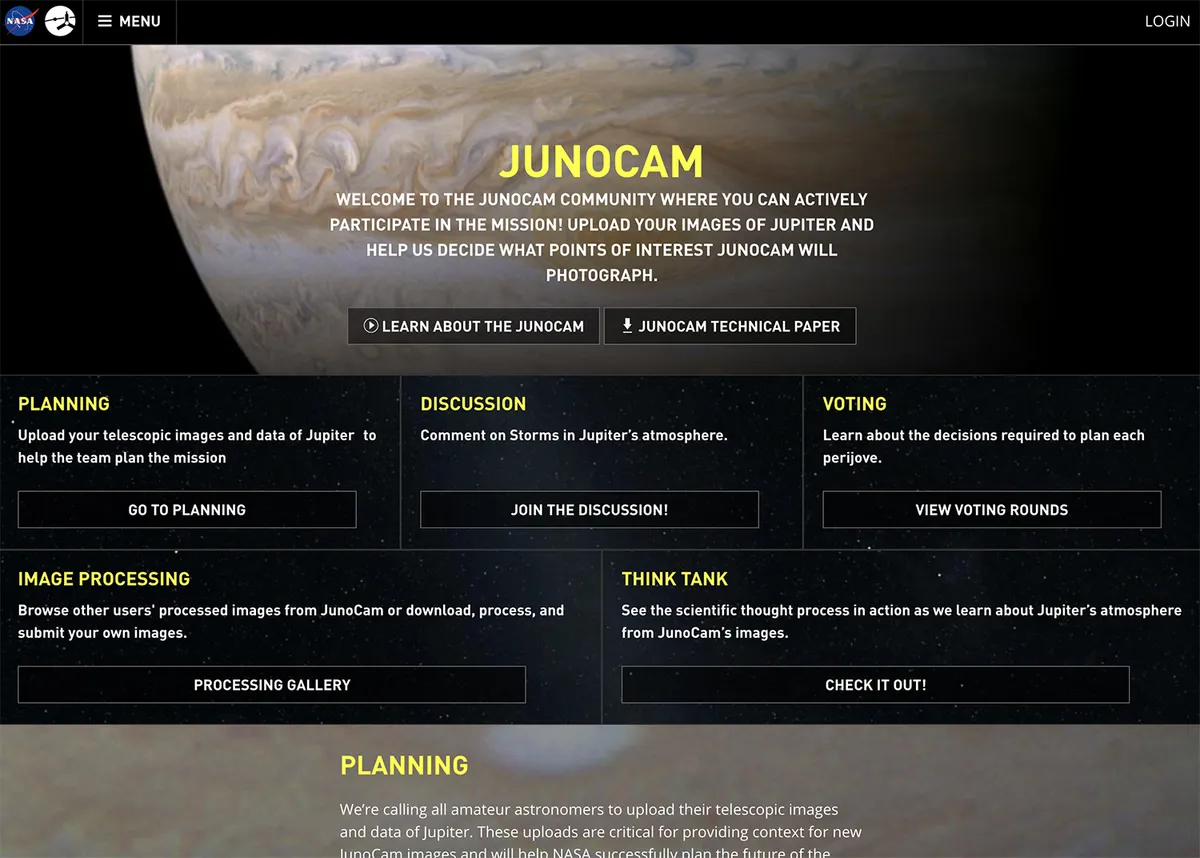
The RAW data is uploaded to the Juno website and is readily available for anyone to process.
Website members can download, process and re-upload their images for NASA and other members to view.
All this is free of charge and is a great way to encourage STEM activities.
Images processed by the public may even help NASA scientists make discoveries about the gas giant and what lies beneath its tempestuous surface.
There is also a JunoCam forum on the website where visitors can discuss images of Jupiter's storms and surface features, and vote for what JunoCam should focus on next.
The first step in processing your own images is to access the Juno website and create an account.
This is done by going to www.missionjuno.swri.edu/junocam and clicking on ‘Login’ in the top right corner of your screen.
At this point you will be asked to create a username and password for your profile.
Once you have done so click Image Processing and you'll be taken to a page where you can see user-uploaded images and RAW data.
To access the full library of Juno's RAW images, look under the heading Most Recent from JunoCam and click More from JunoCam on the right-hand side.
The library page will open up. At the top there is an option to scroll through different sets of images, and the number at the top of the page - e.g. '1/67' - indicates how many pages of data are available.
This will increase as Juno makes more passes at Jupiter and captures more data.
Select the image you would like to process by clicking on it. This will open the download window. Select and download the image set to your computer.
The image set will download in .zip format so you will need to unzip it and store the files on your hard drive.
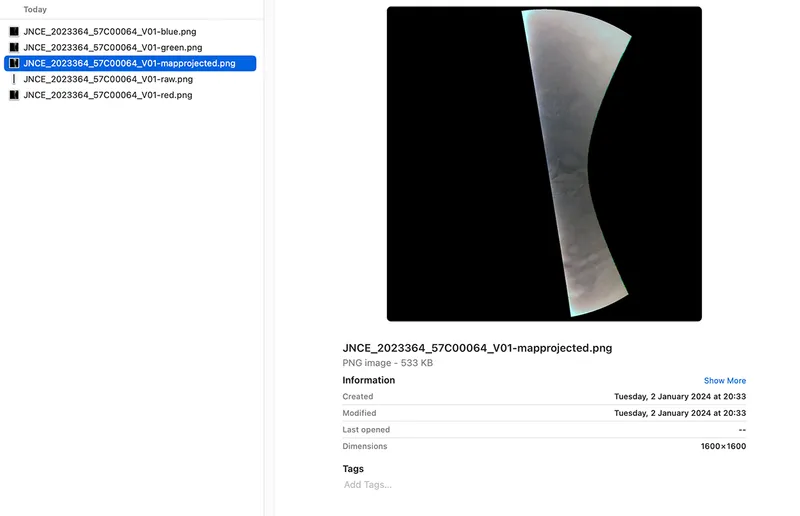
Once unzipped you will see the blue channel, green channel, red channel, raw channel and mapprojected channel images.
You can use the Red, Green and Blue images and combine them in Photoshop or other graphic manipulation programs to make an RGB image
The RAW contains slices and requires custom-written software. For the purposes of this project we will use the mapprojected.png file, which is an RGB combined image.
When you open it you will see that the image is dull and bland. We'll show you how to enhance this image to show Jupiter in a more natural, realistic view.
We used GIMP, a free graphic manipulation piece of software for adjusting levels of dark and light within the image.
Other graphic manipulation software packages are available, such as Photoshop, but any product that allows curves and levels to be adjusted will work with this project.
Use your JunoCam data, step-by-step

Open GIMP, click file > open and select the map-projected image from its location on your computer. Once the image is loaded, click colour from the menu and then select levels.
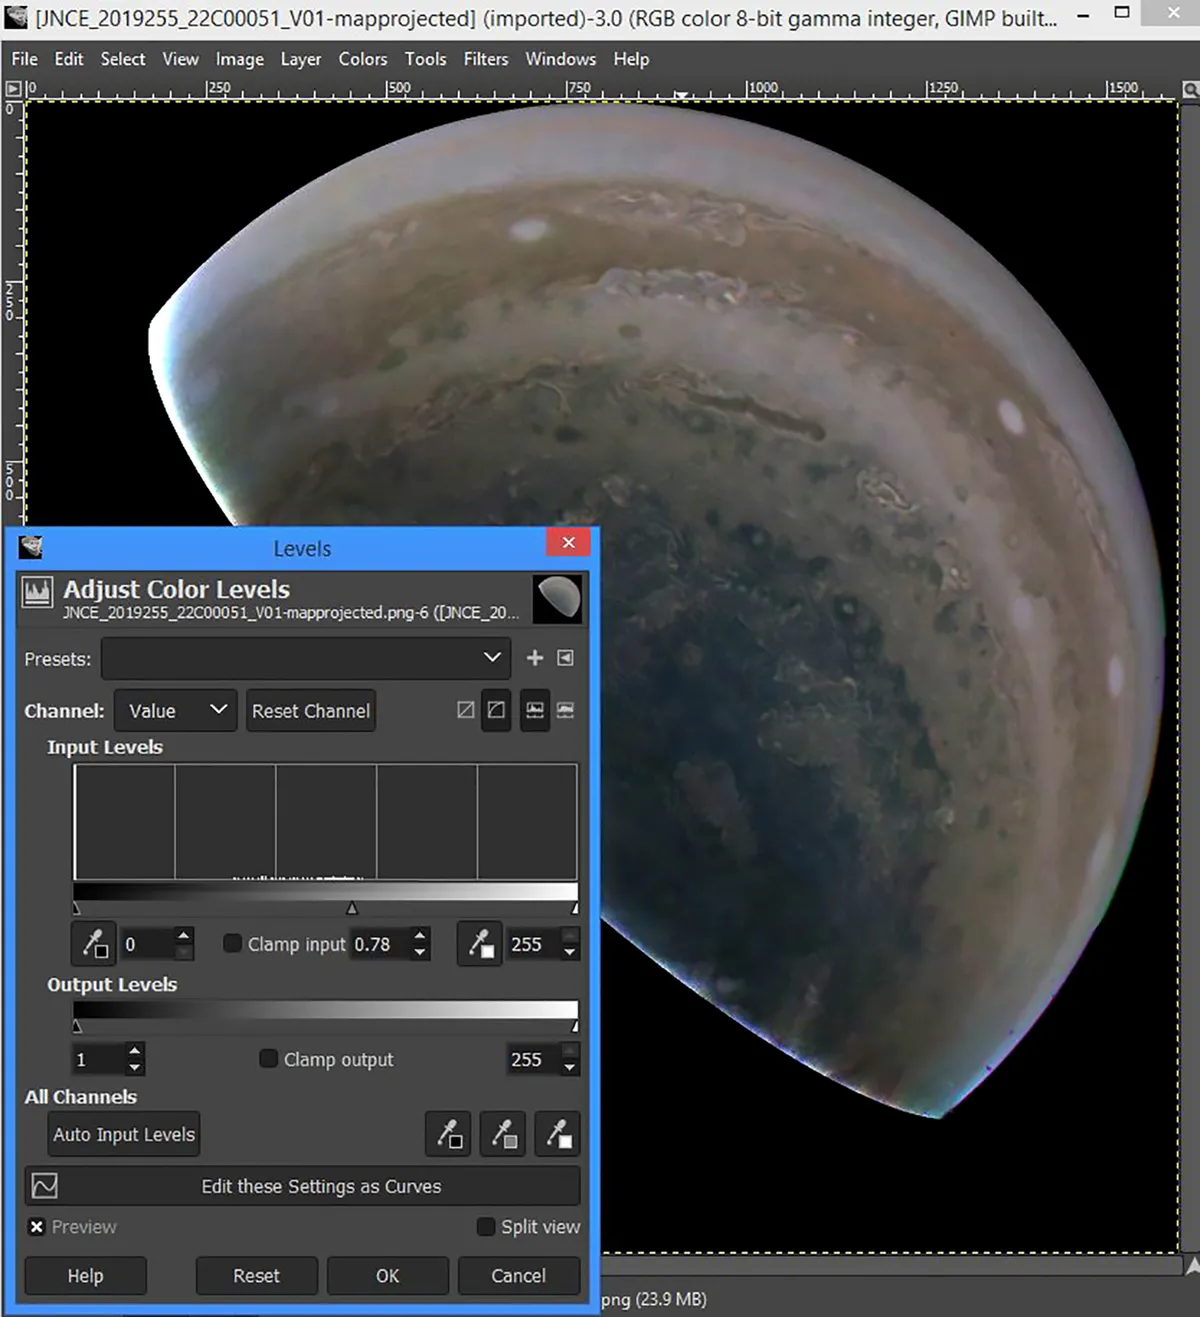
Now the image depth and brightness can be manipulated. Adjusting the options on the input levels section will bring out the cloud belts and darken the dark areas, creating an enhanced 3D look.
The amount of processing that is applied is up to you, but a light touch will often give good results.
Having adjusted the levels, it is now possible to adjust the saturation of the overall image or individual colours. To do this click colour > hue and saturation. This will open the manipulation window.
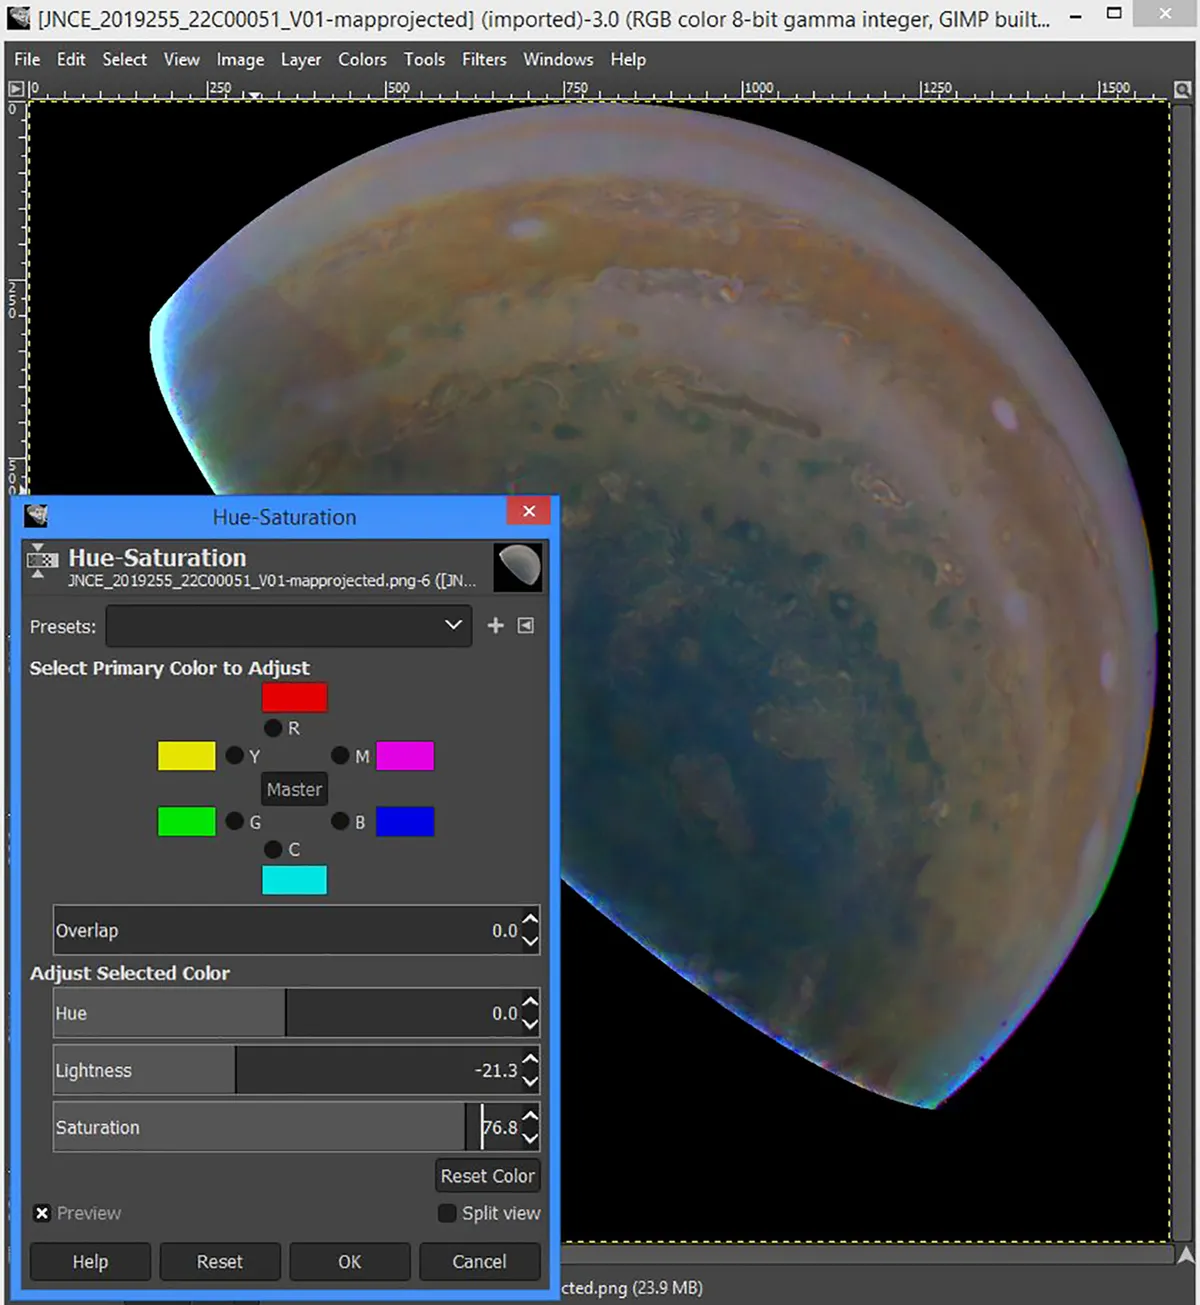
Each colour can be clicked on to manipulate the master image for the overall desired effect.
Once clicked, use the lightness and saturation sliders to adjust to the desired level. Do not adjust the Hue slider unless you wish to create false colour.
After this process is complete, it may be desirable to redo Levels again depending upon personal taste.
Final processing can involve rotating, trimming and cropping the finished image by selecting ‘tool’ from the main menu to make adjustments to give a more pleasing completed image.
Tips for processing RAW Juno data
1 Check for new images regularly, as Juno makes an imaging pass every 53 days
2 Your Juno account offers you the option to select an area of the planet to image.
3 NASA encourages you to upload your results to the Juno site. They choose the best to showcase, whether artistic or scientific.
Where to find RAW space mission data:
The Moon
Lunar Reconnaissance Orbiter mission data
Mars
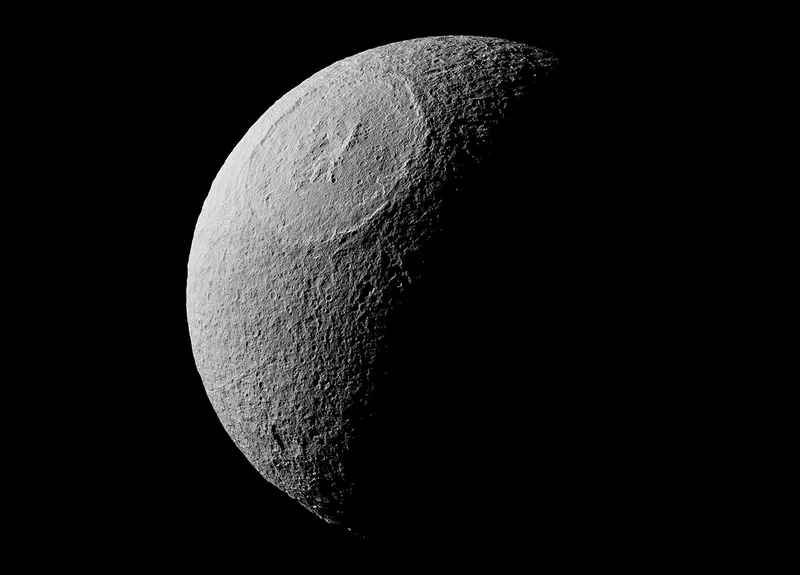
Saturn
Pluto
Pete Williamson is an astronomy broadcaster and a co-founder of the UK's annual Solarsphere Festival.

