
In this astrophotography guide, we'll show you how to photograph and piece together a large mosaic of the full Moon.
There’s a common misconception that the best time to look at the Moon is when it’s full.
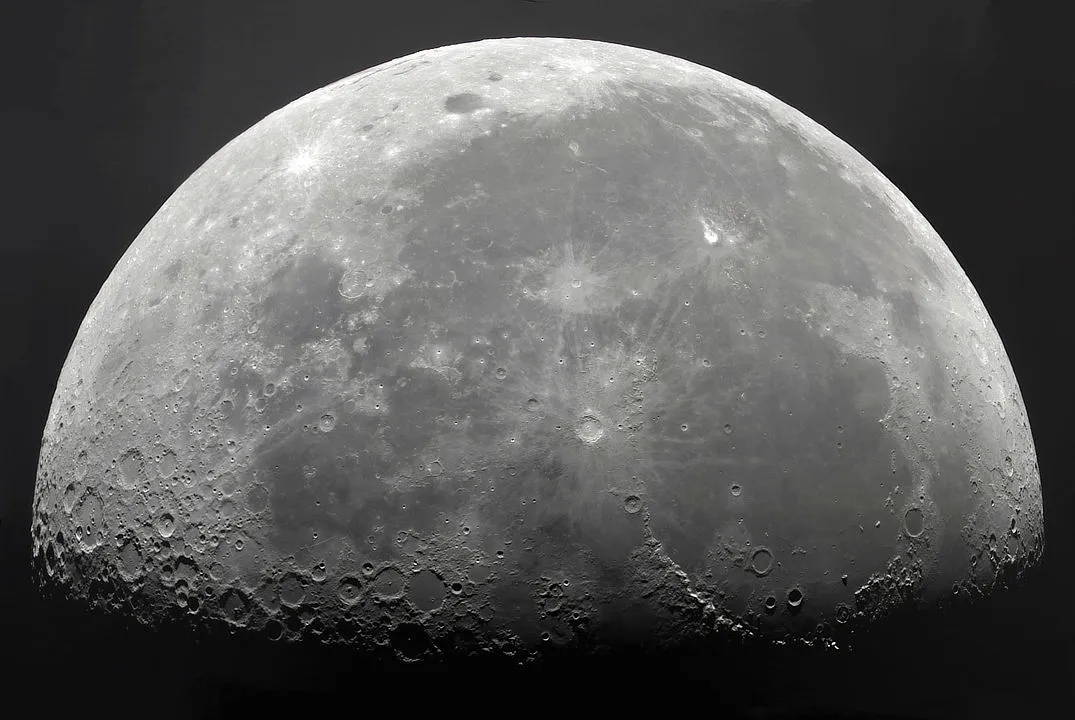
At this phase, the Moon is opposite the Sun in the sky and sunlight, as far as we’re concerned on Earth, is falling straight down onto the lunar surface.
As a result, there are no significant shadows and features such as mountains, crater walls and cracks blend into the bright surrounding regions.
More lunar photography

In truth, the Moon is not quite opposite. If it were, it would be inside the Earth’s shadow and eclipsed.
Instead it will be slightly north or south of directly opposite the Sun in the sky.
Nevertheless, at full Moon, lunar features are at their most ill defined.

That doesn’t prevent people wanting to image the full Moon, though, maybe because it’s such an icon of the night sky
Maybe for the Everest-like ‘because it’s there’ challenge, or maybe to create colour-saturated images bringing out the mineral composition of the Moon.
Often, the temptation to photograph a full Moon, or especially a 'supermoon' at perigee, is difficult to resist.

Making a full Moon mosaic
Imaging the full Moon can be done with a DSLR camera. A low ISO and fairly fast shutter speed are needed to avoid overexposure.
Another way is to create a mosaic of the lunar surface using a setup that images only a small area at a time.
Navigating across the full Moon's disc, however, is complicated by the lack of shadows to use as reference points.
Equipment
To photograph a full Moon mosaic, we recommend a high-frame-rate camera and a telescope on an equatorial mount
A high-frame-rate camera setup is the best way to go: subsequent processing then gives you the sharpest possible result.
Careful adjustment of the settings will allow you to optimise the appearance of the albedo features – areas of the lunar disc that stand out because they reflect a different amount of light.
Full Moon mosaic technique
The key to success is to orientate your camera so that moving your telescope in right ascension moves the Moon horizontally through the frame.
Once this has been done, you need to decide on a technique that’ll let you move methodically over the lunar surface in overlapping sections.
A careful and alert eye is required to spot edge-of-frame features that will provide an anchor point for the next frame and row.
How many overlapping panes you capture depends on how large an image scale you use.
If you’re new to this, it’s worth keeping the image scale low so you don’t have too many panes to work with.
We would suggest four to nine as a good starting point. If you’re more experienced, the choice is yours, but the capture can get quite intense!
A good way to identify navigation points is to assign a meaning to them. For example, a crater rim and a bright spot might look like a smiling face.
Silly though this seems, the more outlandish your choice of comparison, the more likely you are to remember the features when you move to the next area.
Once you have all your frames, the next step is to process them and stitch them together.
In our step-by-step guide below we'll look at using software to take the pain out of this process.
Photograph a full Moon mosaic, step-by-step
Step 1

The image scale can be altered with optical amplifiers such as Barlow lenses or Powermates.
The image scale is the thing that determines how many panes need to be captured.
Using a red or infrared pass filter will help stabilise the view and provide a sharper capture result.
Step 2

With the Moon in frame, slew in right ascension (RA).
If the Moon’s features appear to move at an angle to the bottom of the frame, carefully loosen the camera in the eyepiece holder and rotate it until the Moon’s movement is parallel.
Once done, don’t forget to re-tighten the camera in the eyepiece holder.
Step 3

Focus accurately; the Moon’s edge is a good target for this.
Then, move your telescope so that a really bright feature, such as Tycho or Proclus, is in frame.
Adjust exposure for a high frame rate and keep the gain below 50%.
A small boost to your gamma setting can help bring out detail in the darker lunar mares.
Step 4

Start at the northern limb and work in rows, with a good overlap between frames.
Once a row is complete, drop south in declination for the next one.
Make a note of features at the edge of each frame as you go.
If you doubt an overlap’s integrity, don’t be afraid to go back and redo a frame.
Step 5

Programs such as AutoStakkert! can be used to batch process your capture files. Simply drag all the captures into the main window and process the first result. Initially this can be as simple as clicking Analyse ➔ Place AP Grid ➔ Stack. Once done, all subsequent frames will be processed sequentially.
Step 6

A program such as Microsoft’s free Image Composition Editor (ICE) can take the sting out of building the mosaic. All you need to do is drag your processed images into ICE’s main window and click ‘Stitch’. Finally, ‘Export’ in a lossless format (eg PNG or TIFF), load into editing software and tweak as desired.
Have you managed to photograph a full Moon or make a Moon mosaic? Don't forget to send us your images.

