By photographing the planet Jupiter with a high-frame-rate camera, it’s possible to record the state of the gas giant’s atmosphere.
But you can also stitch together sequences of these images, creating planetary animations showing how the gas giant rotates.
These can be used to clarify atmospheric details as they turn with the planet, or reveal the orbital dance of the four bright Galilean moons.
Creating an animation of Jupiter isn’t that much harder than generating a single image, it’s just more processing-intensive, requiring steps that you’ll need to repeat several times.
Once you’ve built your first animation, the results will hopefully encourage you to have another go.
Don’t be afraid to experiment, perhaps refining your technique to produce a smoother result.
Here we'll look at the techniques to make your own Jovian animations, from capture through to the final build.
For more advice, read our guides on how to photograph planets and astrophotography image processing.
Click here to find out how to create an animation of a lunar eclipse and more detail on processing your animation.
Capturing your planetary images
Consider the weather
Jupiter is at its best when the atmosphere it’s viewed through is stable.
Atmospheric stability is affected by the weather, altitude of the object and the presence of the jetstream.
You can determine when the most promising conditions are due from meteorological forecasts. For more on this, read our guide to weather forecasting for astronomy.
Active fronts and deep low-pressure systems tend to cause instability, while high pressure tends to produce the most stable conditions.
Weather dominated by high pressure with an absence of an overhead jetstream typically produces the best conditions, and websites such as Netweather provide jetstream forecasts for this.
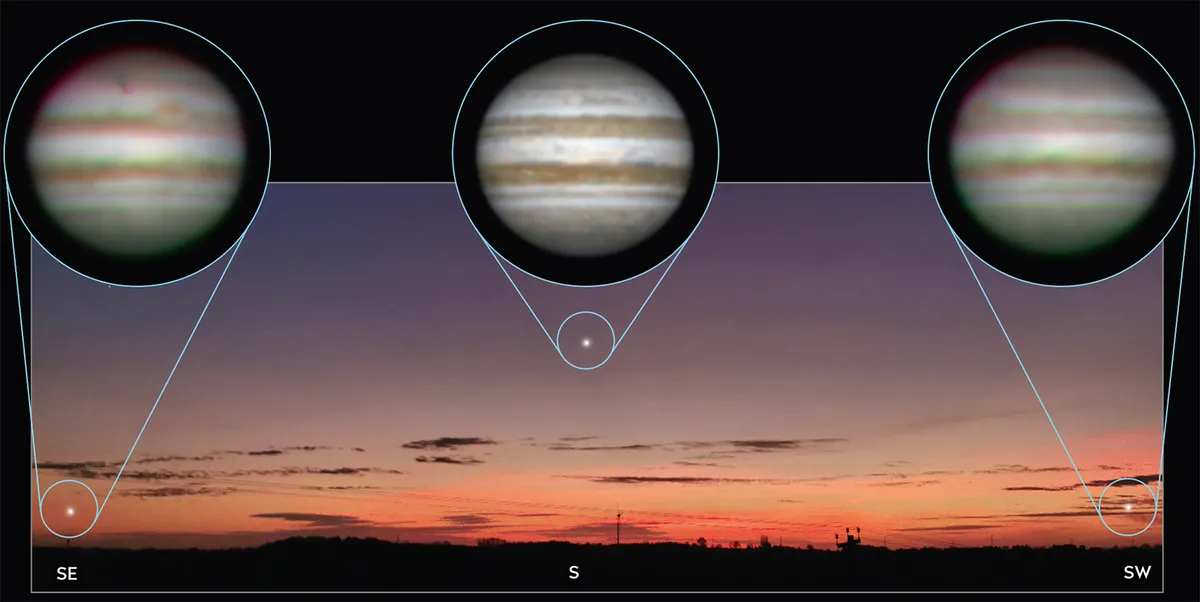
It is when Jupiter is positioned due south that it’s highest in the sky and above the thickest, most turbulent part of the atmosphere.
If you work out how long you want to image for, you can time your session so the planet is due south at the mid-point.
Jupiter moves a fair bit over a long session, so make sure it won’t disappear behind any foreground objects.
Photographing your target
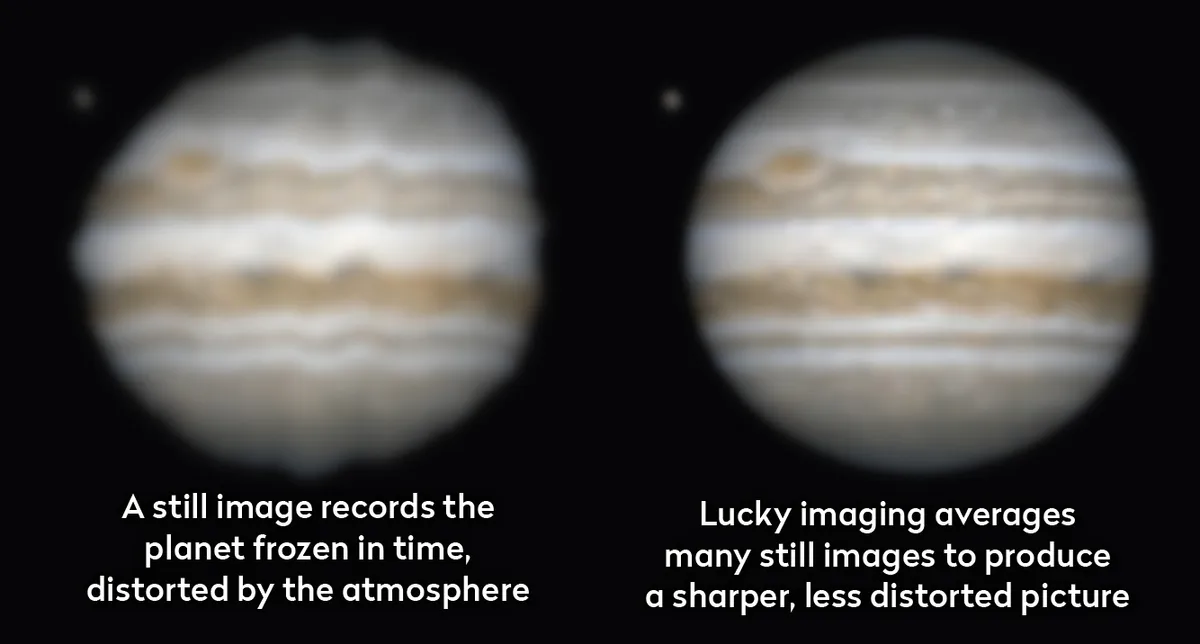
‘Still imaging’ – taking a single frame of a target – tends to produce poor results with planets.
A stills camera, such as a DSLR, captures a snapshot, frozen in time, which is typically heavily distorted by the atmosphere.
‘Lucky imaging’ is a better solution: taking many images in quick succession, harvesting the best and combining them into a single image.
Often resulting in thousands of images, the results are analysed and organised by quality, aligned and averaged to reduce noise.
Known as registration-stacking, this laborious process is largely automated by freeware programs such as RegiStax and AutoStakkert!.
The final image these generate should be robust enough for post-capture tweaking.
Low-altitude bright targets suffer from chromatic dispersion, creating colour fringes around their north and south edges.
With a colour camera, an atmospheric dispersion corrector can reduce this, and a filtered mono camera can diminish the problem too.

Capturing individual red (R), green (G) and blue (B) frames is an excellent way to get high-quality results.
Taking multiple filter sequences means you have a choice of frames to combine.
For example, by taking two RGB sequences you can create an image with the RGB from the first set, but also an image with R from the second set, and G and B from the first, and so on.
An infrared-sensitive camera with an IR-pass filter will produce high-contrast results that will animate well, and wavelengths at the red end of the spectrum tend to be less affected by atmospheric instability.
Create an animation of Jupiter's Galilean moons
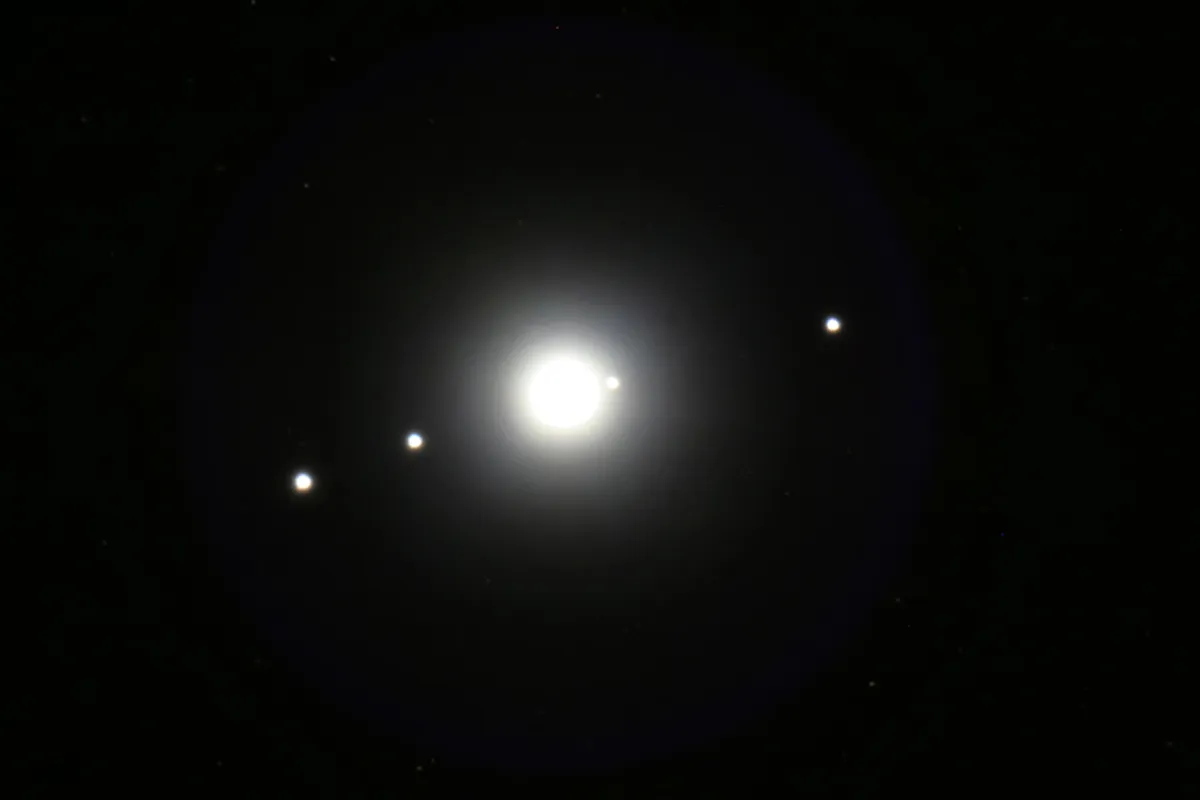
Jupiter’s four largest, Galilean moons, Io, Europa, Ganymede and Callisto, are bright enough to be recorded with a conventional stills camera.
With a large enough image scale, they can be shown clearly as separate entities to the planet and, over time, their movement around Jupiter can be recorded.
There are several ways to accomplish this. One is to ignore the planet’s disc entirely and simply adjust the exposure so the moons record as bright points of light.
It pays to maintain a reasonably short exposure time here: too long an exposure can produce issues such as each moon ‘dot’ ‘wiggling’ at high frequency, due to instabilities in our atmosphere.
If the telescope’s mount isn’t accurately polar-aligned, extended exposures will also result in the moons appearing as short lines rather than points.
Lucky imaging can help overcome many of the vagaries introduced by our unstable atmosphere.
If imaging simply to record a moon as a bright dot, you may still end up with a moon’s image looking larger than it should, but it’ll be tighter than it would be using a stills camera with a long exposure.

The Galilean moons orbit Jupiter at different periods according to their distance from the planet.
- Io takes 1.8 Earth days
- Europa takes 3.6 days
- Ganymede takes 7.2 days
- Callisto takes 16.7 days
Consequently, the fastest movement across the sky will be shown by Io.
To create an animation sequence, determine how you want to image the moons: bright, or properly exposed.
If you’re just starting out, go for the bright option, adjusting your camera settings to record an over-exposed point of light.
Then decide on the frequency of shots. If you’re a novice, try to record a shot or frame sequence every 15 minutes, shortening the gap once you’ve become more accustomed to building animations.

For high-frame-rate captures, try to keep your individual capture lengths to no more than 60 seconds.
You’ll also need a point of reference for the final animation build, Jupiter being the obvious choice.
If you intend to over-expose Jupiter, try to limit the over-exposure so you can still determine where the planet’s edge is in each frame.
This isn’t an issue if you intend to capture the moon frames against a properly exposed planet.
As you get more comfortable creating moon animations, you can adjust the period between captures, or change the image scale to create interesting compositions.
Create a video animation of a planet in motion
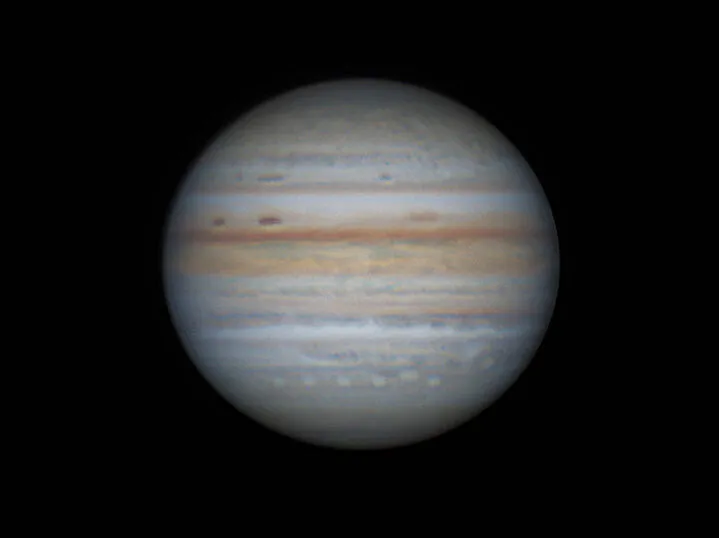
The banded atmosphere of Jupiter, full of ever-changing detail, is an amazing sight to observe and image with a medium to large aperture reflector of 6 inches (150mm) upwards.
Some features, such as the Great Red Spot, are large and obvious to see, while others may be subtle, appearing like small areas of noise on single still images.
This is where animation really comes into its own.
In an animated sequence, disc noise disappears between frames, while real features persist and rotate with the planet.
There is some motion within Jupiter’s atmosphere, but this is hard to see unless you’re using special techniques.
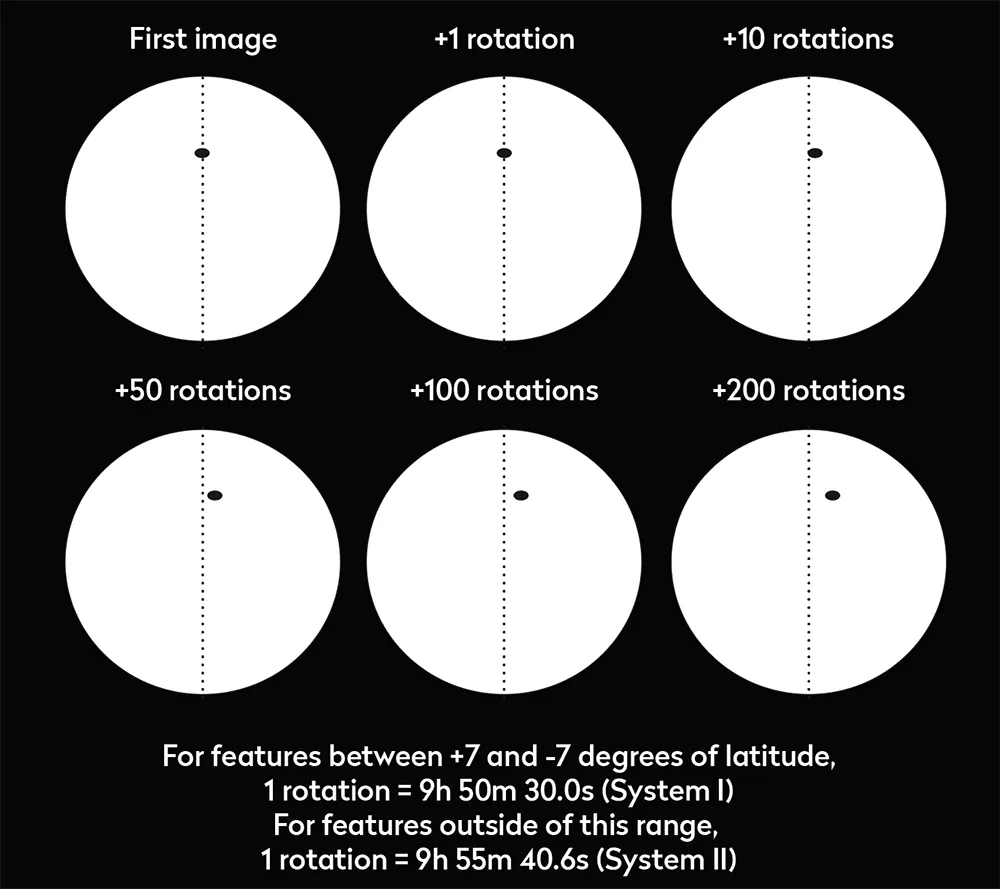
For example, with careful planning and luck with the weather, it should be possible to take an image of Jupiter at the same longitude over many rotations.
Animating these will then reveal atmospheric features drifting and developing over time.
Typically Jovian animations are done with frames recorded at regular intervals over an extended time of many minutes or hours.
These sequence animations use the planet’s limb as the anchor reference, the result showing how the features come and go as Jupiter rotates on its axis.
With each rotation taking less than 10 hours, the results can be quite spectacular.
To capture images for an animation, a polar-aligned tracking equatorial mount is highly recommended.
As well as keeping the planet in position on the camera sensor chip, this removes the need for post-capture orientation adjustment, as each image will have the same orientation.
As was the case with the moon animation, carefully consider what the capture frequency should be.
Bear in mind high-frame-rate captures typically require 30 to 60 seconds to record.
A sequence of, for example, 50 seconds capturing the frames, then waiting 10 seconds, followed by another 50 seconds of capture and 10 seconds of waiting, will produce a very smooth animation but will also be labour-intensive.
Longer intervals between captures take the pressure off, but the final animation won’t be as smooth.
Longer gaps also have the advantage of less data to handle and less post-capture processing to do.
It’s your choice, but we’d recommend looking at a starting figure of 10 minutes between frames.
The shadows cast by transiting moons make for particularly striking animations, providing good motion and image contrast with the steadily rotating Jovian globe.
Moons involved in other events make excellent targets too.
For example, consider animating a moon moving behind (occultation disappearance) or being revealed by (occultation reappearance) Jupiter’s globe.
Alternatively, a moon being hidden (eclipse disappearance) or revealed (eclipse reappearance) by Jupiter’s shadow can make for a dramatic sight through larger apertures.
Building your planetary animation
Step 1
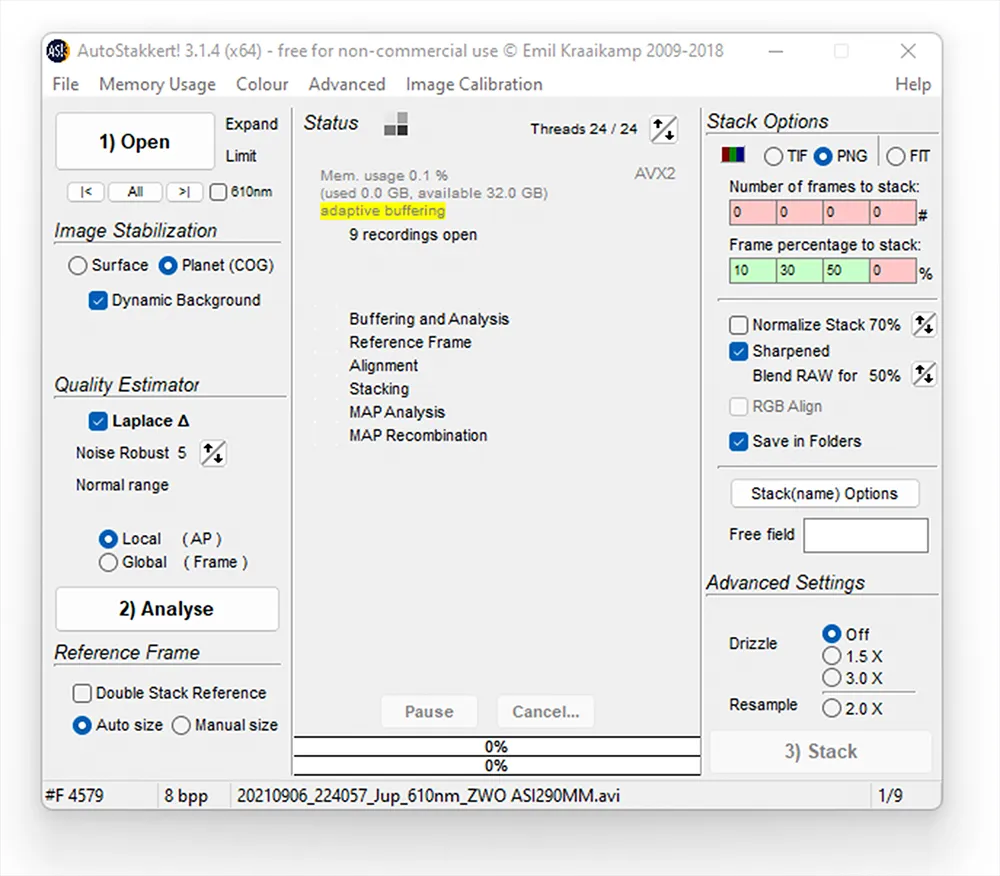
Once you have a set of high-frame-rate capture sequences, it’s recommended to make sure that their file names have the date and time within them. If not, consider prefixing them with the correct date and time in the format ‘YYYYMMDD_hhmmss’. Once ready, drag them into AutoStakkert! for processing.
Step 2
You’ll need to set the processing steps for the first image, and then subsequent images will be processed the same way. AutoStakkert!’s interface may look a bit daunting, but the basic method of use is quite straightforward. Once you’ve dragged in your frames, click ‘Analyse’ and let the program run.
Step 3
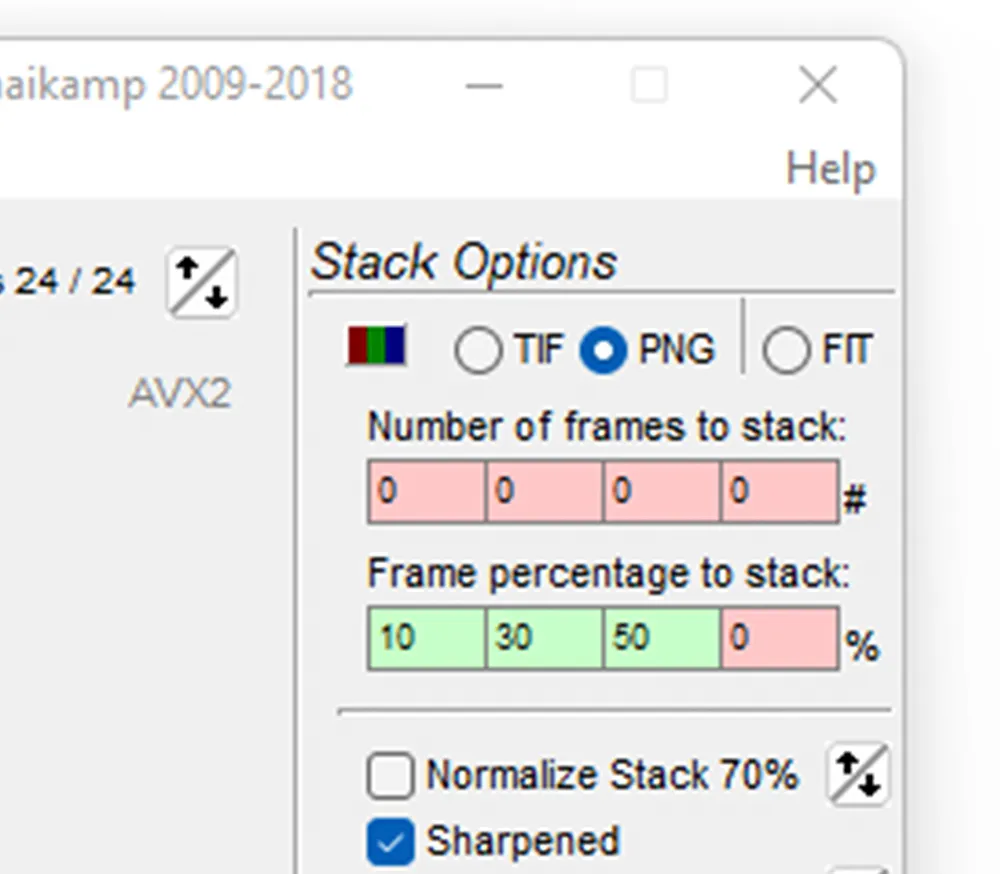
Once done, under ‘Stack options’ set one of the ‘Frame percentage to stack’ values to 30. This means that 30 per cent of the input frames will be used. You can experiment with other values as you please. There are four settings that can be loaded and a further four for the specific number of frames to be used.
Step 4
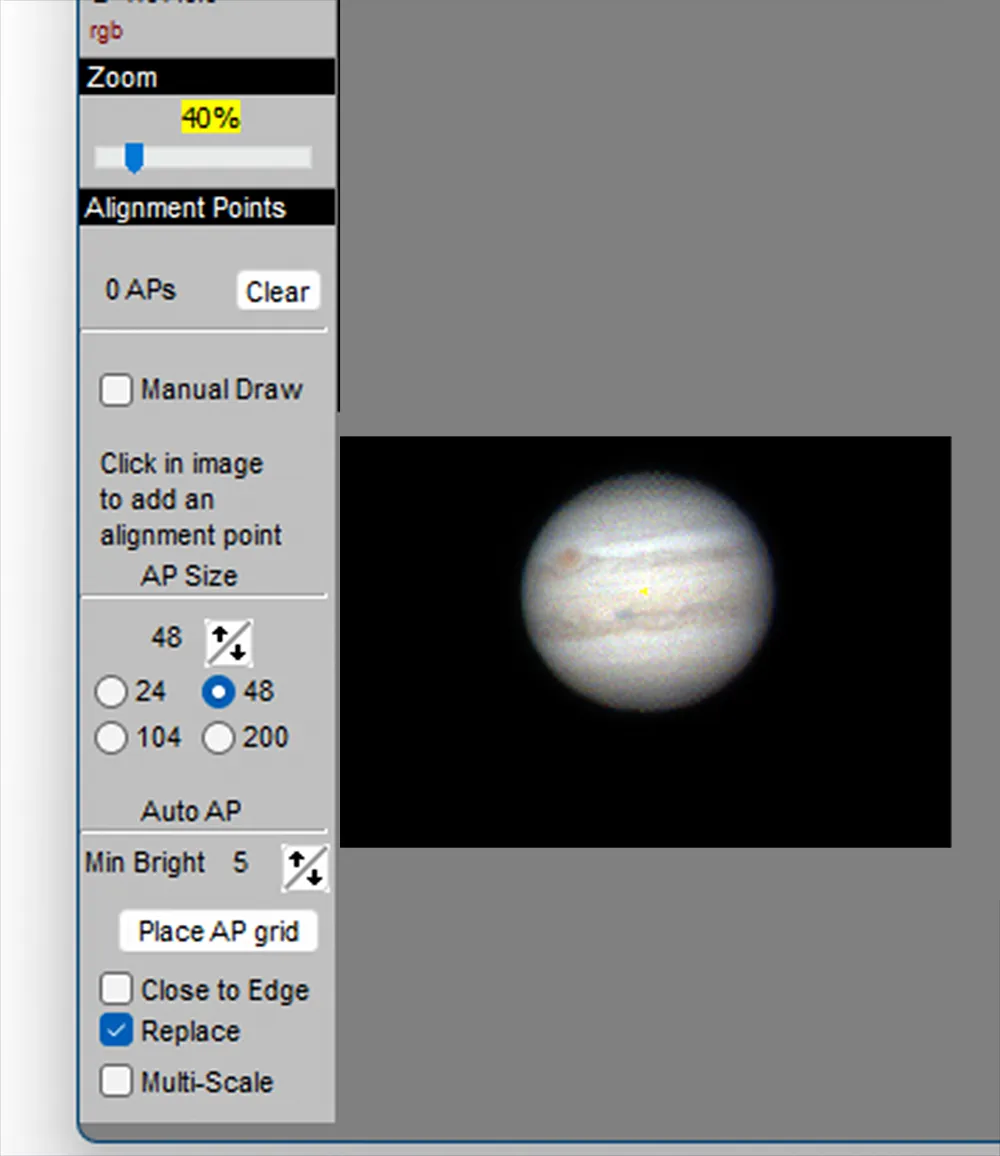
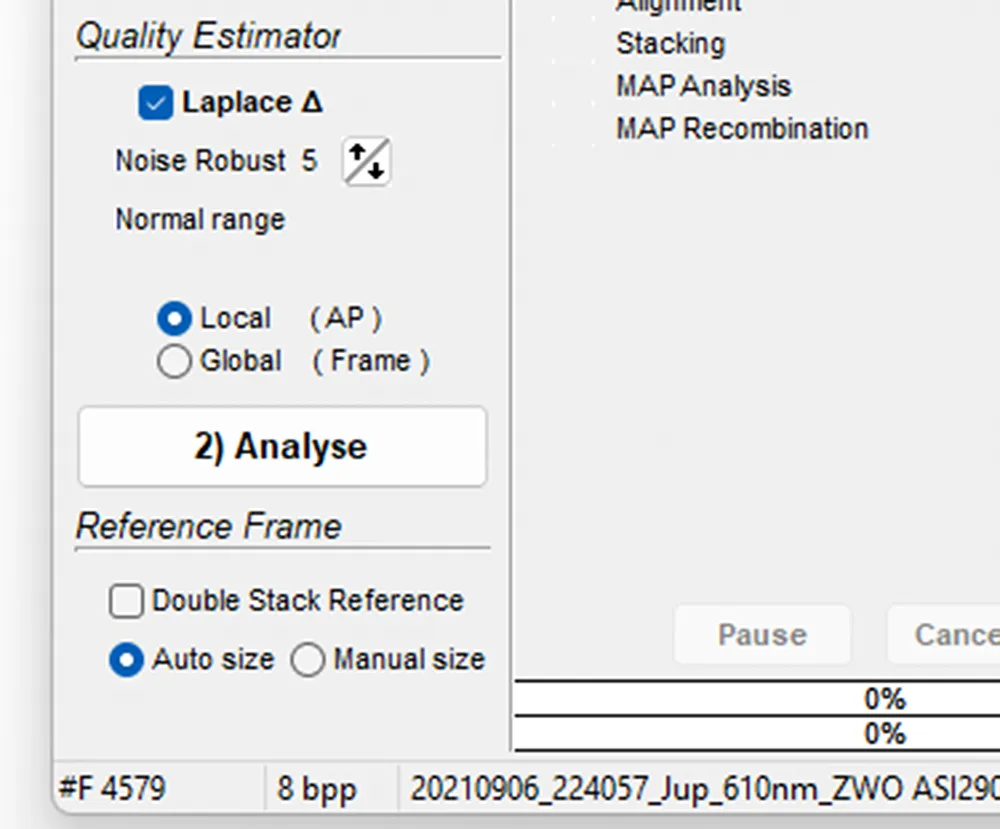
In the ‘Frame View’ window, select an appropriate alignment point size (try 48 if you’re not sure), click ‘Place AP grid’, ensuring that the ensuing set of alignment point markers select only the planet. If not, you may have to adjust the ‘Min bright’ value and re-click ‘Place AP grid’.
Step 5
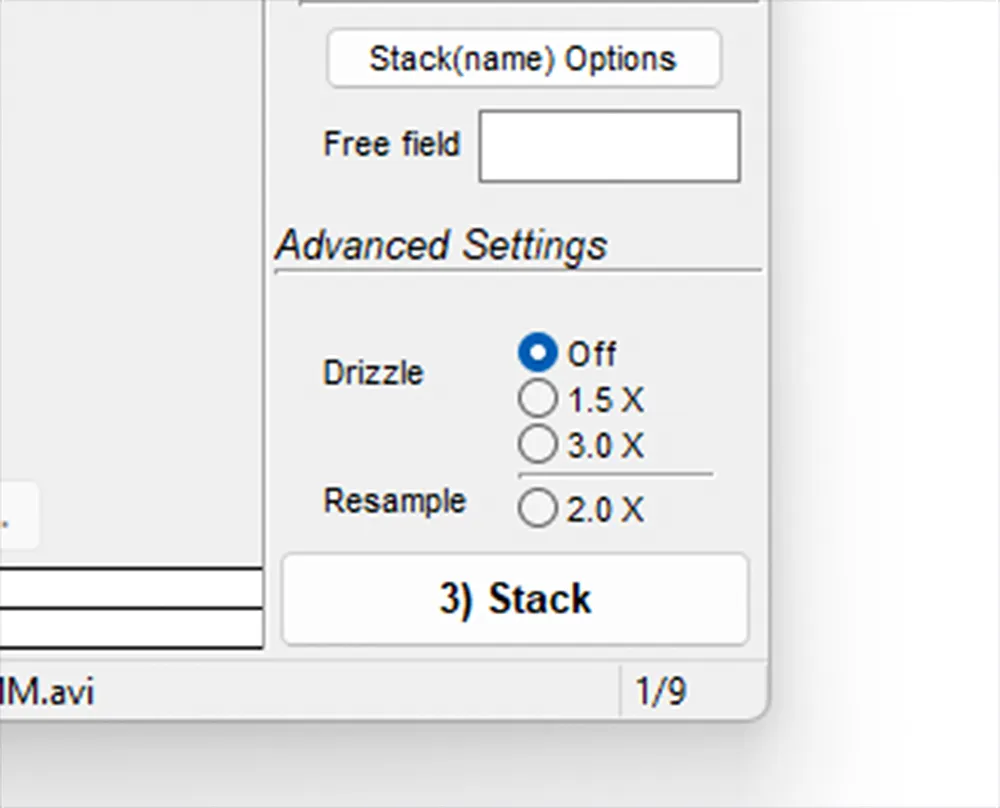
Once done, press ‘Stack’ in the main program window. Let the program process all of the sequence files. If you choose to tweak the results, for example sharpening them using RegiStax, make sure you apply the same processes to each one.
Step 6

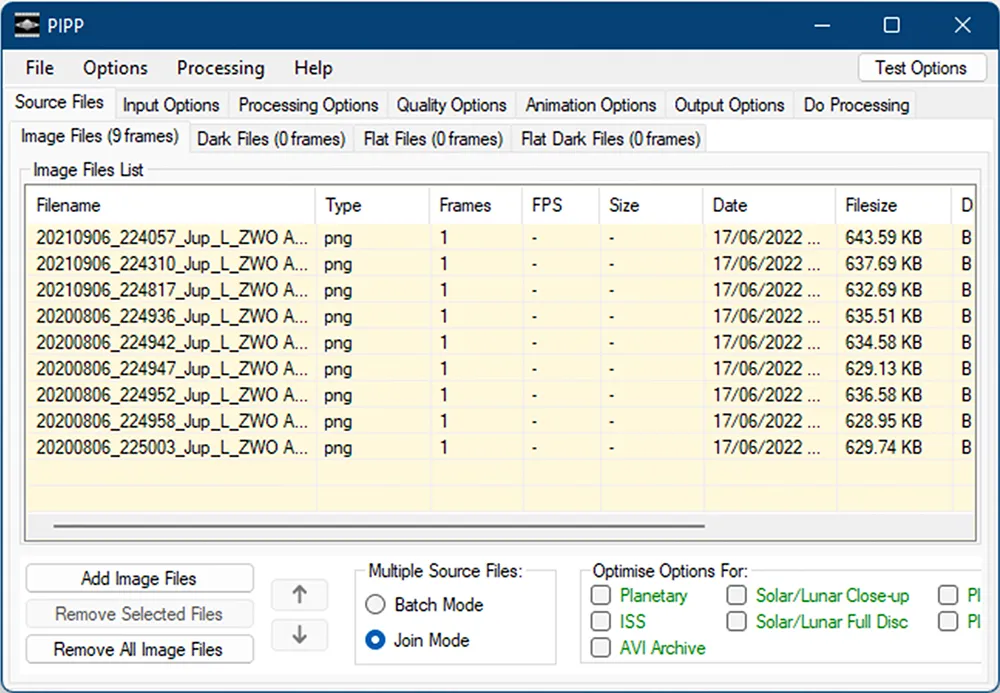
Using the freeware PIPP application (sites.google.com/site/astropipp), drag the still frames generated by AutoStakkert! into the main PIPP window. A dialogue will normally appear stating that ‘Join mode’ has been activated. Click ‘Okay’.
Step 7
PIPP has many options that can be set and it’s left to you to experiment with those not mentioned here. The base images are left untouched, and the worst it will do is fill up your hard drive, so feel free to experiment.
Step 8
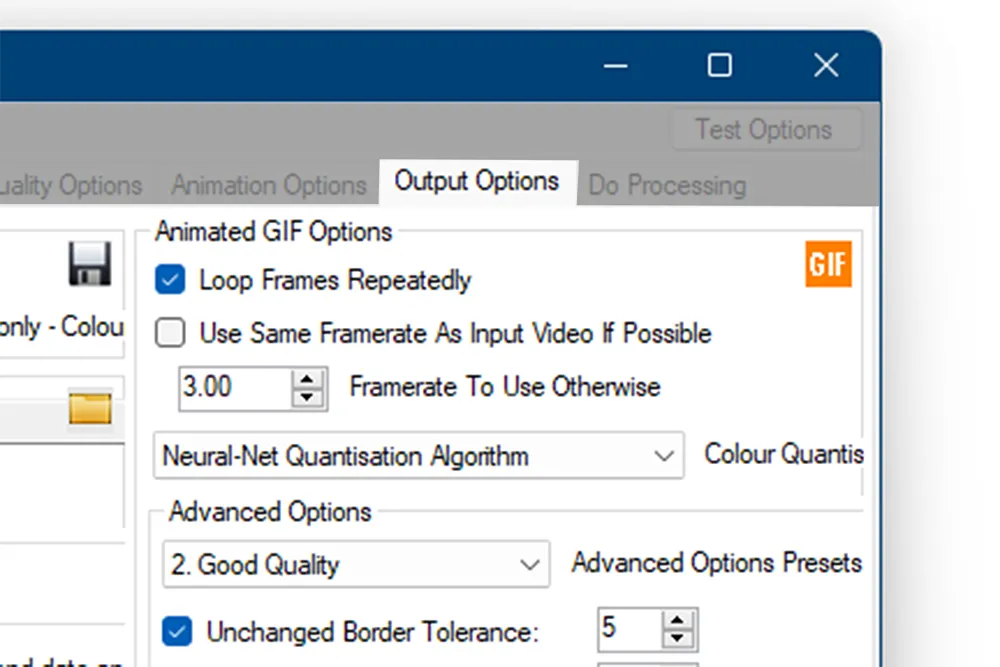
Select the ‘Animation options’ tab, then ‘Play all frames in forward order’. Under ‘Output options’, select the desired output format, eg animated GIF. Select the output folder. Select ‘Loop frames repeatedly’ and set an appropriate frame rate. If you get this wrong, just choose a different value and re-process.
Step 9
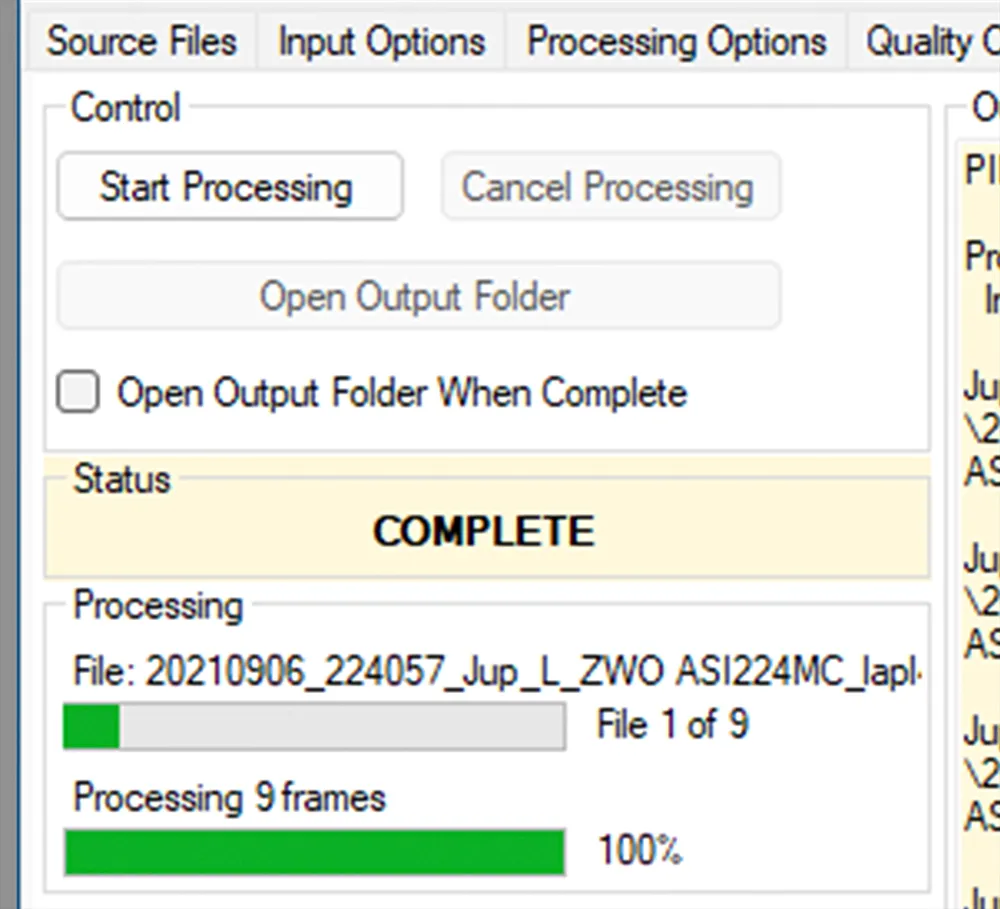
Finally, select the ‘Do processing’ tab and click ‘Start processing’. Your output file will be created and stored in the selected output folder. It’s that simple. If it’s not right, adjust the appropriate setting within PIPP and re-process. By just tweaking the settings you can make a huge difference to your end result.
This guide originally appeared in the September 2022 issue of BBC Sky at Night Magazine


