Planetary imagers are able to get fantastic results using high frame rate planetary cameras to shoot videos through the telescope that you can process later on with software.
Programs such as AutoStakkert! or RegiStax do this by discarding the frames most affected by atmospheric movement, then aligning and stacking the least distorted ones to make an average ‘master frame’ in which any blurring caused by our atmosphere is hugely reduced.
This frame can be sharpened to bring out detail that would be invisible at the eyepiece.
Mostly the final images are in full colour and these can come either from a monochrome camera shooting separate videos through red, green or blue filters or from using a one-shot colour video camera, where the colour filters sit right in front of the chip’s pixels.
One of the limitations in planetary imaging has always been the maximum length of the video you can shoot.
Too long and planetary rotation becomes noticeable during the shot, and this movement causes the stacked master frame to appear smeared.
For this reason all videos used to make any composite image need to be filmed in a short time so that features can be accurately registered in the composite.
The acceptable imaging time depends on the rotational period of the planet, the angular size and the resolution but as a rough guide:
Mars: 5 mins max per video, 15 mins total for all videos you intend to combine
Jupiter: 1 min per video, 3 mins total
Saturn: 3 mins per video, 10 mins total
This might seem to be quite a limitation, but in recent years the freeware program WinJupos has been enhanced to enable you to correct for planetary rotation, effectively allowing you to extend your imaging time by a factor of three or four.
This has the potential to greatly improve the quality of your images.
Although WinJupos does have a sophisticated derotate feature that can correct each frame in a video and thus allow longer videos to be shot without smearing, it’s a complicated and slow process.
This article will concentrate on the much simpler and more popular Image Derotate feature.
The WinJupos Image Derotate feature doesn’t lift the restriction on the length of each video but does allow you to correct for differences in the start time of several videos of normal length.
These can be several sequential videos taken through a one-shot colour camera or several recorded at intervals through the same colour filter for mono RGB imaging.
Correcting to a common time allows you to either add the output master frames from each video together, improving the signal to noise ratio, or reject a greater proportion of bad frames and save the best ones into the final image with a resulting improvement in detail.
Step-by-step
1

Before starting the derotation procedure you will first need to process all your videos as normal to generate fully sharpened output images.The videos must be similar – either full colour videos or a set of mono videos shot through a colour filter.
First, open WinJupos and select the planet’s name under Program > Celestial Body. Under Recording > Image Measurement, open your first image and the time and date that it was captured.
2
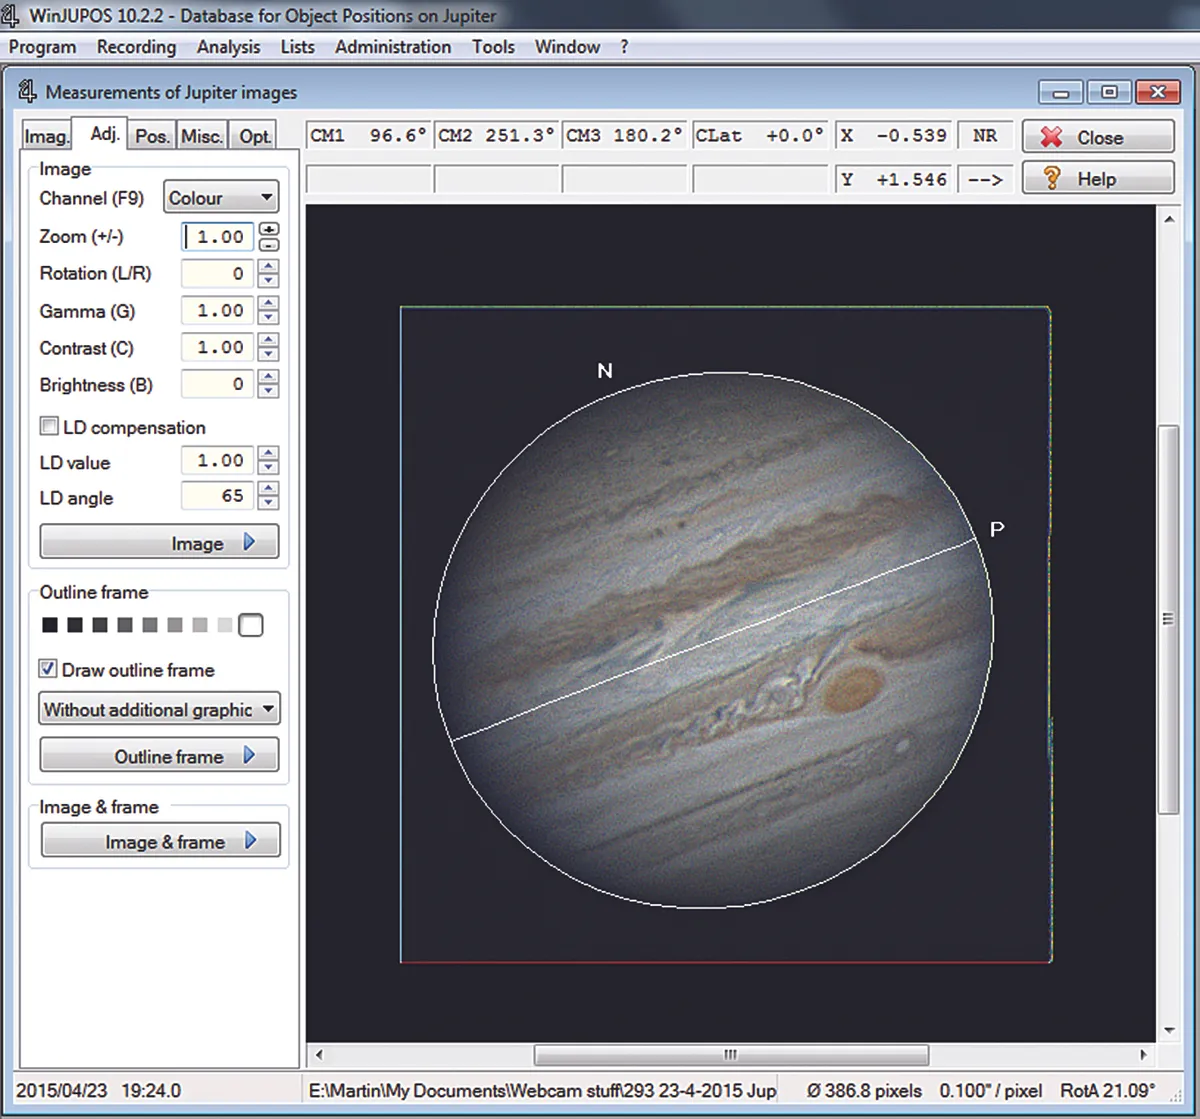
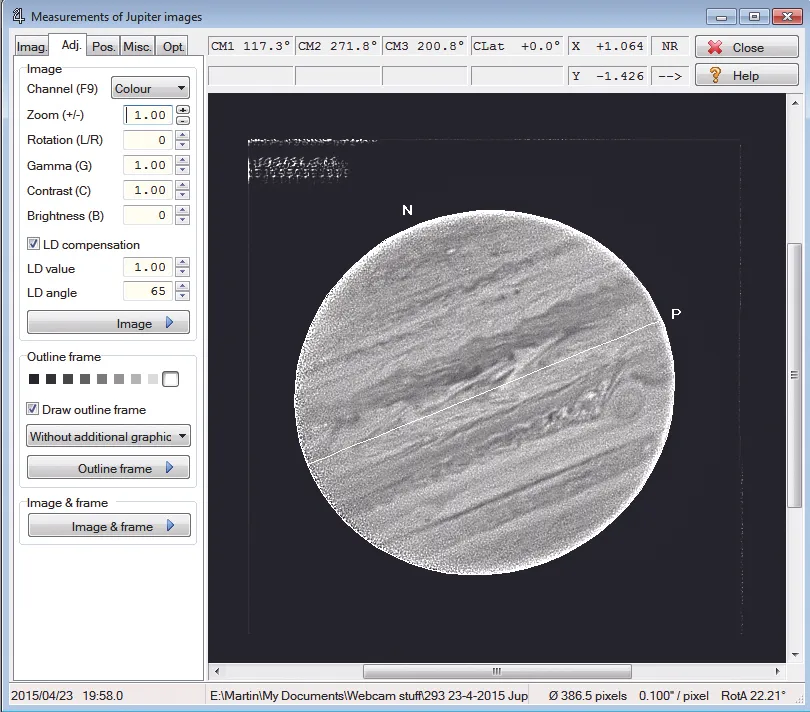
Go to the Adj tab, click on Draw outline frame then hit the F11 key to auto-fit the measurement frame to the image. Use the backspace key if the frame is 180° out.Tweak the frame’s fit using the Page Up/Down keys for size, P and N keys for rotation and cursor arrows for position.
To exaggerate the planet’s edge click on LD compensation and use a value of 1. When you have a good fit, go back to the Imag tab to save the image measurement file (IMS). Create IMS files for each of the images.
3
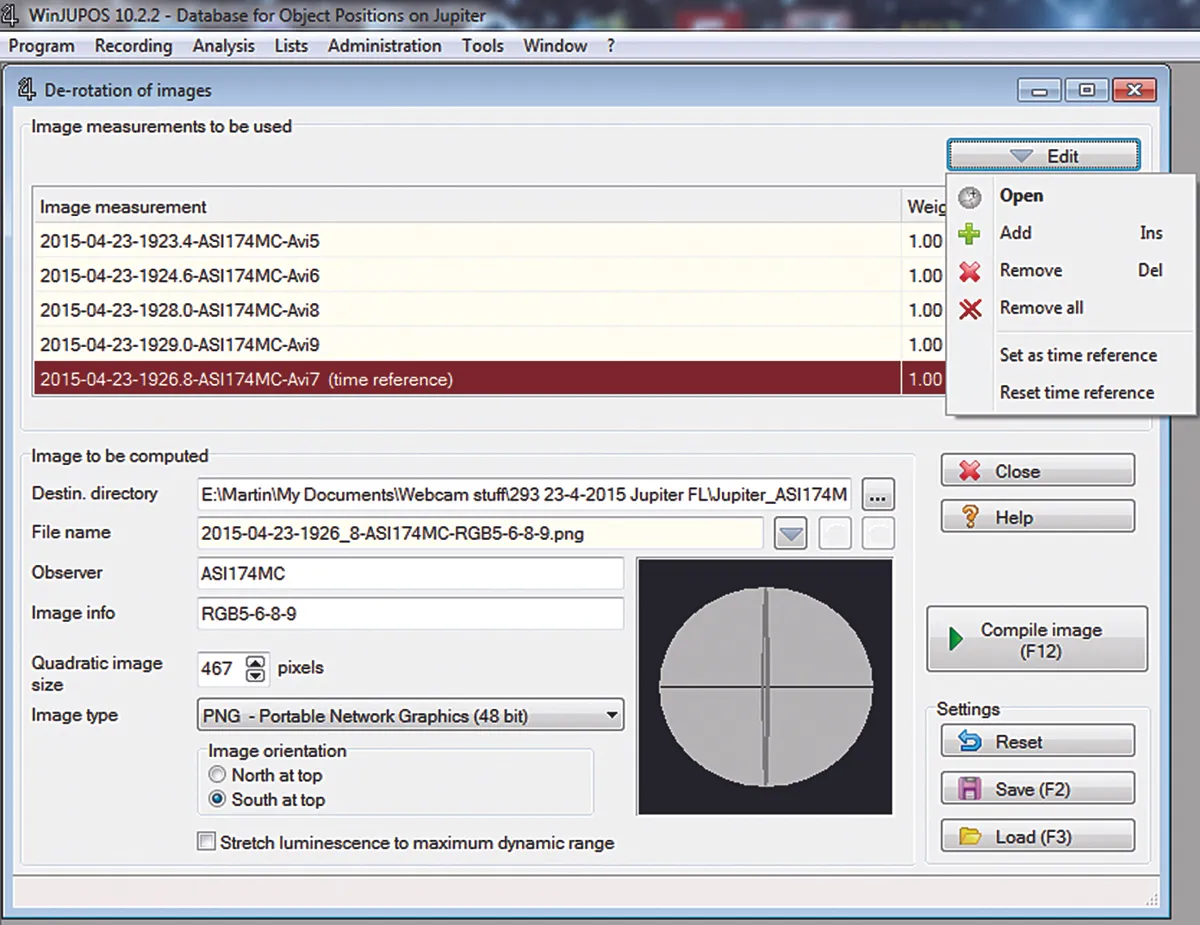
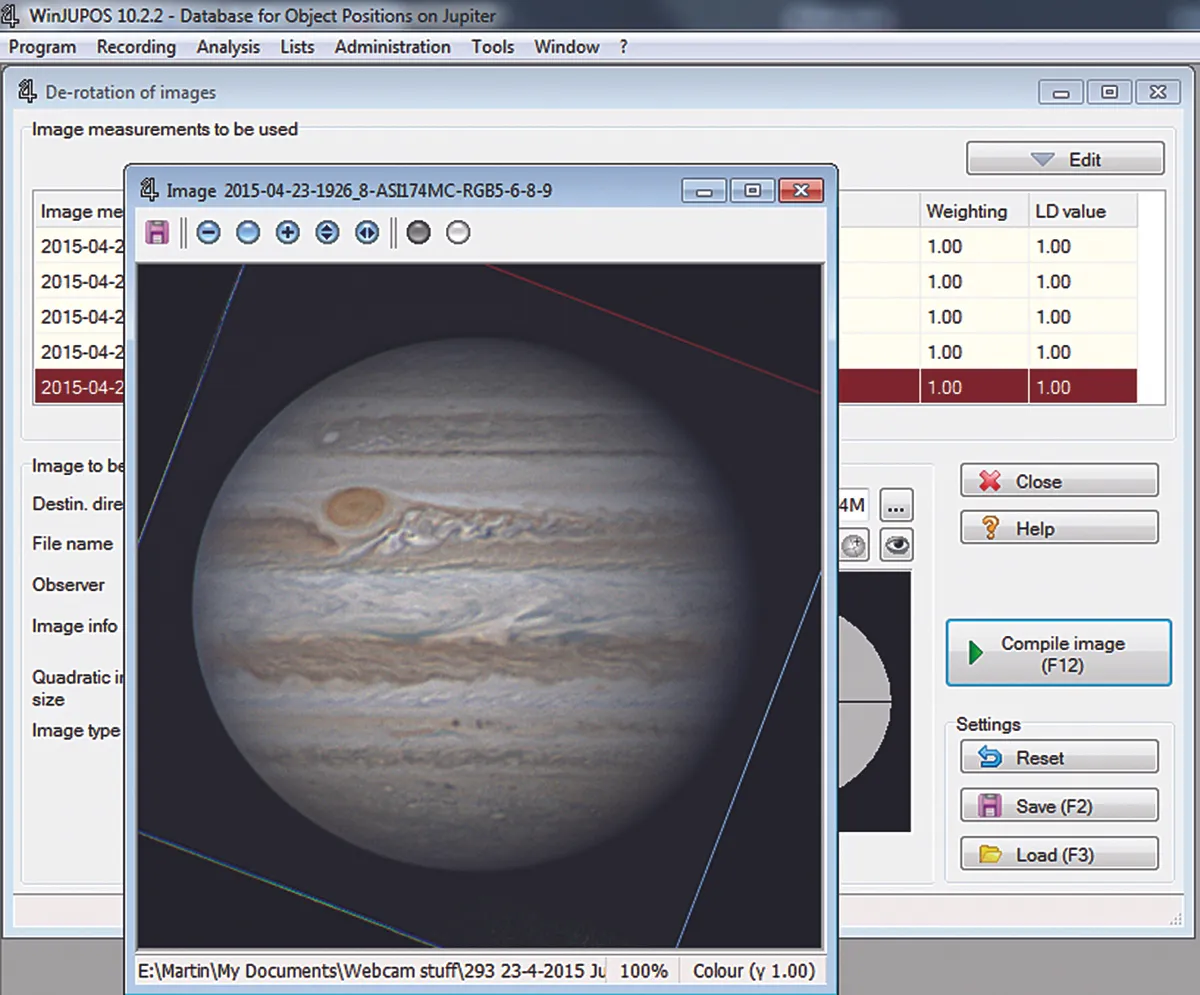
When you have created separate IMS measurement files for the set you want to combine, you are ready merge then to make a single combined and corrected image. Go to the heading Tools and then click on Derotation of Images.Click Edit and use the + button to add in all your IMS files.
The time of the combined image will be an average of all the separate images but you can click on one and then set it as the time reference to adjust all of your captures to the time of that image.
4
When all your IMS files are loaded, click on the ‘...’ button to chose a location for your combined final image. If you wish you can also set the image with south at the top once it is stacked, using the Image Orientation button at the bottom of the screen.
Finally, click on Compile Image and the image files linked to the IMS files chosen will all be derotated to the one reference time, aligned and stacked together to produce a final combined image which will be saved to the set location.
WinJupos also has a related RGB derotate feature used in mono RGB imaging alone, which allows you to combine red, green and blue images from videos taken through different filters at different times and compensate for the rotation that occurs in between them.
We'll look at this technique below.

Above we showed that the useful imaging window can be significantly widened for images which are of the same type (that is, all taken with a one-shot colour camera, or with the same colour filter for mono RGB imaging) by using the Image Derotate feature of the freeware program WinJupos.
This second part explains how the related Derotate RGB Frames feature does the same thing, only this time with separate red, green and blue filtered images captured with a monochrome camera.
Both of these features work not by allowing you to take longer individual videos, but instead by ‘correcting’ the good images generated from processing each video.
This cleverly predicts the planet’s appearance before or after the video was actually taken, compensating for any rotational movement between captures.
As well as correcting separate images to a common time, both WinJupos derotate features align and combine the separate images to create a single corrected final image.
By correcting for rotational smearing, WinJupos allows you to combine far more videos, which has a knock-on effect: you can produce a final output image of greater detail and lower noise than would otherwise be possible.
The Image Derotate feature allows you to combine the output of full colour videos taken at different times or alternatively to combine images from monochrome videos all taken at different times through the same colour filter – be it red, green or blue.
The Derotate RGB Frames function also time-corrects, aligns and combines images, but this time you have one red, one green and one blue image rather than a set which are all the of the same kind.
It helps overcome a common problem when planetary imaging using a monochrome camera and colour filters.
Here planetary rotation occurring between the separate videos taken through the different filters either leads to colour fringing at the edge of the planet if you align the red, green and blue output frames on the centre details or causes colour separation and reduced definition if you just align them on the edges of the planet.
By undertaking the following steps, you should be able to produce a RGB aligned and derotated final image showing more detail.
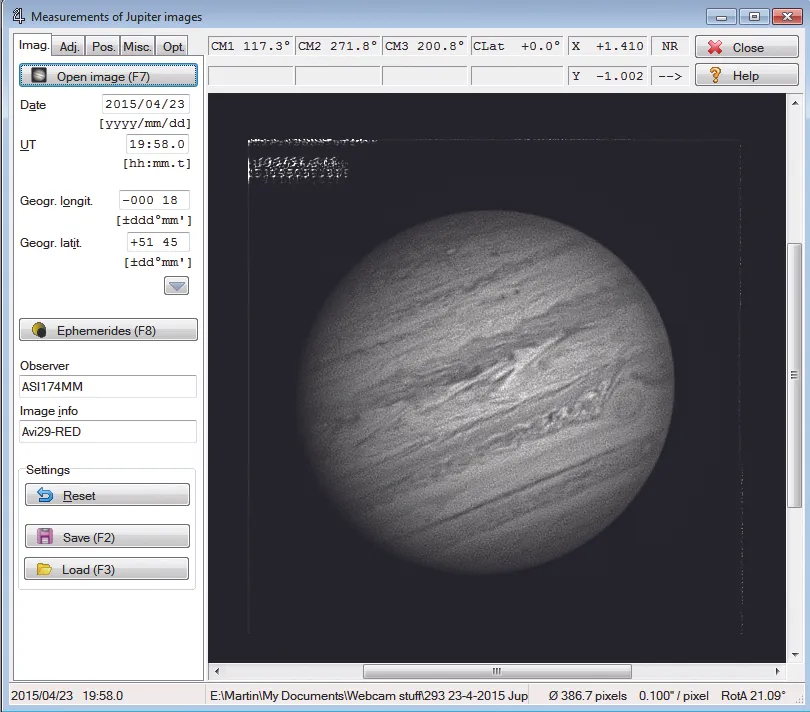
Before starting the derotation procedure you will need to process your monochrome videos to produce one fully sharpened image from each colour filter.
Note that each colour could also have come from several images of the same colour previously combined using Derotation of Images feature.
As before, the first step for derotation is to have WinJupos know the size, orientation and rotation of the images.
First, open WinJupos and select the planet’s name under Program > Celestial Body. Then under Recording > Image Measurement, open your first image and enter its time and date.
Go to the Adj tab, click Draw Outline Frame, then hit F11 to autofit the measurement frame to the image.
Adjust the frame to fit the image using the keyboard: backspace for a north-south flip, Page Up and Page Down for size, P and N for rotation, and the cursor keys for position.
You may want to exaggerate the planet’s edge contrast – click LD Compensation and try a value like 1.00.
When you are happy that you have a good fit, go back to the Image tab and hit Save. This creates an image measurement (IMS) file.
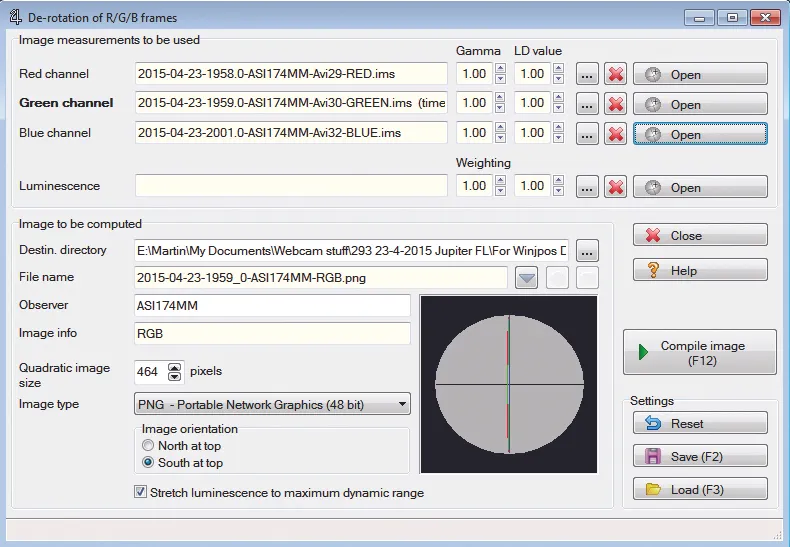
When you have created separate IMS files for your red, green and blue images, you are ready merge them to make a single combined and corrected image.
Click Tools > Derotation RGB Frames. Click on each of the top three ‘...’ buttons to add in the correct IMS file for each colour.
If you wish you can also set the image with south at the top once it is stacked, using the Image Orientation button at the bottom of the screen.
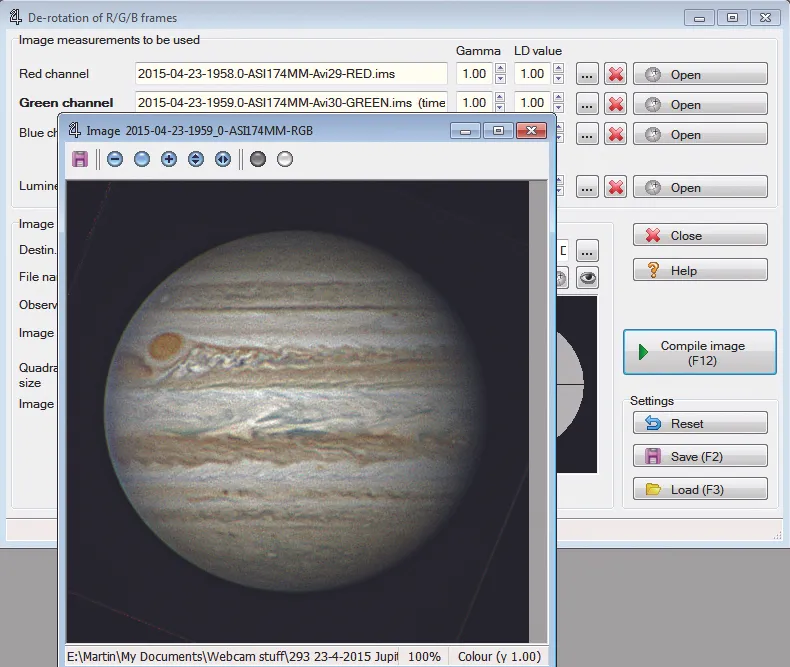
When your three IMS files have loaded, click on the lower ‘...’ button to choose a location to save your combined full colour final image.
Finally, click the Compile Image button. The three different mono image files linked to the IMS files that you have picked will all be derotated to the one reference time, then aligned and stacked together to produce a full colour, combined image.
This will be displayed on screen and also saved to the chosen location.
Step-by-step
5
You need to enter the time and date of each image as you load it into WinJupos – otherwise the alignment routine will not work correctly.
6
Next you need to adjust the measurement frame to fit each image – ‘LD Compensation’ can enhance contrast to help you do this.
7
When it comes to combining your R, G and B images into one shot you have a choice in how you orientate it: south can be at the top or bottom.
8
Clicking the ‘Compile Image’ button does all the hard work, aligning your three images to a single reference point and stacking them.
This article originally appeared in the April and May issues of BBC Sky at Night Magazine. Martin Lewis is a planetary imager and telescope builder.

; the WinJupos Image Derotate facility increases that time period. The combined image on the right was made from four red videos captured over a 15-minute period and gives a much smoother and more detailed result. Credit: Martin Lewis")
