The Revolution Imager R2 is a complete camera and monitor kit that allows you examine the view through your telescope on screen and in real time.With it, you can view details that would be impossible to see with an eyepiece alone.
It is often said that when looking through a telescope eyepiece you can be disappointed, that you can only faintly make out most nebulae and that what you can see is not very colourful.
This camera kit makes it possible to see details in many of these nebulae, and to see them in full colour via a live view on a screen.
The view on the monitor is displayed with astounding colour and clarity and for clubs, outreach or star parties this will certainly be a winner.
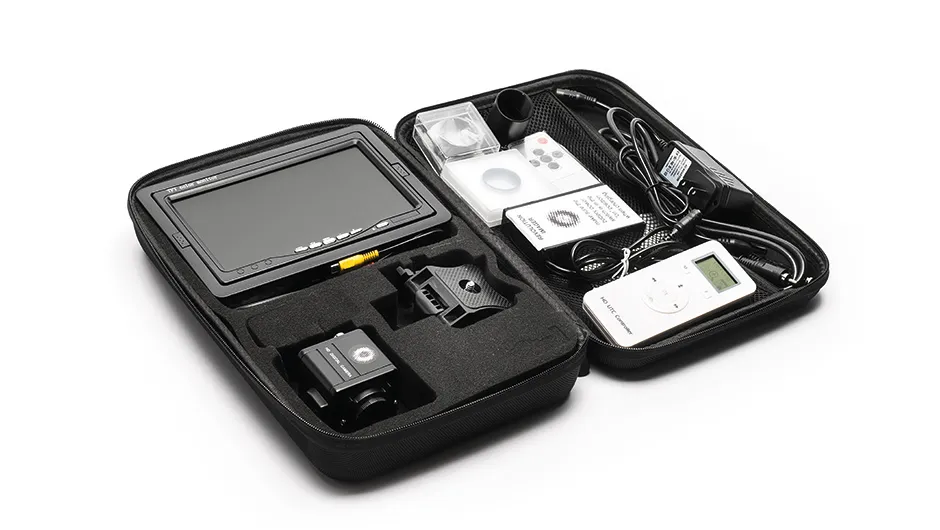
The Revolution Imager comes in a soft case that includes the camera, a 12V rechargeable battery plus charger, a 7-inch colour monitor with an adjustable stand and a number of accessories – a 1.25-inch nosepiece, a 0.5x focal reducer and a 1.25-inch infrared-cut filter.
There are also separate remote controls for the camera and the monitor, and all the cables needed to connect everything together.
This is an exceptionally comprehensive package that includes everything needed to get imaging straight out of the box.
Although all these items are included, there are several valuable accessories available that were loaned to us for the purpose of this review.
These included a number of lenses that attach directly to the camera (allowing you to use the camera as a standalone device), longer connecting cables and a video capture device so you can save images directly onto a computer via a USB connection.
Note that you cannot save the video that the camera records without a capture card of some kind.
To approximate the field of view of the camera’s 1/3-inch Sony ICX811 sensor with your telescope, we recommend consulting our online field of view calculator.
Select your telescope and manually enter the pixel size (5µm) and the image size (720x576), then select a target from the available lists to approximate the view you will see when using the camera.
Pleasant surprises
The TFT monitor is surprisingly sharp and its colour rendition is excellent. It is worth making some adjustments to the brightness and contrast settings using the camera remote, as the default settings for deep-sky viewing are not optimal out of the box.
The supplied 12V battery powers both the camera and monitor, and can do so for up to five hours on a full charge.
The supplied manual is sparse, but enough to get started; the manufacturer’s website (www.revolutionimager.com) provides much more information.
No software is required and, once everything is connected, the system works impeccably.
Should you decide to capture images with an optional video capture device, the resulting video can be saved as an AVI file for further processing using the freeware programs such as AutoStakkert! and RegiStax.
We connected the camera to our 115mm (4.5-inch) refractor, chose the recommended settings for exposure and AGC (gain), aimed at a bright star and, using a Bahtinov mask, found focus without problems.
We then slewed to M13 in Hercules and, with the same settings for exposure and gain, were treated to a fine view of this globular cluster.
Rewarding and fun
To test the camera’s sensitivity we then slewed to the Dumbbell Nebula, M27 in Vulpecula, increased the exposure to the maximum, gain to 32 and the number of frames to stack to six (the maximum).
We were delighted and surprised again by the view afforded, as the frames gradually built up.
We subsequently captured some of the live video and processed it, with good results for
such a basic system.
The resolution of only 720x576 pixels is not up to modern astrophotography standards, but to be able to see such detail and colour in a nebula with such minimal equipment is rewarding and fun.
On a separate night of exceptionally poor seeing interspersed with cloud, we slewed to the Moon, shortened the exposure to 1/500 seconds, set minimum gain and single exposures.
The six captured videos were processed using RegiStax and the images stitched together, resulting in a good image of the terminator.
This kit represents a comprehensive, inexpensive and fun way to view faint deep-sky objects.
It is also a great introduction to astro imaging, not to mention one that provides wonderful enjoyment and entertainment.
Outstanding feature: Building the bigger picture
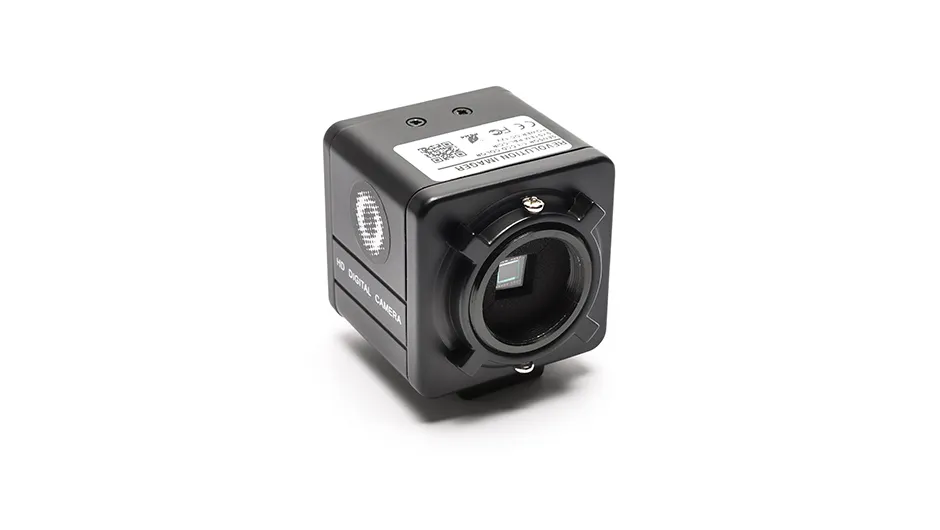
The heart of the system is the analogue video camera which has a 1/3-inch Sony ICX811 CCD sensor.
The resolution of this sensor is 720x576 pixels with a pixel size of 5µm.
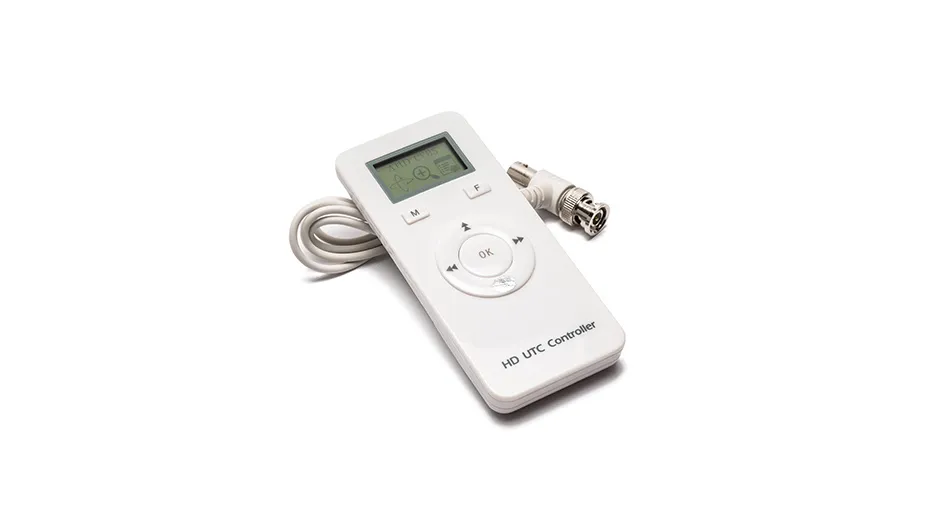
Exposure times of between 1/10,000th of a second and five seconds can be selected using the camera’s remote control.
The exposure time setting can be confusing as these are designated in an unusual way: longer exposures are expressed in the menu as multiples.
For example, 256x is the longest exposure and equates to 5.12 seconds.
Images can be stacked ‘on the fly’ from up to six frames at once, which increases sensitivity and reduces noise in the resulting image.
A word of caution here – if you want to use the maximum of six stacked frames with five-second exposures, then you will need to be using a mount that can accurately track your object for at least 30 seconds; you’ll also need to be patient as the image builds up on the screen.
Extras
As well as the camera and monitor, the kit includes a simple instruction manual, monitor stand, 12V battery with mains charger, monitor remote control, nosepiece, 0.5x reducer, camera remote control, infrared-cut filter and all necessary cables.
This is all contained in a soft padded case.
TFT monitor and stand
The 7-inch TFT monitor has a standard 0.25-inch tripod screw that connects to the stand.
If you have limited space to place the monitor next to your scope, a camera tripod can be used instead.
Screen view
This is an unprocessed DSLR photograph of the view on the TFT monitor during a live viewing session of the Dumbbell Nebula.
The image could be shown on a larger monitor or television as most are equipped with analogue inputs. Longer cables (an optional extra) would then be needed.
Menu
The menu system is quirky, and may have originally been designed so that this camera could be used for purposes other than astronomy.
For example, exposure settings are expressed as multiples (eg, 256x), DNR is the number of frames to stack, AGC is the gain setting.
Hand controller
The hand controller gives access to the on-screen menu system and is supplied with its own soft case.
It connects between the camera and the monitor cable.
The OK button brings up the on-screen menu and functions are selected using the arrows on the controller.
Note that the down arrow is not required and is disabled.
Vital stats
Price: £324.00
Aperture: 3.5-inch
Supplier: Modern Astronomy
Telephone: 020 8763 9953
Website:www.modernastronomy.com
This review originally appeared in the December 2017 issue of BBC Sky at Night Magazine