In this DIY guide, we'll show you how to build an astronomy accessories case.
It's great for storing the bits and bobs that come with the practical pursuit of observing the night sky.
Whatever stage you have reached in astronomy you will accrue a lot of precious equipment.
Eyepieces, cameras, intervalometers, red light torches, tools and cables.
It can all become a jumbled mess if you don't have the right astronomy accessories case for storage.
Your kit needs to be stored and transported to dark sites so you can make effective use of your time.
In this DIY project we'll show you how to make your own accessories case and customise it to suit your particular needs.
Extra plans
Download the plans below to help you build your astronomy accessories case
Astronomy accessories case typical parts (PDF)
Astronomy accessories case parts diagram (PDF)
About the astronomy accessories case design
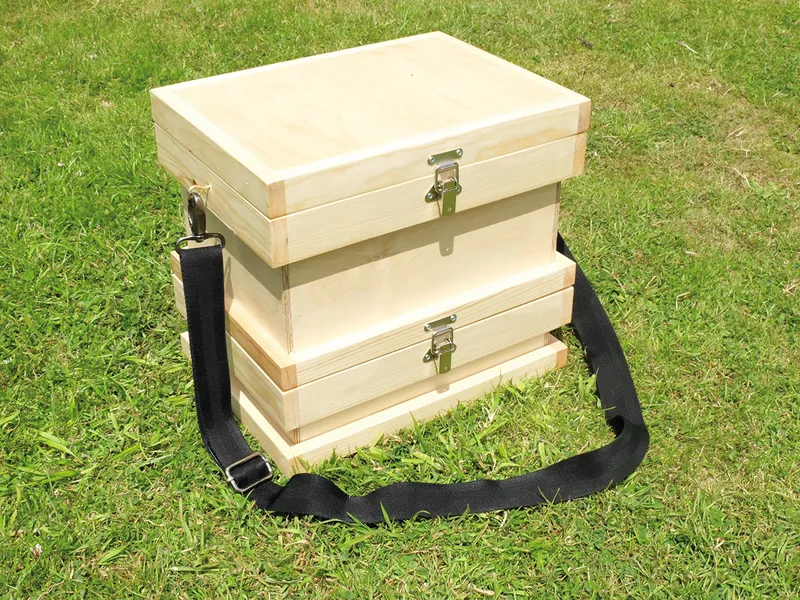
Our basic design for an astronomy accessories case has space for eyepieces in the main layer with a lid, which doubles up as a tray you can use for a star chart.
Additional layers can be added to the stacking design to house other items, such as cameras, filters, cables and tools.
One of our main objectives was to create a design that didn’t require any of the tricky woodwork joints usually associated with this kind of project.
In its place we have devised a neat overlapping corner method that just requires some accurate sawing.
You might find a timber supplier or friendly DIY enthusiast with a machine to do a lot of the cutting work for you.
But with a little care it is possible for anyone to make strong boxes using our technique.
Construction
The construction is a matter of pinning and gluing together.
We also added an inexpensive LED battery lamp (found in many DIY superstores).
If you disassemble it you can spray the lens red and mount it on a moveable arm made from plywood that folds away inside the case to form a kind of angle-poise lamp.
This makes locating that elusive eyepiece much easier in the dark!
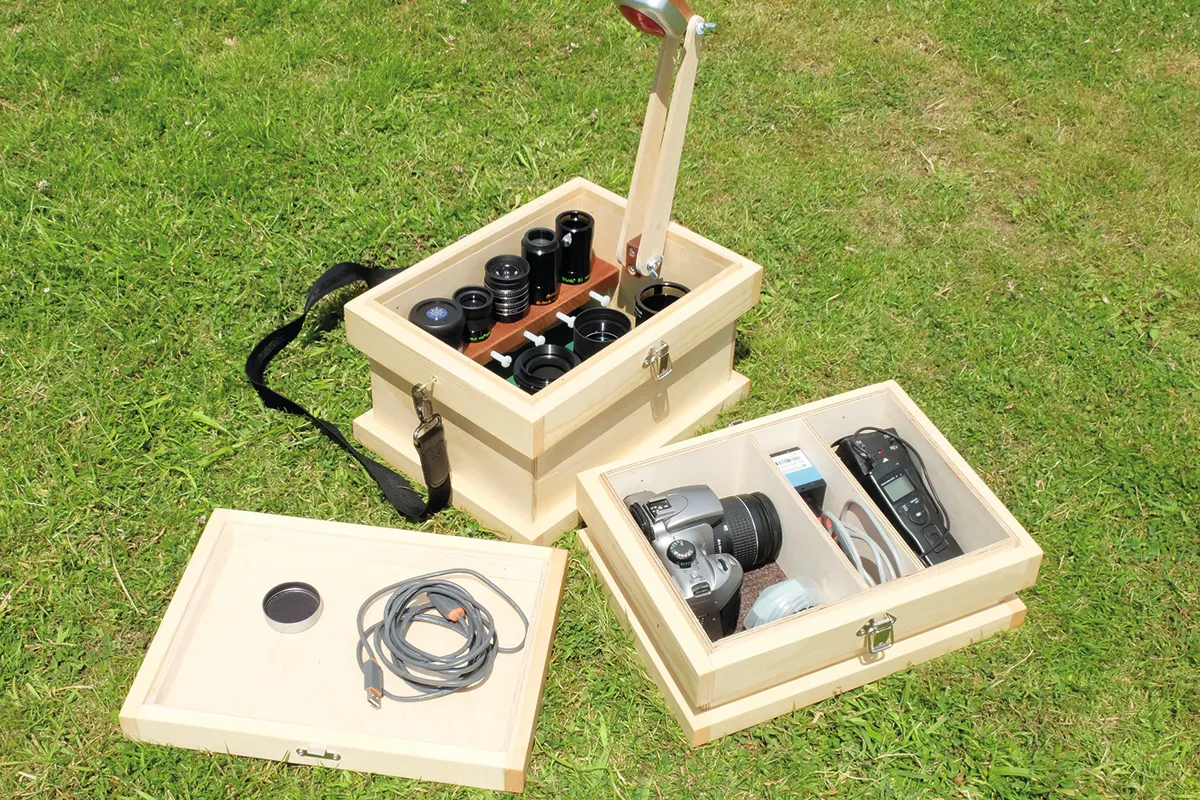
The upturned lid forms a tray – useful for temporarily placing lens caps and small items on, but which can also form a small chart table.
We designed it to accommodate an A4 sheet so we could use printed charts (which you can access above)
The lamp can be positioned so that it illuminates the chart or box below.
And if the lamp unit is affixed to the plywood arm with a Velcro patch, you could use it as a removable torch if you need light elsewhere.
The eyepieces are held in two internal timber shelves.
These are drilled to suit the eyepieces and we used non-marking nylon screws to hold them in place.
Each shelf is glued in place, supported on two small rectangular off-cuts of plywood, which are stuck to the inside of the box below either end.
Customise to suit your needs
We lined the bottom of our case with felt, but there is room here for a rack of filters or other small accessories such as pencils and an astronomy log book if you wanted to improvise.
Each box has a raised internal lip around the top edge, which fits inside a corresponding recess below the base of the box above.
This means the boxes can be stacked and locked together to form a modular case of any height.
You could keep all your accessories in one place at home, but only take selective layers out for a night’s observing.
You could even add dividers into individual layers.
A shoulder strap was added to the upper layer of our astronomy accessories case to make carrying easy.
Handles could be added or small casters if your stack of cases becomes large or you decide to scale up the design.
You could add padding to the lid to create a seat if find yourself waiting for the clouds to clear.
You might decide to stick to the online plans for your first layer.
But once you have mastered the basic principle, it is easy to add some more layers with varying heights.
You can also devise your own modifications as your interests in astronomy grow and evolve.
Tools and materials
Tools
- Tenon saw or equivalent
- Drill with bits
- Wood screws and eyepieces
- Ssandpaper
- Clamps
- Small hammer
- Screwdriver
Materials
- Two 2.4m lengths of 44x15mm softwood
- Two 2.4m lengths of 25x15mm softwood per box layer
- 6mm plywood for the sides and bases of each layer
Sundries
- Cabinet fasteners with small screws (a pair for each layer)
- 15mm panel pins
- PVA wood glue,
- Eyelets and bag strap or handles
- 30mm M6 nylon screws
- 40mm M6 bolts and wingnuts
- Masking tape
- String
- LED battery lamp
Finish
- Fine sandpaper
- Exterior quality gloss paint or varnish
- Red spray for lamp
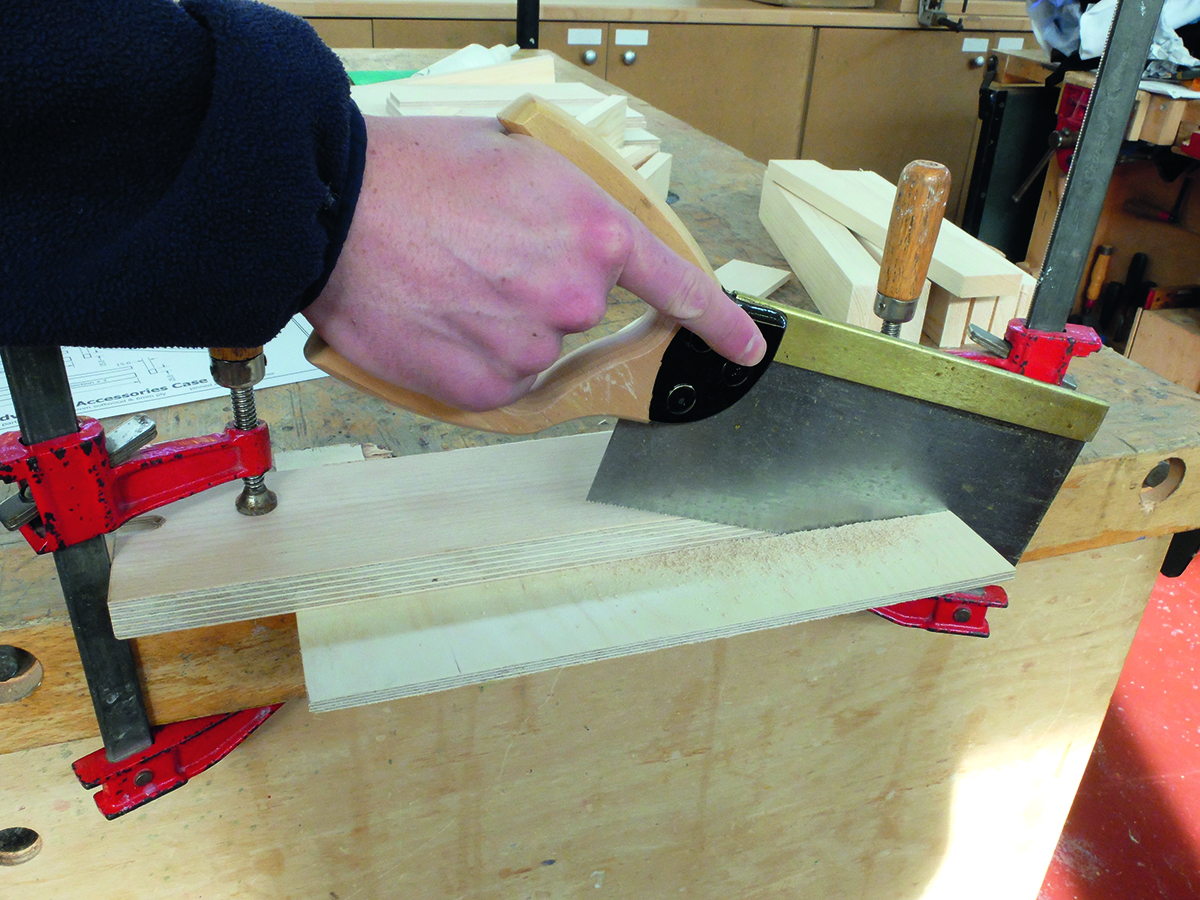 Use the dimensions on the printable plans available at the top of this article to mark out the timber to size.
Clamp a straight piece of wood to each part and use this as a guide for the saw.
A timber merchant might be able cut your wood for you.
Use the dimensions on the printable plans available at the top of this article to mark out the timber to size.
Clamp a straight piece of wood to each part and use this as a guide for the saw.
A timber merchant might be able cut your wood for you.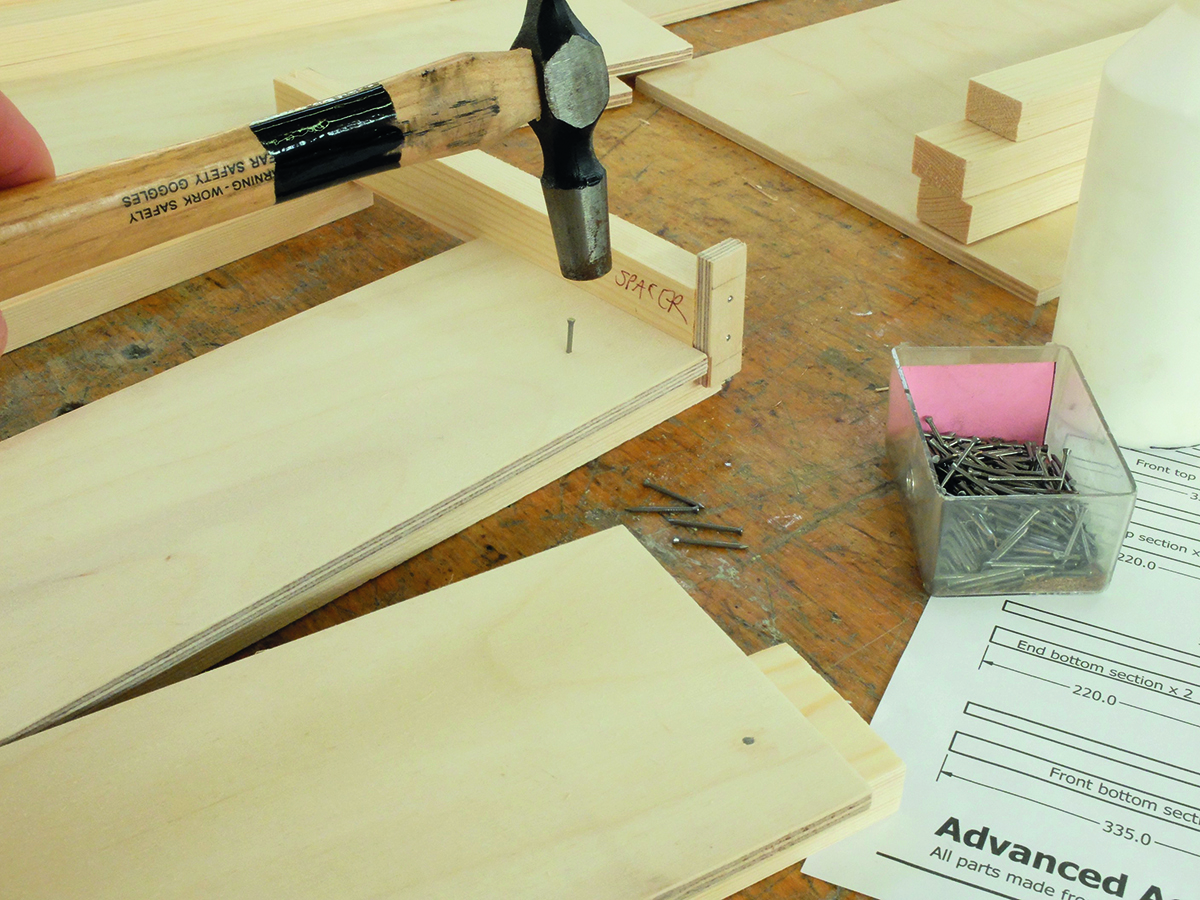 Use PVA glue and pins to join the softwood strips to each plywood side.
We made a spacer from offcuts of wood to achieve the correct overhangs and lip sizes.
Check the parts fit to make each box layer before the glue dries.
Use PVA glue and pins to join the softwood strips to each plywood side.
We made a spacer from offcuts of wood to achieve the correct overhangs and lip sizes.
Check the parts fit to make each box layer before the glue dries.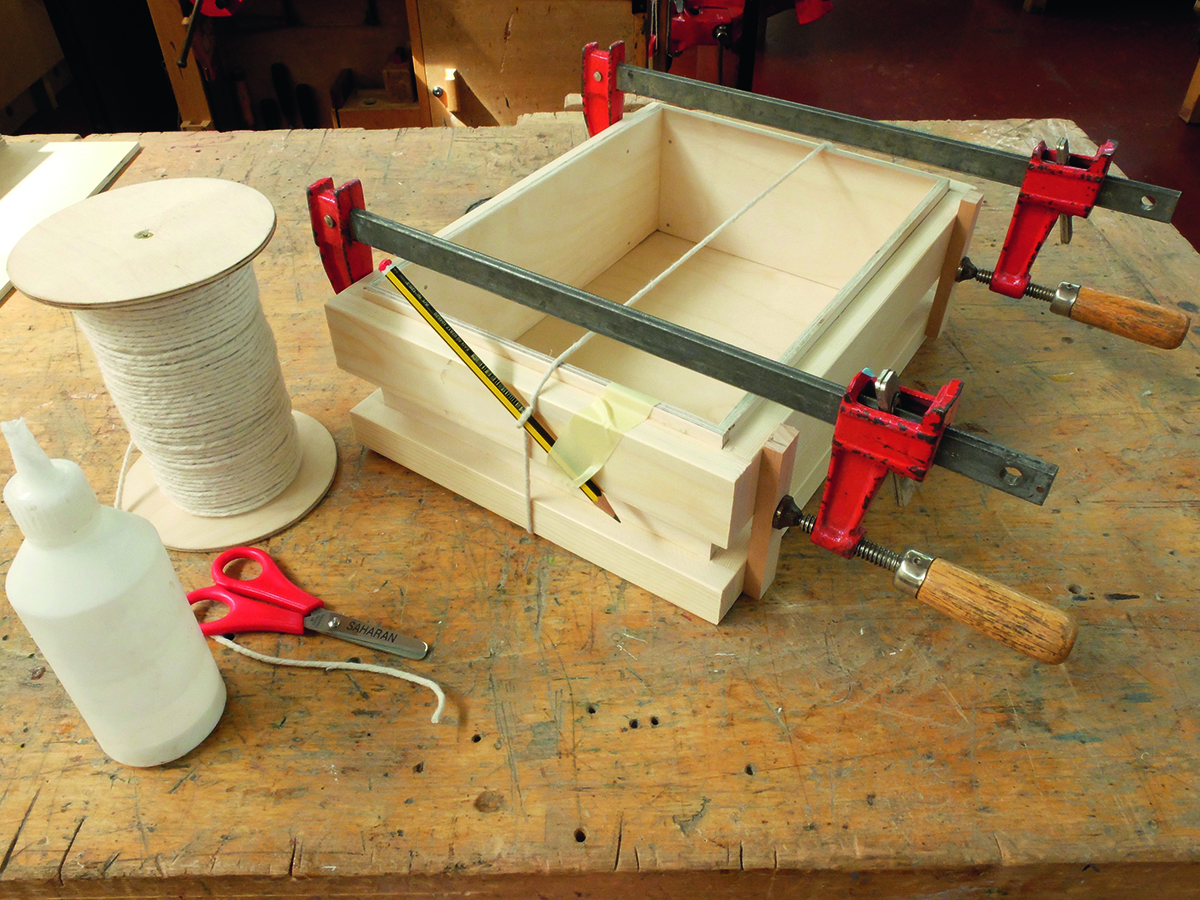 The main sections can now be glued together.
PVA wood glue is strong but you need to put pressure on it while it dries.
If you don’t have long clamps, make ‘tourniquet’ clamps from string and a pencil, as above.
Fit the base at the same time to keep it square.
The main sections can now be glued together.
PVA wood glue is strong but you need to put pressure on it while it dries.
If you don’t have long clamps, make ‘tourniquet’ clamps from string and a pencil, as above.
Fit the base at the same time to keep it square.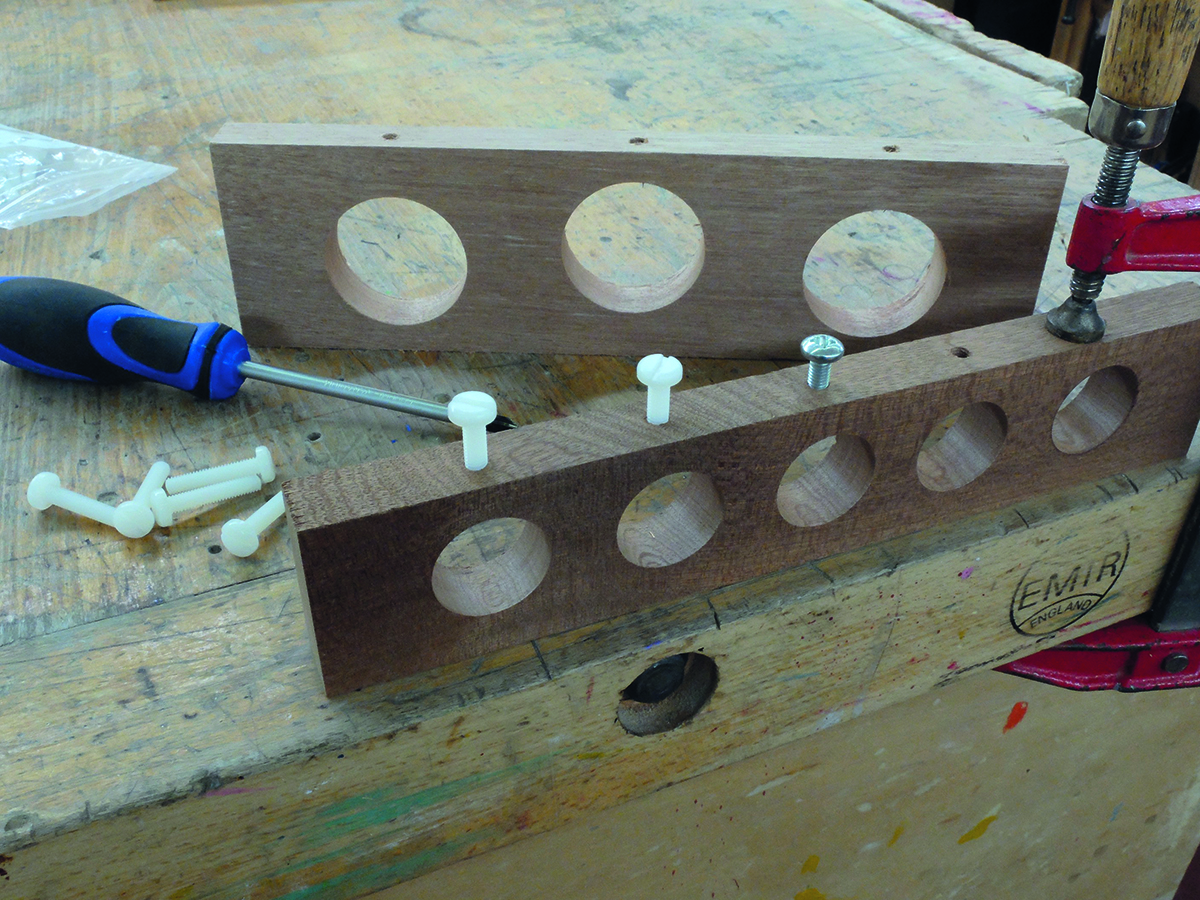 Drill 1.25-inch or 2-inch holes for your eyepieces in two lengths of timber, pre-cut to fit inside the case.
Drilled 5.5mm holes can be threaded by screwing in an M6 metal screw.
When this is removed a nylon screw is substituted in.
Drill 1.25-inch or 2-inch holes for your eyepieces in two lengths of timber, pre-cut to fit inside the case.
Drilled 5.5mm holes can be threaded by screwing in an M6 metal screw.
When this is removed a nylon screw is substituted in.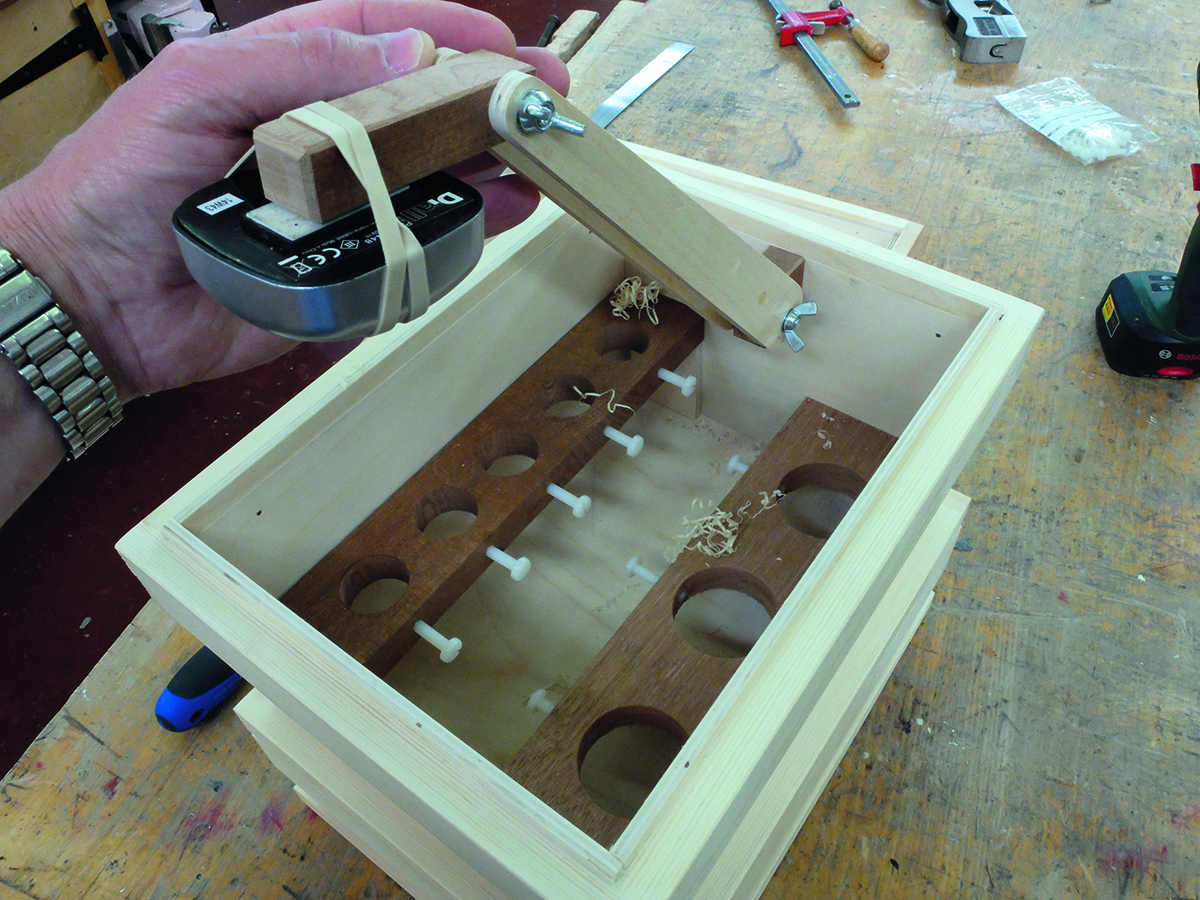 An LED lamp can be mounted on an arm made from two strips of plywood.
Cut and drill these while taped together so they are identical.
The arms are joined to two timber blocks, which attach to the lamp and case respectively.
M6 screws and wingnuts provide some friction.
An LED lamp can be mounted on an arm made from two strips of plywood.
Cut and drill these while taped together so they are identical.
The arms are joined to two timber blocks, which attach to the lamp and case respectively.
M6 screws and wingnuts provide some friction.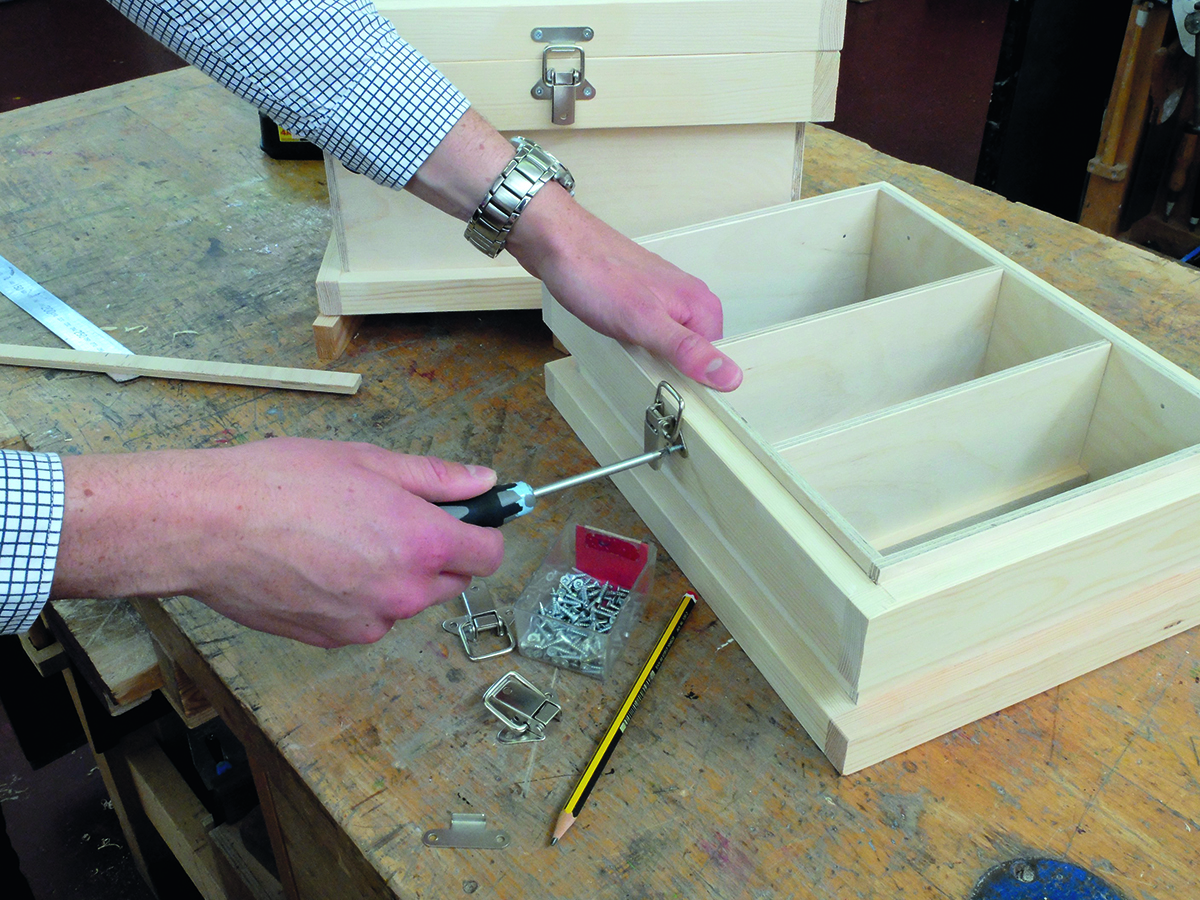 Use small screws to attach the fasteners to your accessory case.
Dividers can be added to suit your requirements.
Remove all fasteners, rub with fine sandpaper and paint or varnish.
Reassemble and line with felt if required.
Use small screws to attach the fasteners to your accessory case.
Dividers can be added to suit your requirements.
Remove all fasteners, rub with fine sandpaper and paint or varnish.
Reassemble and line with felt if required.