There are few pieces of software that have made such a contribution to amateur astronomy as the free planetarium program Stellarium. Available from stellarium.org for Windows, Mac OS X and Linux systems, it is popular with beginners and advanced stargazers alike.
Not only can Stellarium do everything you’d want from a planetarium program – simulate the night sky and the positions of planets and other celestial bodies at a given date and time – it’s also packed with other features that are useful for experienced observers and astrophotographers.
Here we'll look at the basics of the program with an introduction to how to use the software, before examining Stellarium’s plug-ins and other useful tools.
We suggest you fire up the program while you read this so you can experiment as we go.To download, visit stellarium.org.
Did you know that you can change Stellarium's landscape? Find out how with our guide on how to create a customised Stellarium landscape.
Getting started with Stellarium
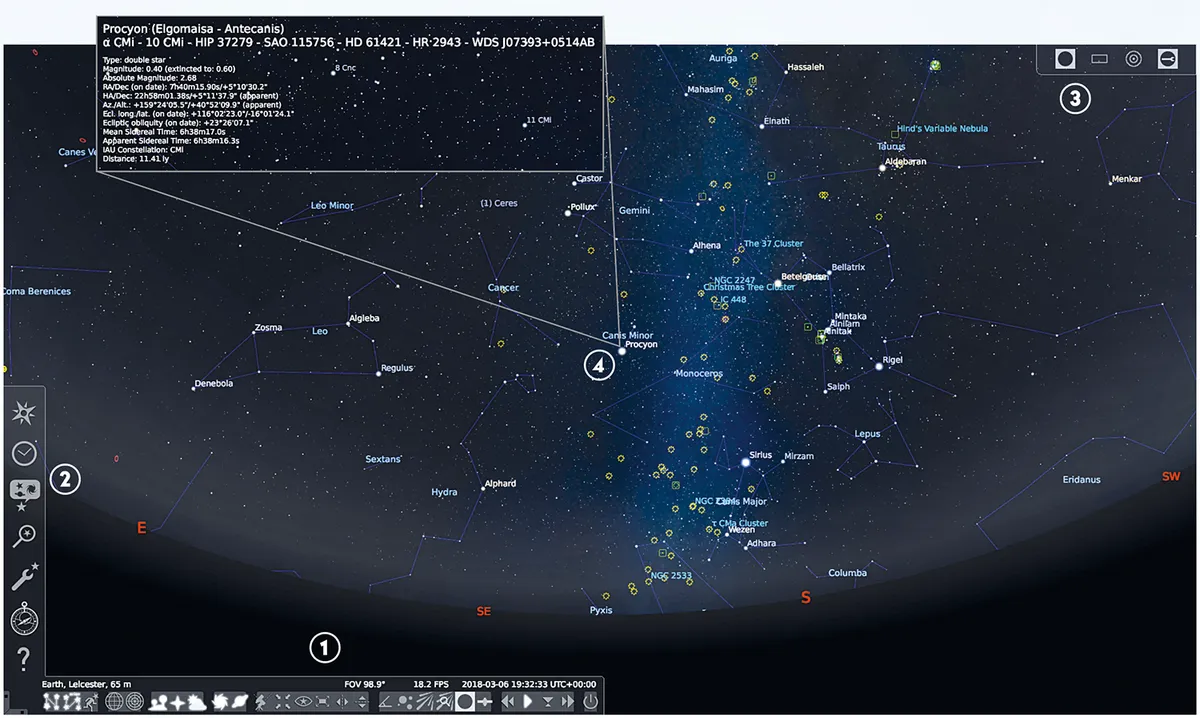
1 The Stellarium main screen has two main toolbars. The bar along the bottom shows key information such as the location, the field of view (FOV) and the time.
Placing your cursor over this bar will raise it to reveal buttons that can toggle various display settings such as constellation lines and star labels. This bar is also where some plug-in buttons will appear.
2 Hidden on the bottom-left edge of the screen is another toolbar with several icons. These access further configuration windows which enable you to select the location you’re observing from and set the date and time, along with several display and general program configuration menus allowing you to tailor what’s shown on screen, plus the Search tool and the Help window.
3 If you have the Oculars plug-in enabled (see further down in Simulating eyepiece and camera fields of view) you will see a set of icons relating to it in the top right-hand corner of the screen.
4 If you left click on a celestial object from the main screen, the object will acquire a small rotating ‘target’ around it (stars) or a bouncing blue ‘frame’ (other objects).
You’ll see information about the object appear at the top of the screen, including its name and other useful astronomical data, such as its magnitude and catalogue numbers. You can customise this display in the ‘Information’ tab of the Configuration Window, which can be accessed by pressing F2.
Clicking on the ‘eye’ symbol on the bottom toolbar activates a night-vision mode that tints the whole Stellarium window red, to help preserve your dark adaptation if you’re using the program while observing.
How to change the date and time in Stellarium

When Stellarium first opens it is synchronised to your computer’s date and time. So if you open it during the day it’ll show a simulated daytime sky.
You’ll need to advance the time to see the stars come out. However the program has a handy ‘startup date and time’ feature on the ‘Navigation’ tab of the Configuration Window (F2) that allows you to specify a time that Stellarium will default to – say 11pm – every time you open the program.
In general use, if you want to display the sky for a specific date and time, simply click the clock icon on the left toolbar (or use F5) and input the desired values.
Set Stellarium's viewing location
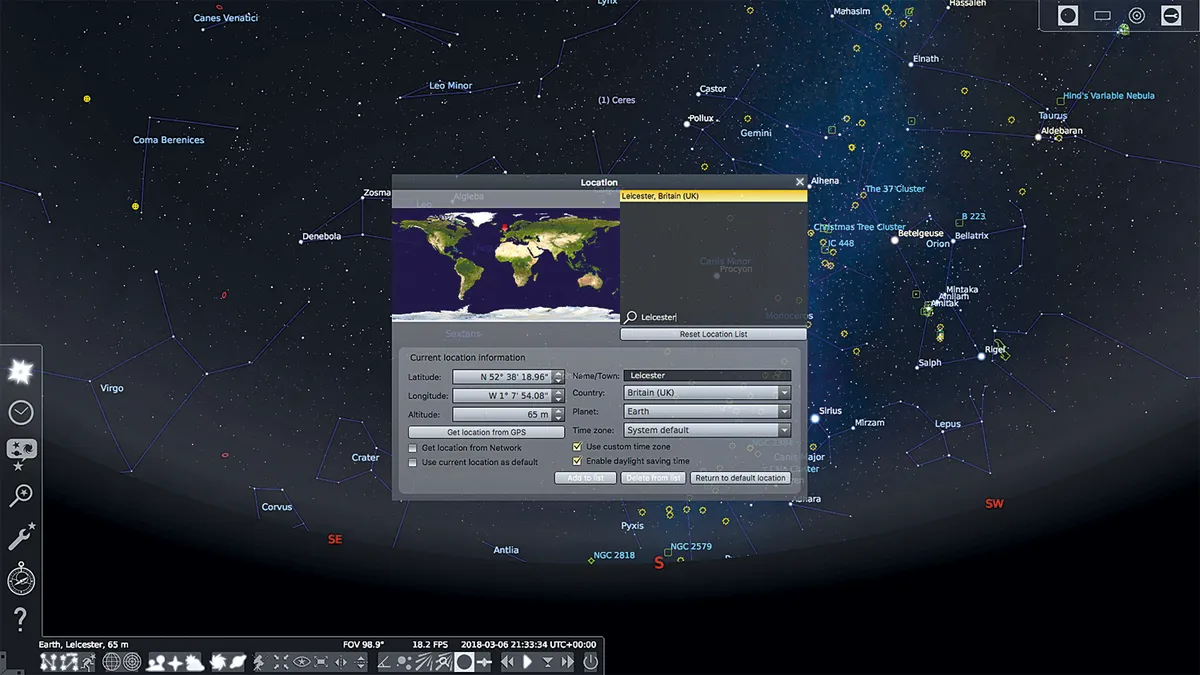
Selecting the location from which you want to view the sky in Stellarium is simple. The menu can be accessed by clicking on the compass icon in the left-hand toolbar or by pressing F6 to bring up the ‘Location’ window.
In that window, you can then choose a location by either by: clicking on a world map then selecting from a list of nearby places; typing in a town or city; or, alternatively, inputting an exact longitude and latitude.
You can even select an extra-terrestrial viewing location if you want to simulate the sky from other bodies within the Solar System.
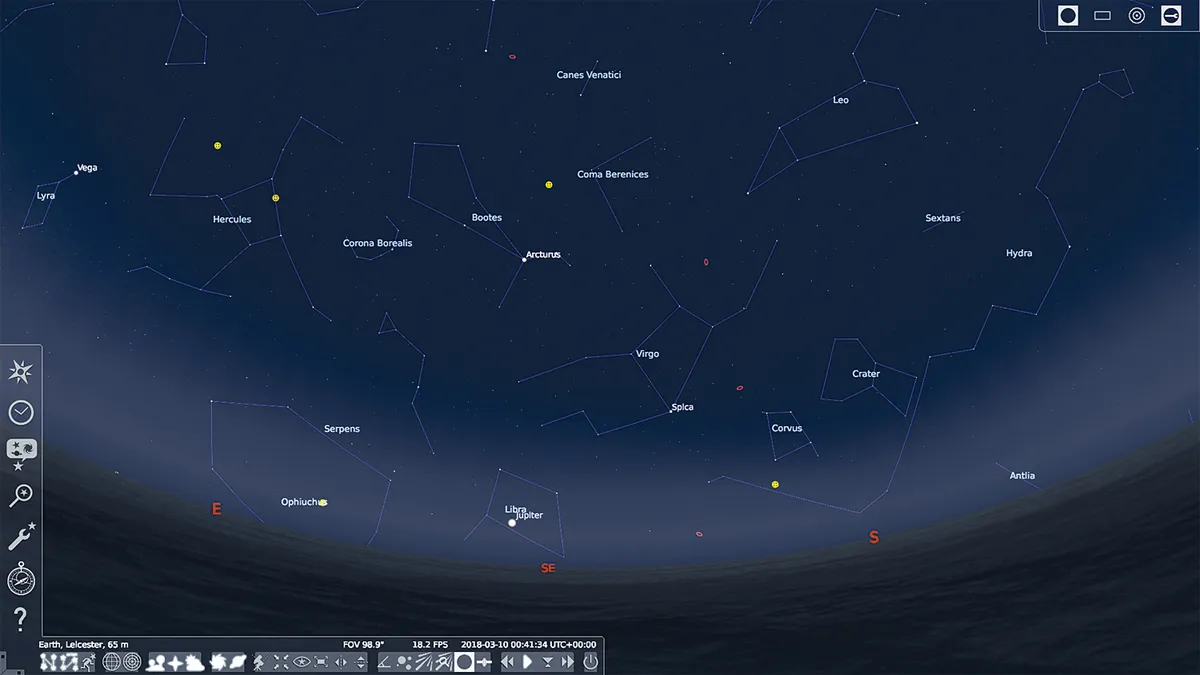
How to explore the sky
To explore the sky in Stellarium you can drag it round with your mouse or use the arrow keys on a keyboard. To zoom in and out use ‘ctrl’ (or ‘cmd’ on a Mac) plus the up and down arrows, or you can use a roller wheel on a mouse.
To zoom in on a specific target first left click on it, then press the spacebar to centre it before using the zoom keys (as above).
Stellarium’s search menu can be accessed by pressing F3. Pressing the ‘return’ key on a successful search will immediately centre that object on the screen.
Stellarium allows you to customise the size of stars relative to each other on-screen (press F4, Sky tag). We like to set the ‘Absolute scale’ to 2.20 and the ‘Relative scale’ to 0.50, as that gives a more photorealistic look that’s useful for astrophotography planning.
How to tweak what Stellarium shows
Pressing F4 brings up a ‘Sky and viewing options’ window where you can customise Stellarium’s view. From the ‘Sky’ tab you can change the size of the stars, adjust the number of labels and limit star magnitudes, which is useful for decluttering the chart.
You can simulate light pollution to work out what’s visible from an urban observing site.
From the ‘DSO’ tab you can choose which catalogues of deep-sky objects are flagged, while the ‘Markings’ tab allows you to switch between various celestial markers, lines and coordinate grids.
The ‘Landscape’ and ‘Starlore’ tabs give the option to change the foreground scenery and alter which culture’s star names and constellation patterns are used.
Ordinarily Stellarium's two onscreen toolbars are hidden unless you move your cursor near them. They can be ‘locked’ in place by clicking the tiny triangles on the ‘L’-shaped tab in the bottom-left of the Stellarium window.
Now that you've got the hang of things, we'll delve deeper into Stellarium to look at some of the useful plug-ins for imagers and observers
Simulating eyepiece and camera fields of view
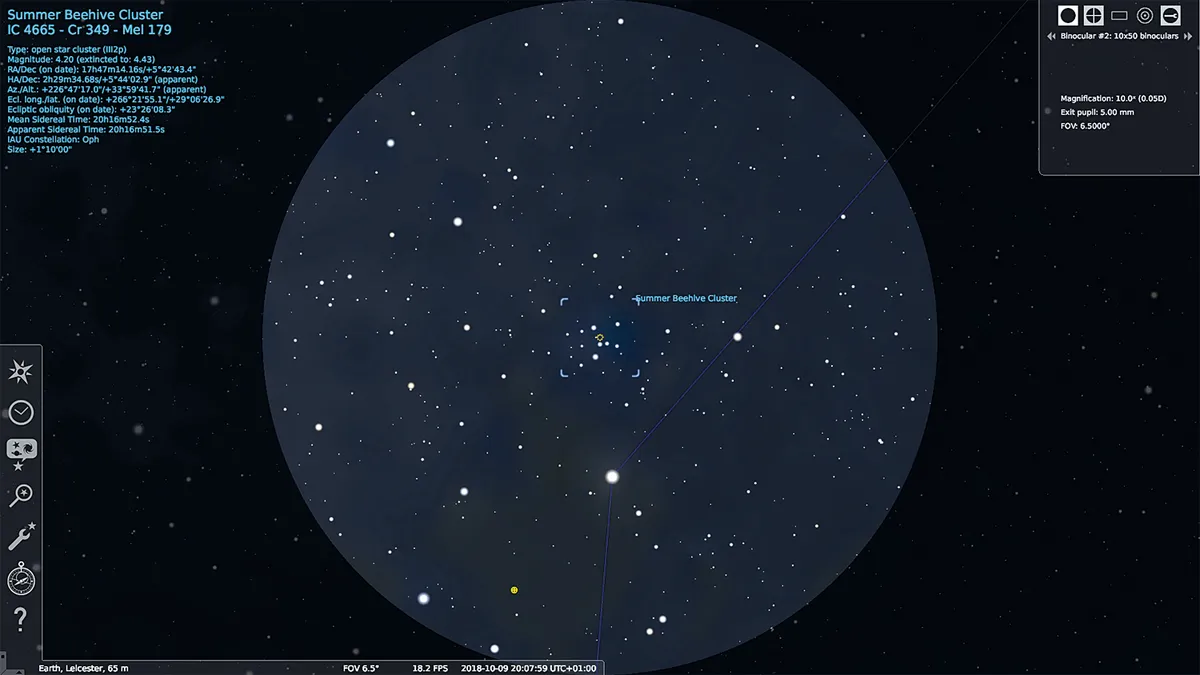
Stellarium comes with an extremely useful feature – the ‘Oculars’ plug-in – that allows you to simulate the field of view of a given eyepiece and telescope combination as well as overlay the field of view of a camera and optics setup onto the sky.
Of all the plug-ins in the program this is the one we use the most and its ease of use makes it a superb tool for planning astrophotos.
The plug-in can be activated by accessing the ‘Configuration’ window using the F2 button, then clicking on the ‘Plug-ins’ tab. In the window that appears, scroll down the menu on the left to ‘Oculars’ then click on the ‘Load at startup’ button at the bottom.
When you reopen Stellarium, you’ll see a new toolbar has appeared in the top right of the screen.
The rightmost of these (a spanner symbol) brings up the plug-in’s Configuration Window where you can list what telescopes, eyepieces and cameras you own, with a mask covering the rest of the sky.
The second button activates a camera field of view tool that, when clicked on, places a red box onto the simulated sky representing the boundary of the field of view of the specified equipment setup.

The third icon switches on a circular ‘target’ pattern that’s used in Telrad finders.
Swapping between various eyepiece and scope pairings – or between different combinations of camera and telescope (or indeed camera lens) – while using the program is easy: simply click the double arrows next to each piece of equipment listed in the box under the toolbar, which appears when either the eyepiece field of view or camera field of view tools are in use.
The camera field of view can even be rotated by different increments when it’s shown, so you can experiment with the ideal framing and composition of a potential astro image.
Using and updating Stellarium's Solar System Editor
Stellarium doesn’t just simulate the positions of stars, deep-sky objects, the planets and the Moon in the sky. It also shows where numerous asteroids and comets are located at any given moment.
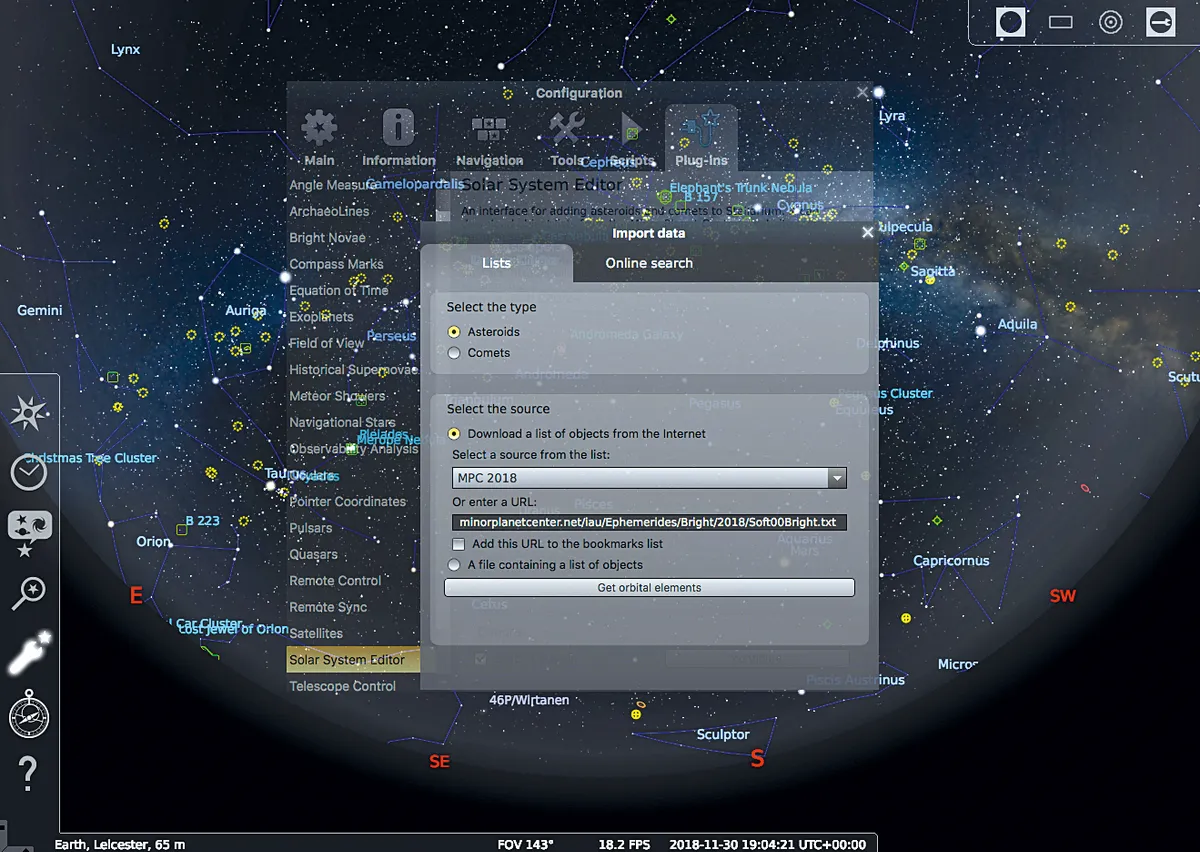
New comets and asteroids are discovered frequently and you can keep the program’s databases of these objects up-to-date using the ‘Solar System Editor’ plug-in located in the Plug-Ins menu in the Configuration Window (accessed with F2).
Clicking the ‘configure’ button on the Solar System Editor page brings up a new window with a ‘Solar System’ tab.On this tab there is a button to ‘Import orbital elements in MPC format’.
Selecting this will bring up a window that enables you to download orbit data for both asteroids and comets from various lists maintained by the Minor Planet Center; you simply select which list you want to import from the drop-down menu, click ‘Get orbital elements’ and then select which bodies you want Stellarium to plot before clicking ‘Add objects’.
You can then search for these objects using the search function (F3).
How to find satellites with Stellarium
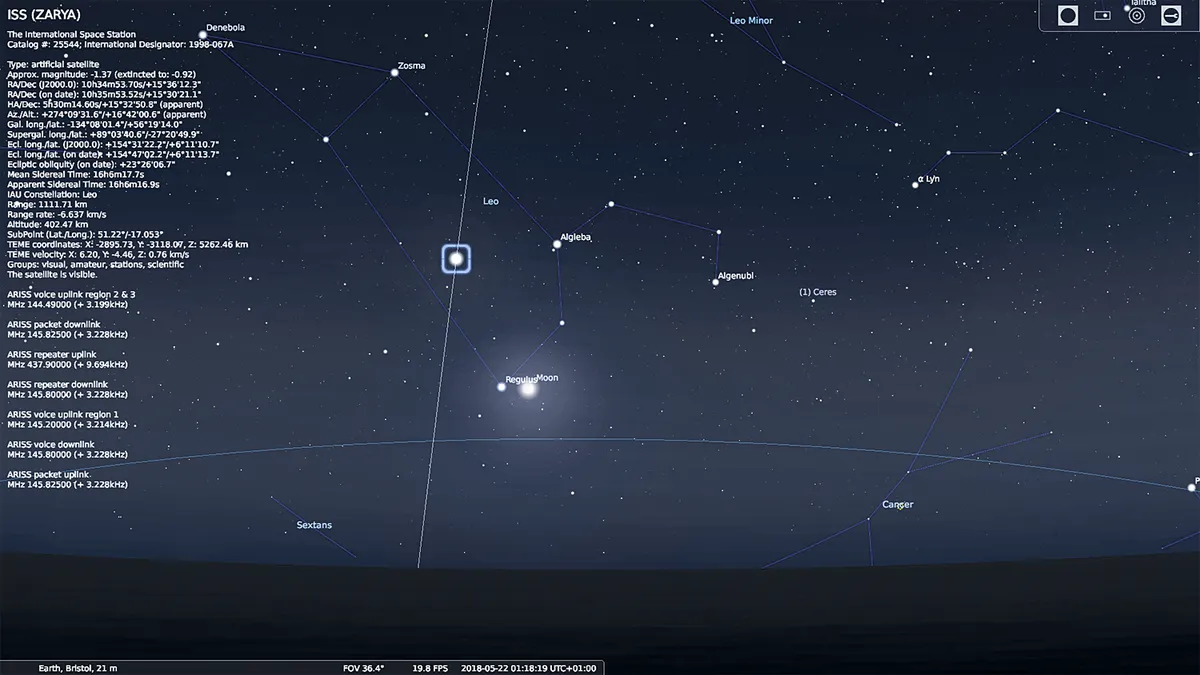
Among the many excellent advanced features contained within Stellarium, the ‘Satellites’ plug-in is likely to be the one that will be of most interest to watchers of humanity’s orbital outposts.
Once enabled via the ‘Plug-ins’ menu, it plots the positions and movements of a huge number of satellites.
This is not just interesting to look at, it also creates a superb planning tool for astrophotographers who enjoy taking pictures of things like the International Space Station, geostationary satellites and iridium flares – especially when it’s used with the camera field-of-view function in the ‘Oculars’ plug-in.
For example, if the ISS is going to make a pass over the location that Stellarium is simulating the sky for, the program will show it as a bright point of light moving against the stars, just as you would see it in real life.
For more on this, read our guides on how to see the International Space Station and how to take a photo of the International Space Station.
Stellarium will even simulate the Station going into – or emerging out of – Earth’s shadow if that occurs on the pass.
To make the path of the ISS even clearer we advise checking the ‘Orbit Lines’ box on the plug-in’s configuration page.
To find whether a meteor came from a shower, use the ‘Angle Measure’ plug-in to draw its path, then use ‘Showers’ to see which radiant its path matches.
Other good planetarium programmes
There are many other sky charts programs available if Stellarium doesn’t quite fit your virtual stargazing requirements:
- Sky Safari skysafariastronomy.com
- Starry Night www.starrynighteducation.com/index.html
- Cartes du Ciel Skychart www.ap-i.net/skychart/en/start
- Google Sky www.google.com/sky/
- Redshift www.redshift-live.com/ext/en/
- ESA Sky sky.esa.int/
- Sky Mapwww.sky-map.org
Will Gater is an astronomy journalist, author and presenter. Follow him on Twitter at @willgater or visit willgater.com.
This guide originally appeared in the June 2018 issue of BBC Sky at Night Magazine.