Deep-sky photography can be a difficult area of astrophotography to associate with scientific observation. This is because it attracts a huge following of imagers who often produce results optimised for visual rather than scientific appreciation. There are several reasons for this.
Deep-sky objects are very distant and there’s a belief that they don’t change appearance significantly over time.
In addition, these often very beautiful objects nurture a desire to present them at their best.
Read more:
- A guide to deep-sky photometry and spectroscopy
- Process scientifically valuable images of Saturn
- A guide to CMOS deep-sky astrophotography
Treating a deep-sky image as a scientific recording seems inappropriate when large professional telescopes can do it so much better.
But there is in fact much scientific work that can be done by astrophotographers.
Their images can lead to a better understanding of the nature of the objects being photographed, reveal surprises and bring an overall richer appreciation for the workings of the Universe.
Best of all, there is room for both aesthetic and scientific presentation using the same image data.
Tools required
Hardware
- Telescope
- Equatorial mount
- Autoguider
- Camera (DSLR, cooled astronomical CCD, high frame rate)
- Laptop
Software
- PixInsight
- Photoshop
- GIMP
- AutoStakkert!
- StarTools
- DeepSkyStacker
- APT
- Sequence Generator Pro
- Maxim DL
Strike a balance between aesthetics and scientific value
The term ‘deep sky’ generally relates to anything that lies outside the Solar System.
This encompasses stars in single, multiple or clustered collections along with a whole host of objects both internal and external to our own Milky Way Galaxy.
The form, colour, variety and beauty of these objects are vast and imaging them can become a compulsive pursuit, requiring a set of skills unique to this area of astrophotography.
The question of image manipulation is perhaps most relevant in deep-sky imaging and the type of manipulation can strip or enhance an image of scientific merit.
Unedited images may look visually unappealing, but they potentially contain the most scientific worth.
Ultimately it’s up to you as an imager how you want to present your results.A good strategy is to create an archive to hold the original images in case they are required for further scrutiny at a later date.
Most amateur astrophotos are manipulated to a degree. Stacking, noise reduction, brightness stretching and more, all produce results that are based on the original recorded data but have been adjusted to produce something new.
But how much manipulation is too much manipulation? The answer is open to subjective interpretation.
Adjusting an object’s colour may produce a correct-looking result but this could easily be incorrect, simply reflecting a stereotype colour gained from looking at professional images or the work of other amateurs.
Few deep-sky objects are bright enough to provide a definitive visual colour reference to work toward.
For greatest visual impact it’s common to want to pull out every last detail contained within the image.
Here too caution must be applied because producing a high-dynamic-range (HDR) end result may show all of the detail recorded, but there will be a degree of subjectivity involved that ultimately relies on the processing and compositional skills used to create the final image.
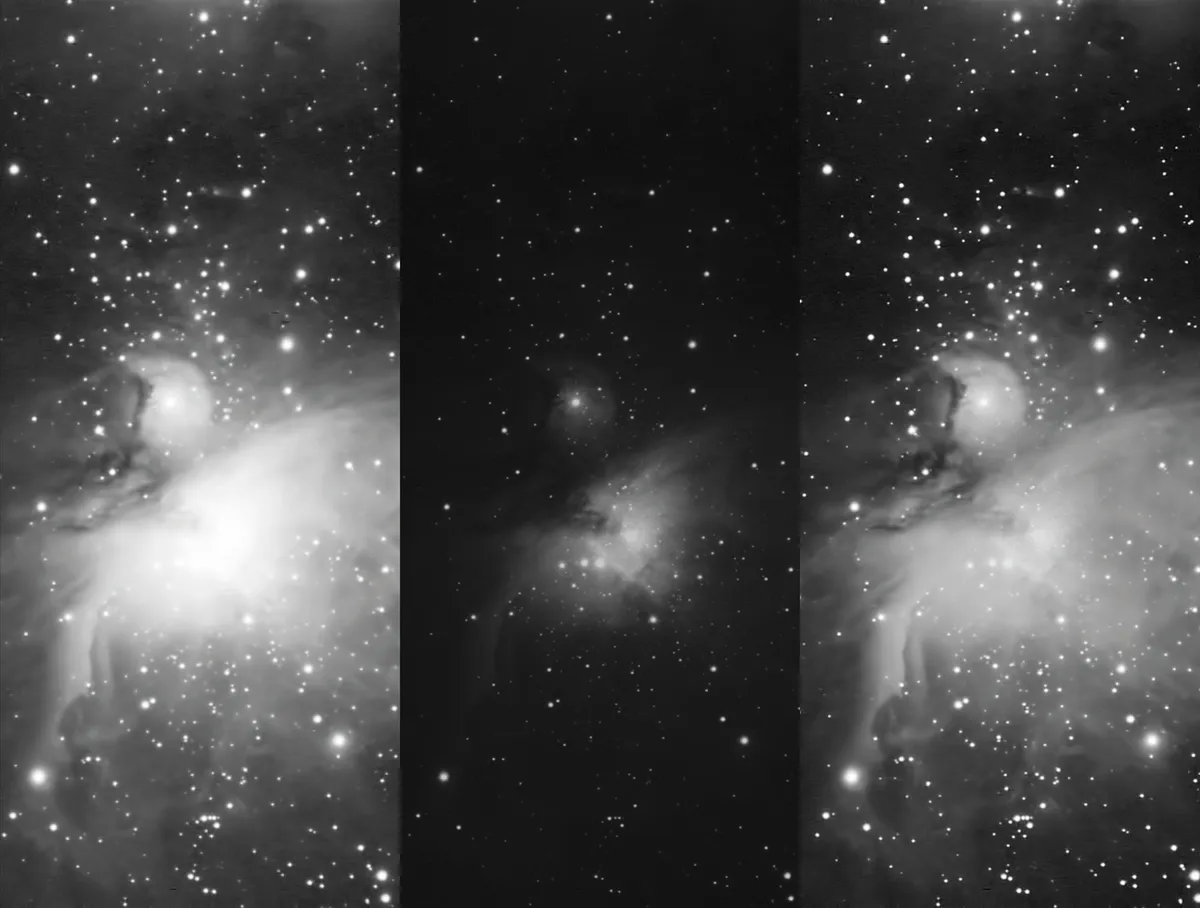
Image annotation and presentation for science
Deep-sky images are typically recorded with one-shot colour cameras or mono cameras and filters.
One-shot colour cameras remove a lot of the hard work, but mono cameras with filters provide more scope for scientific imaging.
A common method of processing and combining mono, colour-filtered images is to concentrate on producing a high-quality luminance image to which colour-filtered images can be added for a full-colour result.
In addition, speciality filters can be used to record specific wavelengths produced by certain elements. Common examples include H-alpha, H-beta, SII and OIII.
The results can be presented in a number of ways. A familiar example is the so-called Hubble palette.
This is typically achieved by substituting RGB components with those taken through SII, Ha and OIII.
The end result does not represent what you’d see visually but it does produce an image in which it’s possible to see the contributions of sulphur (SII), hydrogen (Ha) and oxygen (OIII).
In addition, some mono results may be recombined into the luminance component, or replace it completely.
A common example is to use an H-alpha filtered image of a nebula to further enhance the luminance part.
This makes the luminance sharper and more defined than that produced by a conventional multi-wavelength luminance filter.
An issue arises as to how this information is conveyed to the viewer. Date and time stamps are very important as well as details of the telescope, camera and any other optical elements used in the imaging train.
For multi-filtered images, filters should be identified along with the exposure times and number of sub-frames used for each filter.
Finally, orientation markers, scale lines and star identification can be added to make interpretation easier. Your name and location should also be recorded.
As long as the original calibrated but unprocessed components have been archived for easy retrieval, the scientific elements of the image can still be analysed should further investigation be required.
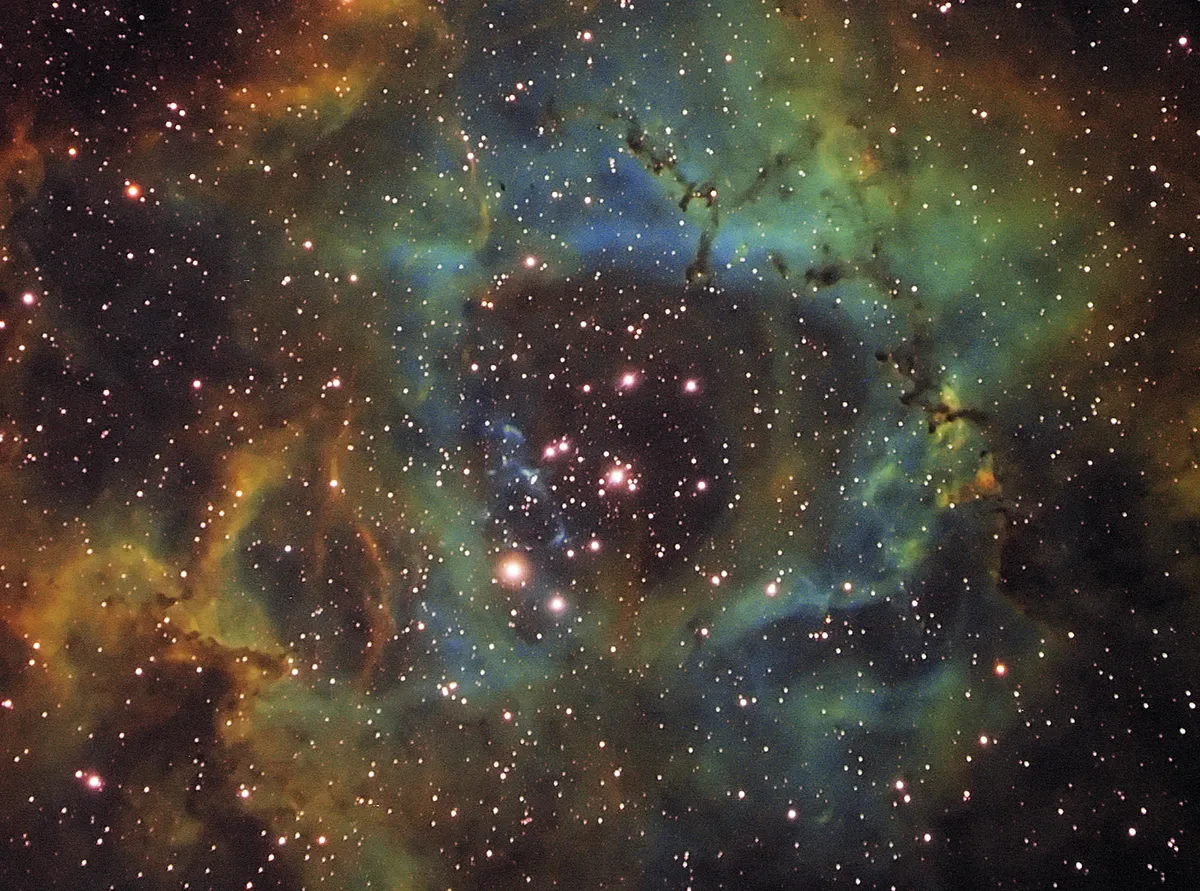
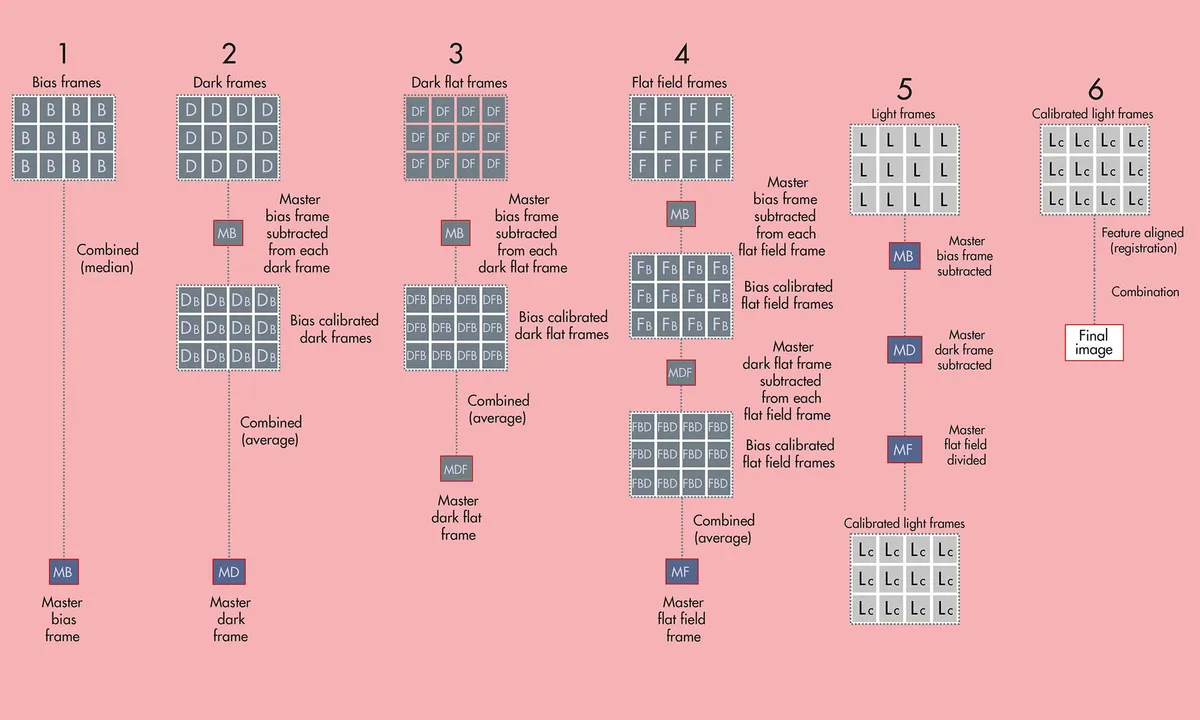
Image calibration
Image calibration removes elements from an image that shouldn’t be there. There are various calibration steps that can be applied but care and understanding is required to use them correctly.
Basic calibration involves processes known as dark frame subtraction, flat-field correction and bias field correction.
In addition, more advanced processes can be employed to apply some of these calibration processes to the calibration frames themselves before applying to the final image.
In imaging parlance, image frames are often referred to as ‘light frames’. Images taken using the same settings but with the front of the camera covered are known as ‘dark frames’ or ‘darks’.
The data recorded by a dark frame is dependent on temperature, so it’s important to take dark frames at a similar time to when you’re collecting your light frames.
Some astrophotographers choose to create a library of darks made at specific temperatures for this purpose.
However, it’s important to note that camera characteristics can change over time, so a library should be periodically updated.
Every image has an element of random noise. This can be reduced by taking several light frames and averaging them together.A similar process can be applied to calibration frames.
Noise reduces by the square root of the number of images stacked: four images reduce the noise to half strength, nine reduce it to one-third strength.
Flat fields (flats) are taken through the same optical setup used to collect the light frames but with the instrument pointing at an evenly illuminated target.
This may be a specially constructed light panel or even a clear, evenly lit sky. Typically,
an image saturation of one-third to half the camera’s full saturation is ideal.
Bias frames are the shortest exposures possible with the camera aperture covered. They represent the base state of the camera’s pixels, which typically have small, non-zero values even when no image is present.
For more deep-sky image processing, read our guide to deep-sky photometry and spectroscopy.
Pete Lawrence is an experienced astrophotographer and a co-host of The Sky at Night. This article originally appeared in the February 2019 issue of BBC Sky at Night Magazine.


