
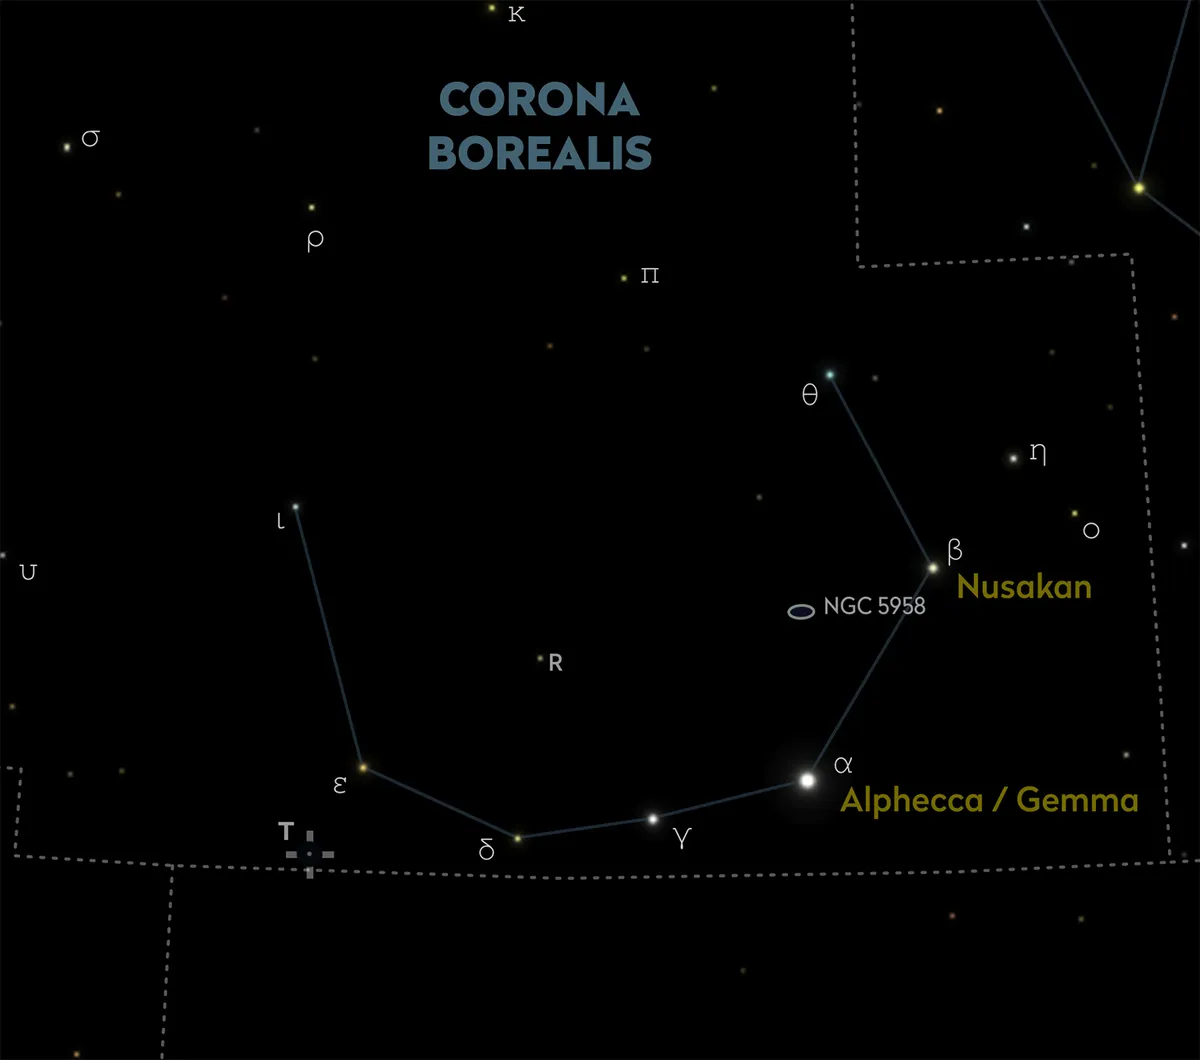
The constellation Corona Borealis, the Northern Crown, is the location of the so-called Blaze Star, T Coronae Borealis (T CrB), which is due to brighten any time soon, creating the effect of a 'new' star visible with the naked eye.
If you start photographing Corona Borealis now, you'll be able to track changes in the constellation over time, and may even capture the moment the Blaze Star brightens.
More on the Blaze Star

Why the Blaze Star will brighten
T CrB is a recurrent nova binary system, a pair of stars where one leeches material off the other – in this case, a white dwarf leeching from a red giant.
When enough material has accumulated on the white dwarf, a nuclear detonation large enough to be visible from Earth will occur.
While normally a dim 10th-magnitude star that calls for a telescope, in outburst T CrB is predicted to reach second magnitude, similar to mag. +2.2 Alphecca (Alpha (α) Coronae Borealis).
At its peak, T CrB should therefore be easy to see with the unaided eye.

After its last outburst in 1946, 80 years on from the first one observed in 1866, it was predicted that a follow-up would occur in 2026.
Activity from the star in 2015 suggested it may come earlier, in September 2024, and further predicted dates have come and gone since then.
The initial press excitement for a ‘bright new star in the sky’ has now waned, but the event should still occur.

Photographing the Blaze Star
When T CrB does brighten, the peak brightening is likely to last only a day or two, so you’ll need to be ready and hope the skies are clear enough to see it.
A shot of Corona Borealis without T CrB in outburst is a useful control image for comparison.
Photographing an entire constellation sounds simple – just point a general camera, or even a smartphone, at it, click and it’s done – but there are a few things to bear in mind.
For one, constellations aren’t always that exciting on camera, especially the larger ones, as their stars often don’t translate well to an image.
If you take a short exposure, the main stars can look puny, especially if they aren’t particularly bright.
A long, tracked exposure under a really dark, clear sky will certainly pick up lots of additional stars, but the main pattern can then get totally lost and become very difficult to identify.

Then there’s scale. If you image a small constellation like Corona Borealis using a wide-angle lens, it’ll become lost.
A close-up which frames just the constellation stars will show things better, but then you’ll be plagued by Earth’s rotation – if your camera isn’t on a tracking mount, the stars will trail.
Actually, this isn’t always a bad thing, as star trails can produce an interesting effect and are good for showing star colours.
Keep the trails too short, though, and they’ll look like they were unplanned. Conversely, allowing them to get too long means the constellation becomes hard to identify.

Light pollution is another issue affecting visibility, along with the natural light pollution of the Moon.
Zodiacal constellations may also gain extra ‘stars’ if any planets happen to wander through them during your capture.
So, there are a few challenges, but our step-by-step guide shows you how to capture the Crown and other constellations effectively.
Then you’ll be ready if T CrB makes its move.
Equipment
- Camera
- Tripod
- Remote shutter release
Step 1

First, what equipment will you use? Smartphones can capture constellations quite well, but if you’ll be zooming in, you’ll need to mount the phone on a tripod. DSLRs and MILCs definitely need mounting and you’ll need a lens that can cover the entire constellation plus a decent surrounding margin.
Step 2

To keep the constellation recognisable, capture stars down to around mag. +7 (consult a star chart app). A mid to low ISO is ideal, with a wide-open lens closed a stop or two to avoid edge distortions. Use the 500 rule to find an exposure time that avoids trailing; beyond this, consider using a tracking mount.
Step 3

Deliberate star trails can be effective, especially for revealing star colours. Instead of overexposing the star’s core, its light is smeared into a line, preserving the colour. Take an extended long exposure with your camera in bulb mode, using a lockable remote shutter release. Try 2, 5, 10, 15 and 20 minutes.
Step 4

Consider the shape of the constellation. Using a star map app, identify the boundary shape and orient your camera to best cover this. Shoot tall constellations in portrait and wide ones in landscape. For squarish constellations like Corona Borealis, consider what nearby objects to include for added interest.
Step 5

The weather doesn’t always play fair, but high misty conditions can sometimes be used to good effect, spreading a star’s light into a larger disc. As with star trailing, this can help spread the weak colour and prevent it from becoming overexposed. The biggest issue here is that you can’t control the mist layer.
Step 6

However you do it, document the date, time, camera, tracking, lenses and camera settings used. This is also recorded in the image’s EXIF header, which can be viewed using something like the freeware FastStone Viewer. Keep this record handy so if T CrB does go off, you’ll be ready!
If you photograph the Blaze Star, share your images with us by emailing contactus@skyatnightmagazine.com

