Star trail images look very striking straight out of the stacking software.However, they can sometimes lack contrast and, if you’ve shot them in a light-polluted area, the chances are that your white balance will be pushed towards pink.
Additionally, the colour saturation may need improving and there may be other flaws in the image caused by passing aircraft or telegraph wires.
All of these issues are quick and easy to fix and will take an already dramatic star trail photograph to the next level.
In this article, we’re using the free image editing software FastStone Image Viewer to make these final tweaks.
The starting image was shot with a Canon EOS 1100D DSLR camera with an 18-55mm lens and a Japan Optics wide-angle lens attachment.
150 images and 15 dark frames were shot in RAW, batch converted into TIFFs then stacked in StarStaX.
To open the image in FastStone, right click on it and select ‘Open with FastStone Image Viewer’.
All the menus used here will appear when you move your cursor to the left of the screen.
The first step is to straighten the image then crop it to remove vignetting from the lens attachment.
From the left-hand list select the ‘Rotation, Resize and Text’ menu and click on ‘Straighten’.
Use the slider that appears to straighten the image; in this case we corrected the angle of the windmill.
Click ‘OK’.
Cropping and framing
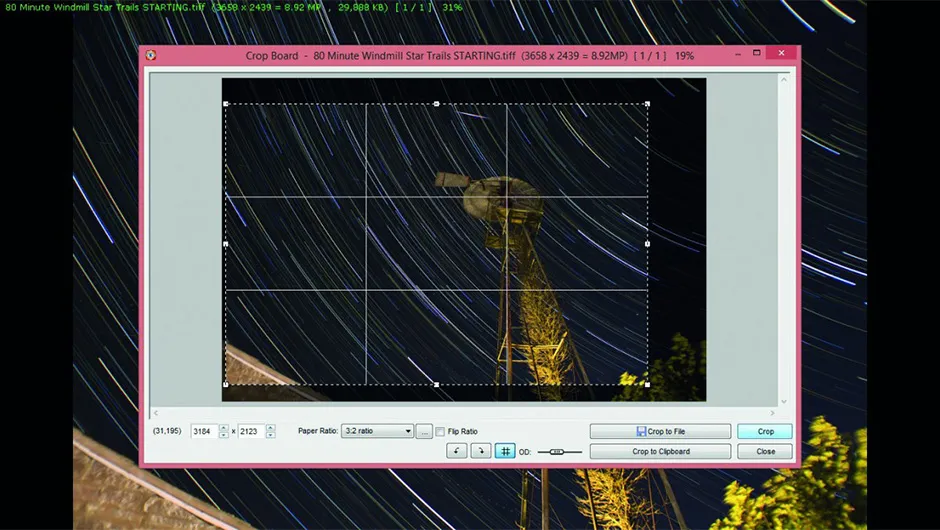
From the same menu, click on ‘Crop Board’.
Keeping to the same ratio that you shot the image in, position the cropping frame where you want the cropped area to be.
Here we’ve opted to place the windmill on the left vertical grid line to adhere to the ‘rule of thirds’, while cropping out a shrub that suffered from motion blur. Click on ‘Crop’ when finished.
From the ‘Colours’ menu, click on ‘Levels’.
The histogram shows the peak where most of the data is.
Drag the right-side marker to the left to brighten up the background and adjust the middle slider to attain the desired level of contrast.
Be careful not to overexpose the brighter areas and be gentle with the contrast.
Click ‘OK’ when you’re happy.
Next, click on ‘Adjust Lighting’. Using the sliders, adjust the highlights, shadows and contrast until the background is brighter but without losing too much contrast.
Then adjust the colour saturation a small amount up or down to make sure the star colours are apparent without looking too garish. Click ‘OK’ when done.
Also from the ‘Colours’ menu, select ‘Adjust Colours’ and use the red, green and blue sliders to correct for sodium light pollution.
If necessary you can change the hue and tweak the saturation again.
A little goes a long way with these sliders so keep changes subtle. Click ‘OK’ when finished.
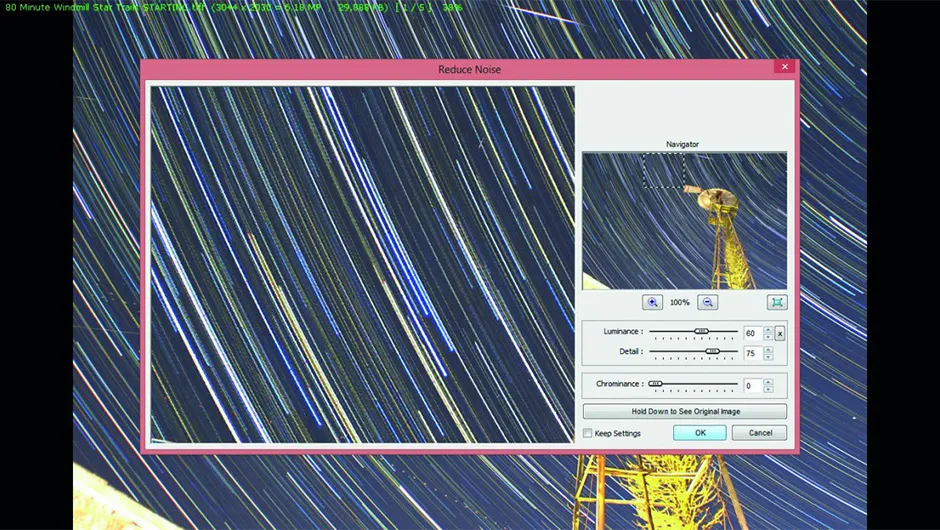
Even when you’ve included darks, your image may still suffer from noise.
Luckily FastStone has an excellent noise reduction tool.
From the ‘Colours’ menu, select ‘Reduce Noise’.
Drag the preview window around until you identify the noisiest part of the image.
Drag the luminance slider up until you get a smoother background without losing detail; using the ‘Detail’ slider you can increase how much detail is preserved.
Play with both sliders until you have a good balance between the two, then click ‘OK’.
Send in the clones

Next you can make any necessary cosmetic adjustments such as eliminating aircraft trails, satellites and hot pixels not removed by the darks.
This can be achieved using the ‘Clone and Heal’ function found in the ‘Rotation, Resize and Text’ menu.
The idea is that you replace a small affected patch of your image with a similar non-affected one nearby.
Click on ‘Clone and Heal’ and make sure you have the ‘Clone’ button checked.
Increase or decrease the size of the brush using your mouse scroll button, though normally it’s best to use as small a selection as you can.
Select an area close to the part you need to clone out (and obviously as similar as possible, just without the offending glitch), hold down the Control button on your keyboard and click the mouse on that area.
Now when you click over the problem section, it will be replaced by the area you cloned earlier.
With star trails it is essential that the trails form a continuous straight line so take your time and get things lined up properly.
Repeat this step anywhere on your image that it’s needed.
Finally, if necessary, go back and tweak the levels once more before saving.
To save your image, select ‘Save as’ from the ‘File and Slideshow’ menu.
Now you’re ready to wow friends and family with the gracefully arcing beauty of your final image.
Mary McIntyre is a dedicated astro imager based in Oxfordshire