With a garden observatory at home, you can simply open the roof and in a few minutes you’re observing. When it’s time to stop, just close up and head indoors.
There are many styles of home observatory. Commercially made glass-reinforced plastic domes are an instant – although expensive – solution, but home-built options also include apex-roofed sheds with roll-off or lift-off roofs.
If space is tight you can make a small enclosure, which rolls back on wheels. Every style has its merits and drawbacks, but the great thing about designing and building your own observatory is that you choose the best size, layout and appearance for your particular situation.
More DIY Astronomy projects:
- How to build a rolling telescope dolly
- Create a protective shield for your telescope pillar
- How to build an astronomy accessories case
Here we will outline the construction of a domed-roof observatory. This is ideal for a site with strong winds, local light pollution and limited space because the dome shields the telescope and observer.
First we'll consider the location and show how to cast the concrete foundations, then we'll deal with the framework for the walls and floor, and then we'll construct the dome and fit out the interior.
The construction methods and principles described can be used with other designs and the materials and techniques will be familiar to anyone with DIY experience, so read on and begin dreaming of your own miniature ‘Kitt Peak’.
Part 1
For this part of the project you will need:
- Marking-out tools A tape measure is essential, as is a spirit level
- Mixer and barrowHire a cement mixer and use a wheelbarrow to transport wet concrete
- PegsMake pegs from 1x2-inch timber
- Shutter board and toolsA handsaw, hammer, nails and a selection of plywood or chipboard pieces
- Space and shovel For shifting ballast and concrete
Find a location for your observatory
Carefully consider the siting of your observatory. Spend several nights with your telescope on a portable mount, trying different locations.There are a number of factors to consider, all influencing where you get the best views.
Remember that for planetary and lunar observations a clear view of the southern sky is essential.
Could small trees eventually grow and block your view? Do house lights cause a nuisance? Is the site secure? Make a note of the optimum position and decide how high the mount should be.
Once these practicalities are resolved, check that you have permission to build. With the aid of sketches or photos of similar projects, talk to your family – especially if a favourite flowerbed will require ‘modification’!
It’s also a good idea to check with your local planning authorities. Temporary structures less than 3m tall are usually allowed, providing that they are not too close to buildings or beyond the boundaries set by building lines.
An informal chat with the planning department may be all that is required. Inform your neighbours as well – a good relationship helps things run smoothly.
If they feel involved, they will more readily understand future requests to trim bushes and turn off security lights.
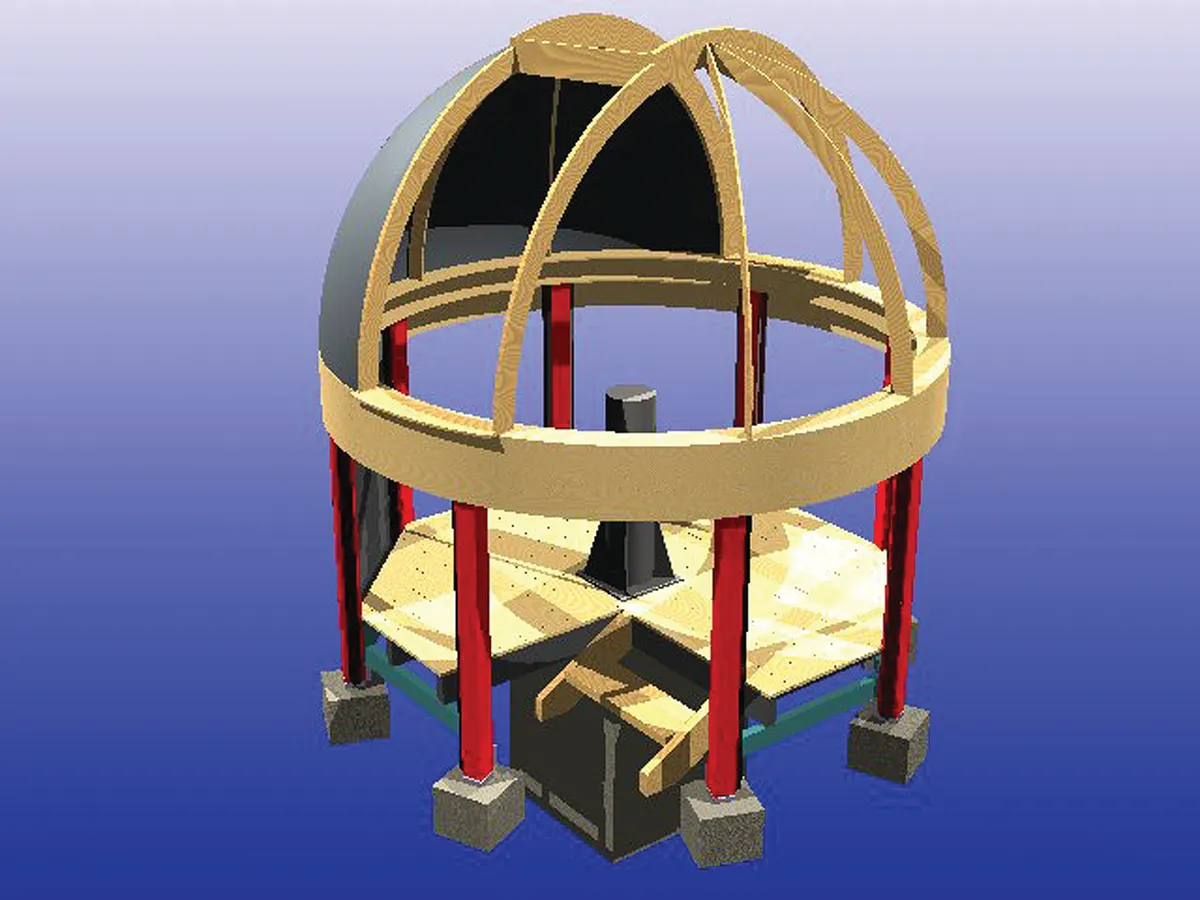
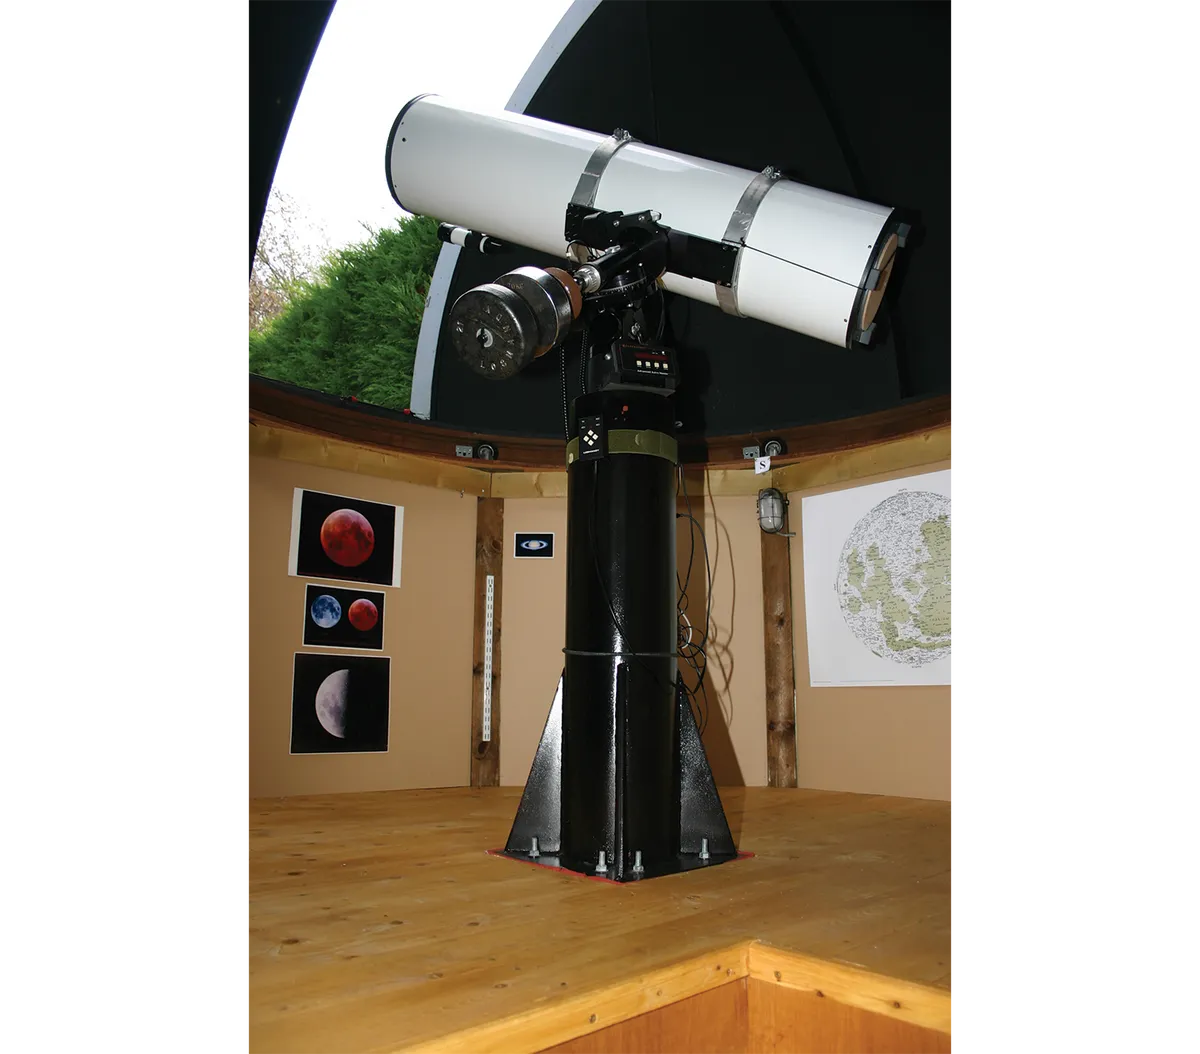
Our design has eight concrete pads below the wall posts and a large block (almost 1m3) for the central pier. Bolting the mount to this solid mass of concrete keeps it aligned and stops vibrations at the eyepiece when walking around on the floor above.
Because the floor is raised, additional shuttering (wooden support) was used to provide a short column on which to fix the steel pier.
Eight M12 threaded rods a metre long were cast into this column to provide reinforcement, and 50mm sections were left sticking up to which the pier base was bolted.
Sawing and nailing together the shuttering, and mixing concrete, is hard but rewarding work. Neatness isn’t vital, but ensure that each surface is level and smooth to avoid problems later on.
We used 1.5m3 of ballast and 12x 25kg bags of cement altogether, mixed in a ratio of about 6:1.
While you are waiting for the concrete to harden, you can begin preparing the timber sections.
Follow our step-by-step guide below, and then we'll get on to finding out how to construct the framework for the walls and floor.
Step-by-step
Step 1
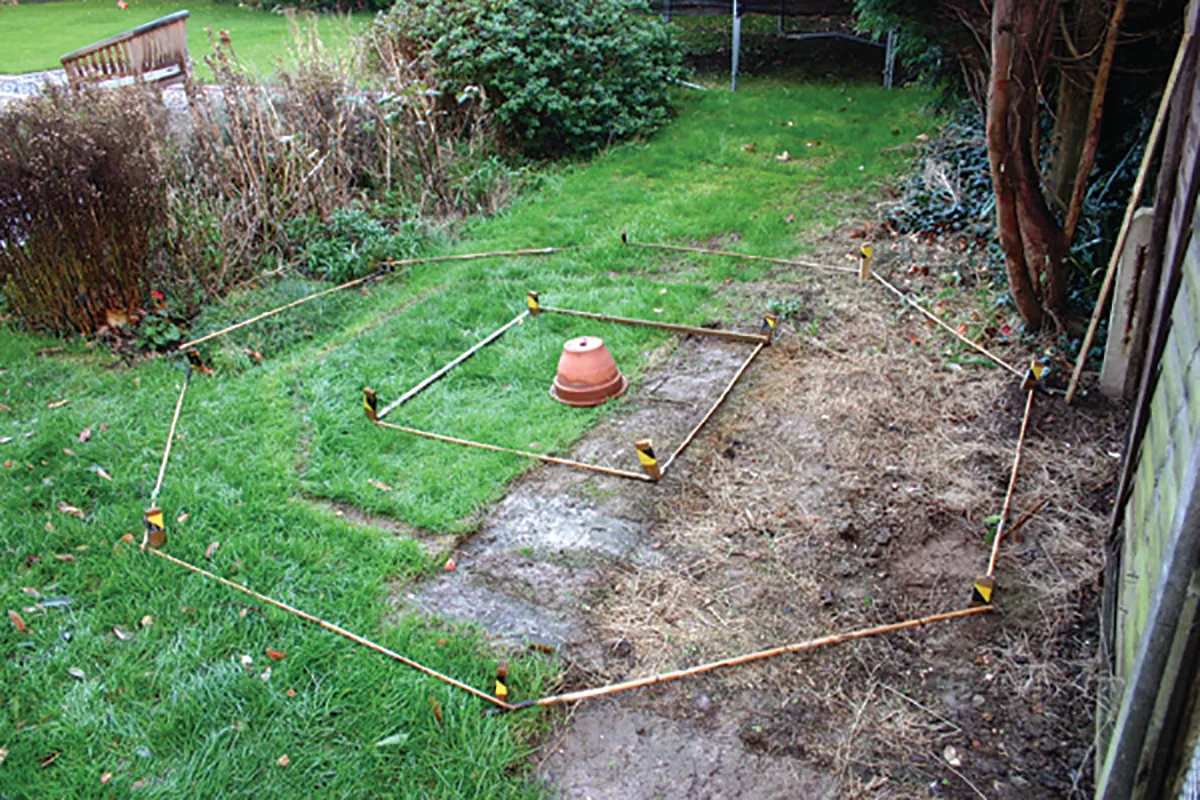
Carefully mark out the ground using wooden pegs, straight poles and string. Peg tops, which are used as a reference for the top of the concrete, should all be hammered down to the same level and checked with a spirit level rested on a long bar.
Step 2
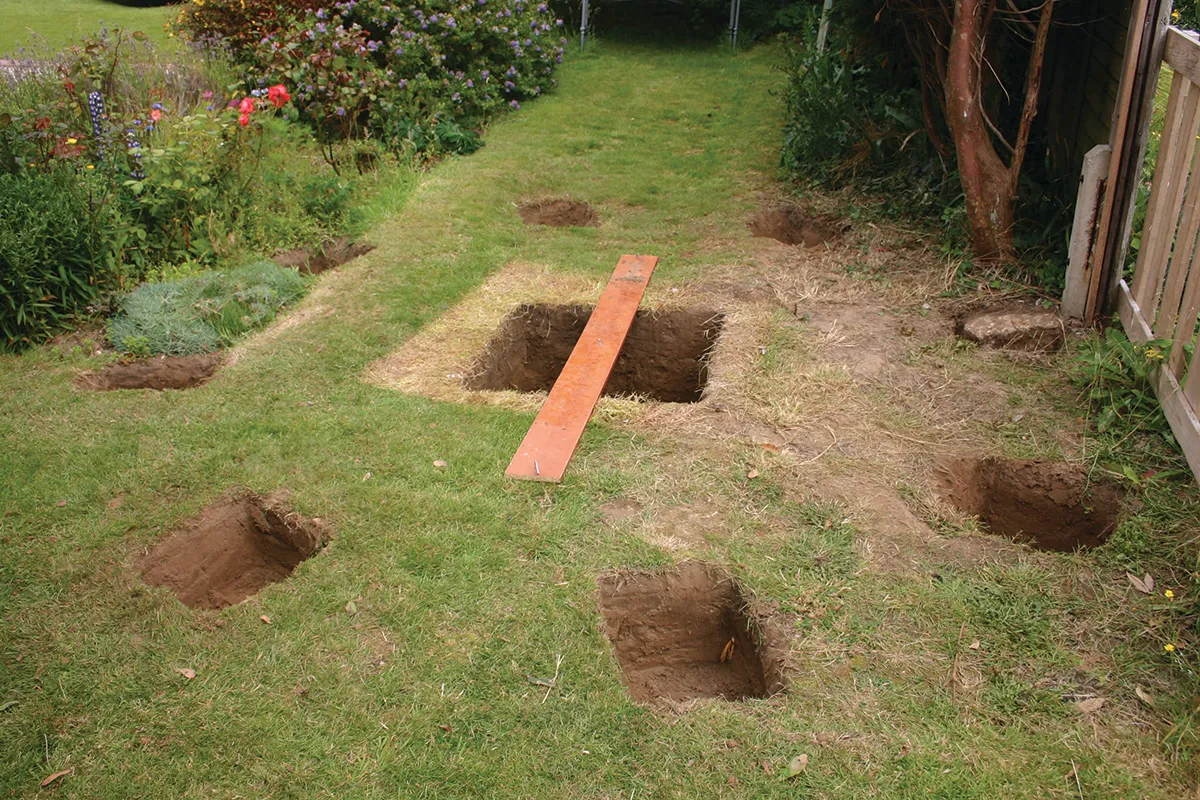
Dig the pad holes 400x400mm (250 to 400mm deep) and central pier hole (900x900x900mm). If you dig the holes carefully you may not need any shuttering, but off-cuts of timber or plywood nailed together can be used to keep the edges neat.
Step 3
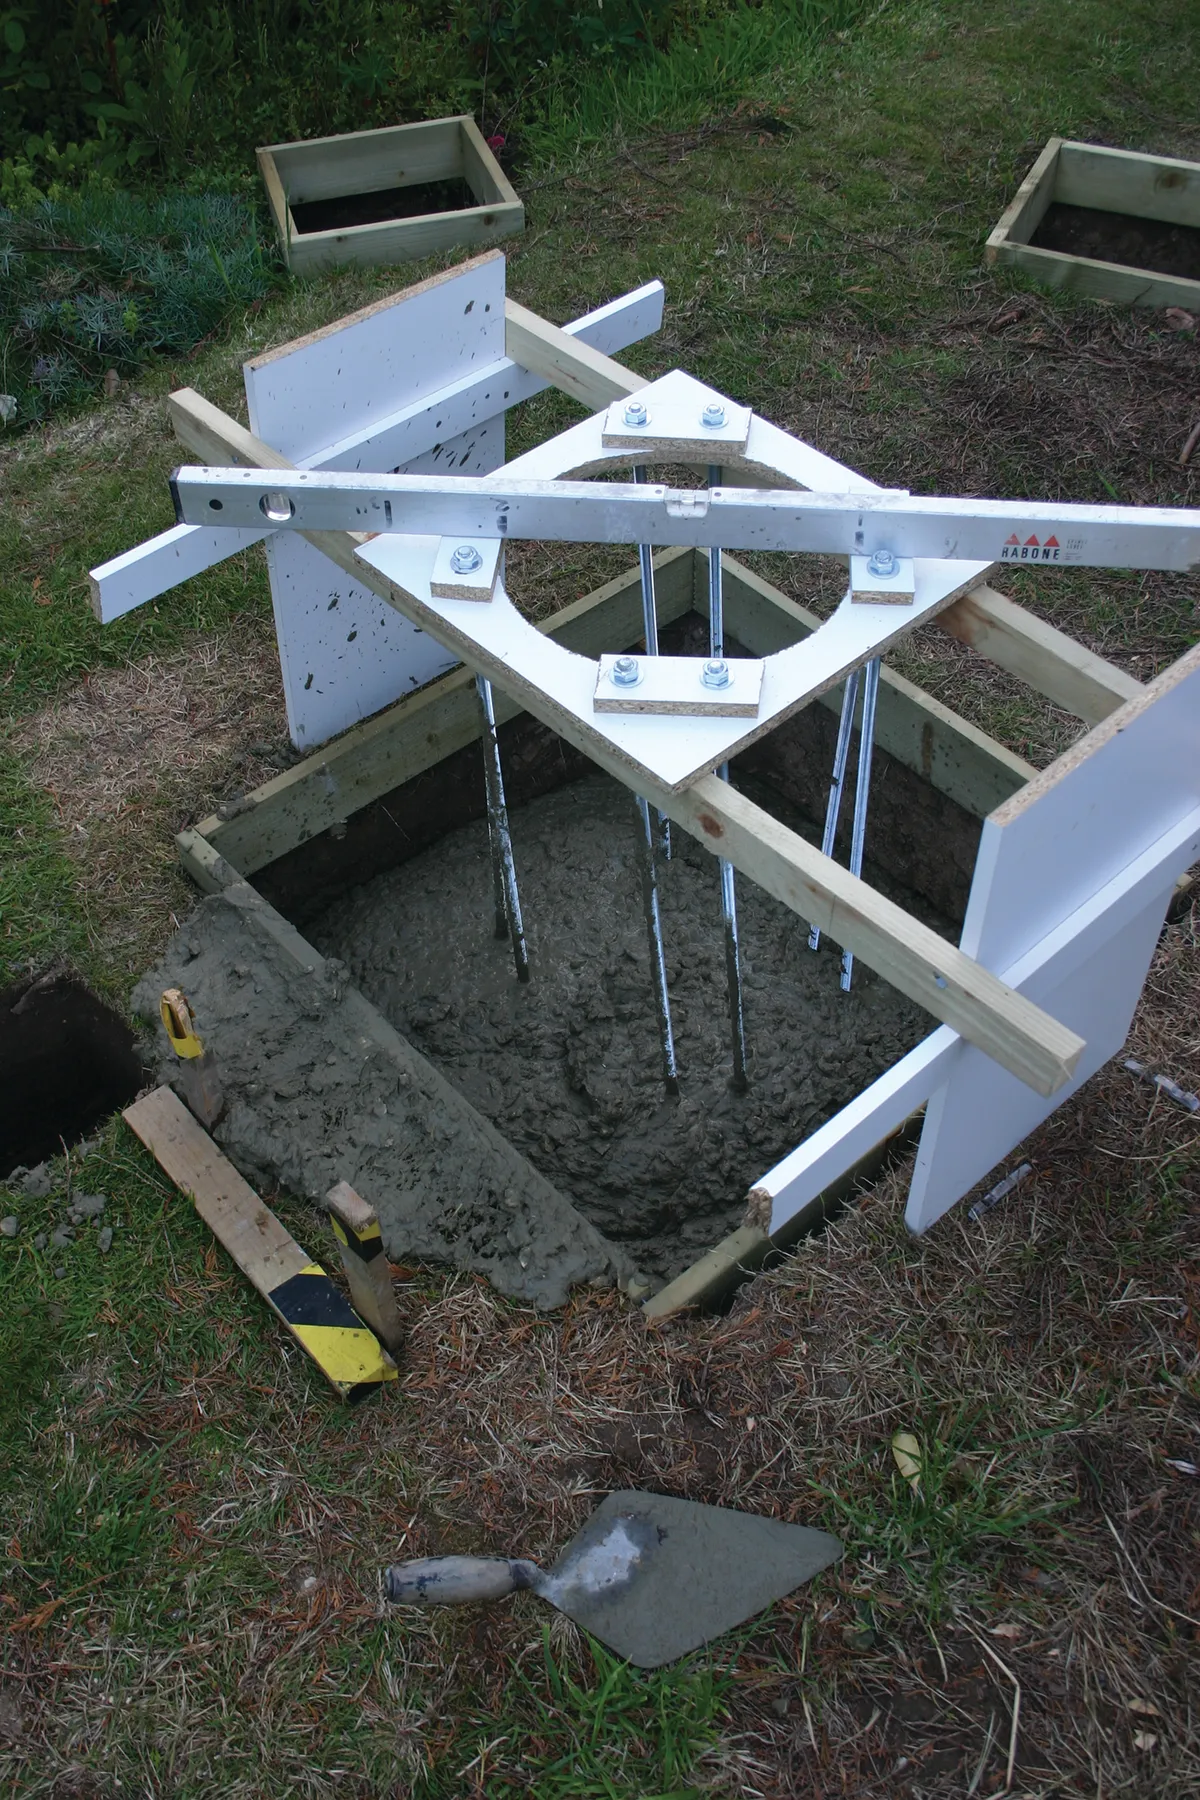
Here we’ve used chipboard to make shuttering, which gives the concrete neat edges and sides. Make a frame to hold the eight 1m-long threaded rods in place while the concrete in the central pier base sets. Note the spirit level for accuracy.
Step 4
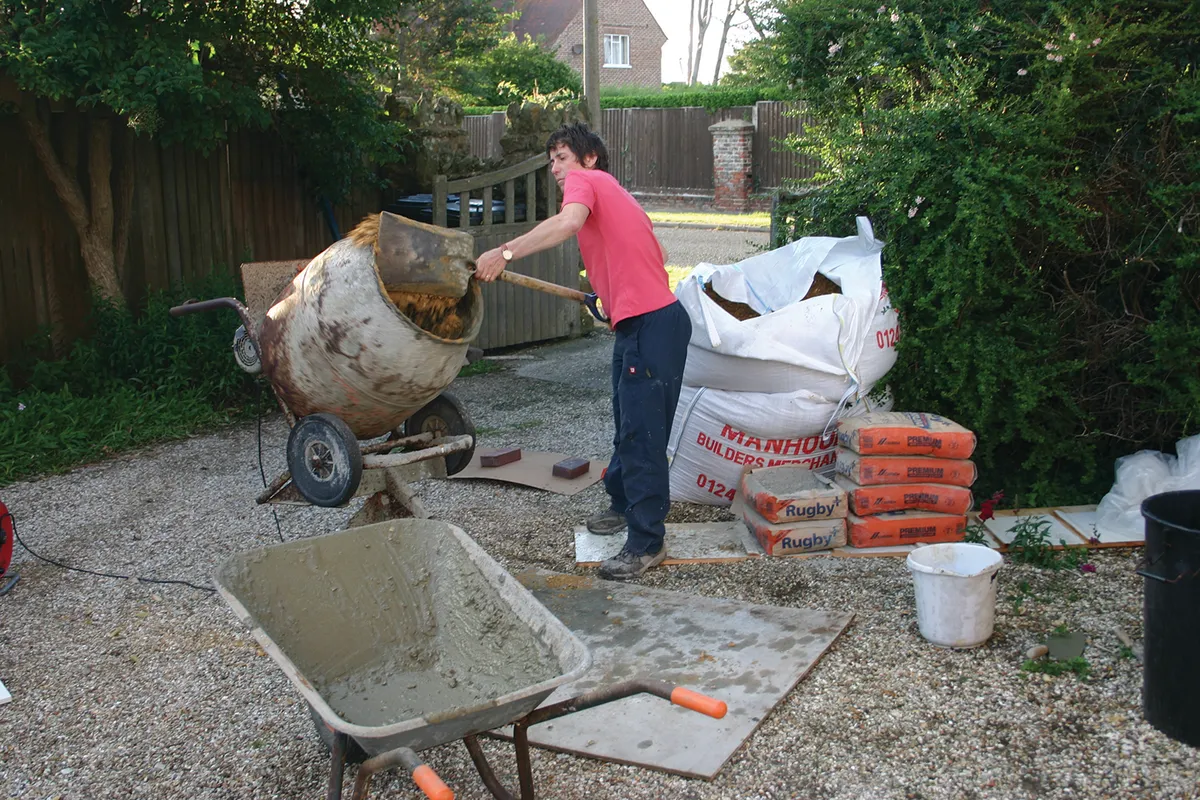
A cement mixer (and plenty of help) makes mixing the concrete easier. Protect grass and plants from cement dust. Add enough water to make a ‘dropping’ consistency like thick porridge. Wash all your tools before the concrete on them sets.
Step 5

Pour in the mix and pat it down to remove air pockets. Top up to the correct level then use a trowel to smooth the surface. Make a square frame to form a lip on top of the pier base. This will help you align shuttering for the top part.
Step 6

Once the concrete begins to set, fit your frame around the upper section of the pier and pour in the remaining concrete. The shuttering can be carefully removed after a couple of days, but don’t chip any edges, which take much longer to go hard.
Part 2
Now we'll show you how to construct the observatory’s walls.
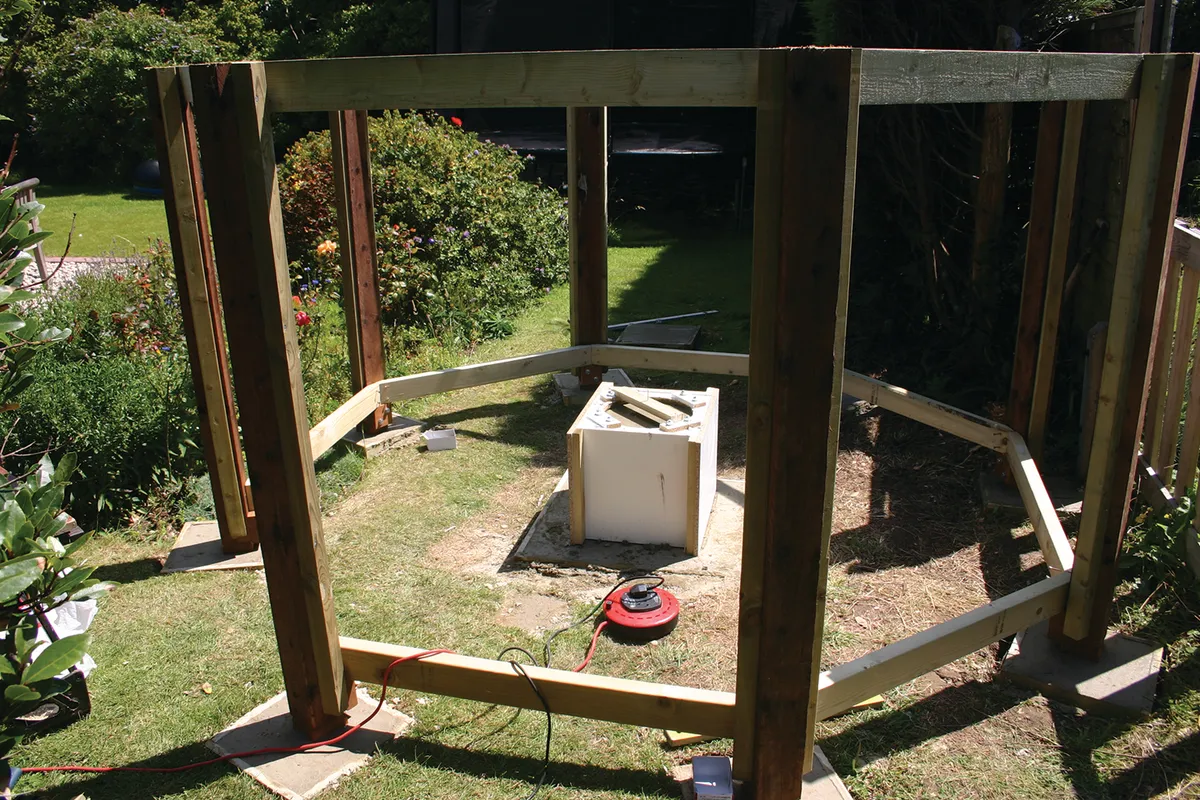
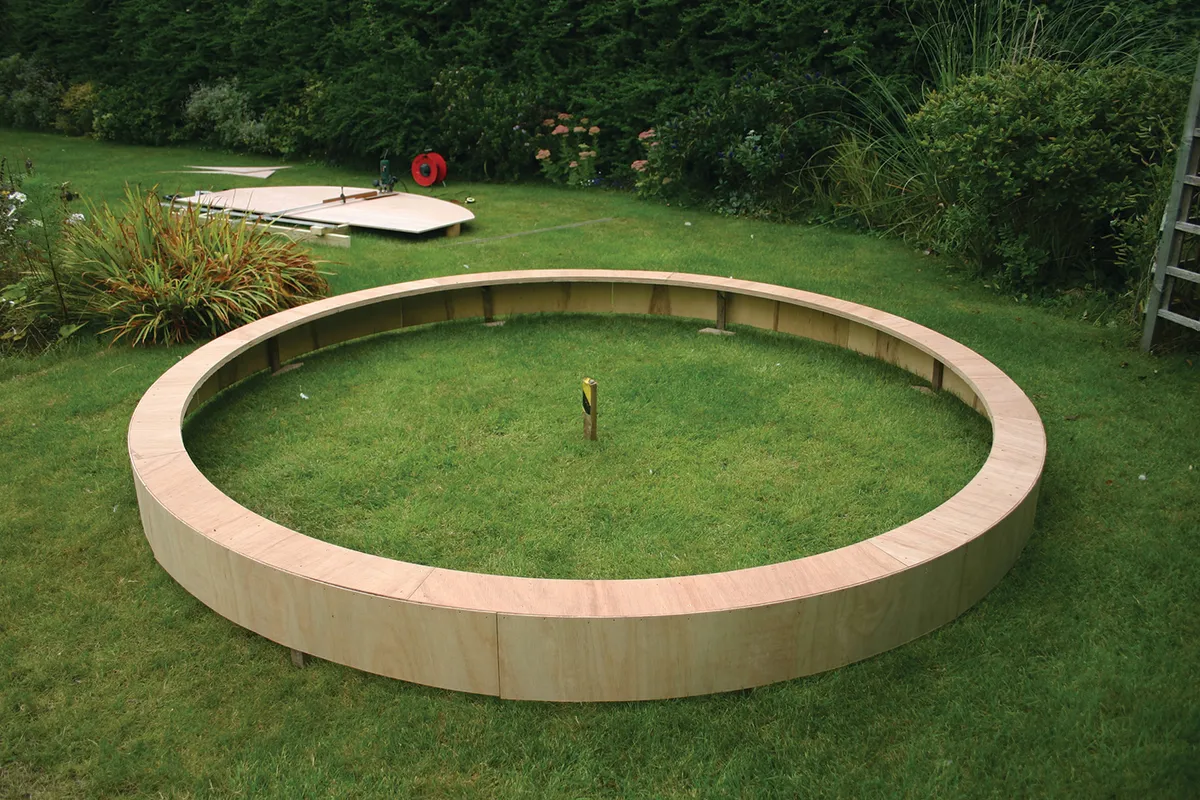
Once all the concrete work we covered in Part 1 is complete, it’s time to start work on the walls and floor structure. This doesn’t involve any complicated joints, just careful cutting and fixing with screws and nails. You may need help to erect the posts, but once they are upright, construction is fairly straightforward.
The eight posts have shaped strips on either side, to which the wall cladding will be fixed. They also have hardwood blocks attached that hold the joist support beams, plus pads on the bottom.
We used hardwood off-cuts for these pads, but you could improvise with thick plastic or ceramic tiles – anything that separates the wood from the damp ground.
For this part of the project you will need:
- Power toolsA circular saw, router or jigsaw for cutting the wood (you can hire these tools)
- Timber Eight 153cm 100x100mm treated fence posts, 150x50mm timber for the floor joists, 100x50mm timber for the joist beams, and a sheet of 18mm plywood
- Wood preservative Water-based fencing paint is available in many colours
- Woodwork toolsA handsaw, plane, hammer and screwdriver, plus nails and screws.
You should first loosely erect the structure and then make adjustments so that the posts are evenly spaced and upright. An off-cut of wood, bolted to the central column, provides a useful reference point to take measurements from.
Tap a nail into it and you can use a length of string to ensure all the posts are the same distance from the centre. If some of your concrete pads aren’t quite level, you can add a little packing under the relevant posts.
When you’re happy with the alignment, screw all the parts tightly together. A powered screwdriver is a great help here.

When you come to the joists, the first to place are the long ones either side of the central column. Leave a gap of about 10mm between the concrete and the wood so that vibrations from walking on the floor aren’t transmitted to the telescope.
We used 75mm woodscrews screwed in at about a 45º angle from either side to fix the joists onto the supporting beams.
Next, fix a joist at right angles to form the step. The remaining joists are placed at an equal spacing (about 400mm apart) until you reach the edges.
Some angled cuts are needed at the edges or else the wall cladding may not fit properly.
In between the main joists, nail short sections of the same timber to brace the structure. Our joists were 50mm wide x 150mm deep, but if you wantto calculate your own depth, use the following formula as a guide:
Depth in mm = [(span in mm ÷ 600) x 25] + 50
We decided not to fix the floorboards to the joists until the dome was in place, as rainwater could damage them.
Next, cast a simple concrete floor under your step. Alternatives could be a gravel patch or a simple paving stone. This will help to prevent wear and will stop muddy footprints getting into the dome after wet weather.
For our cladding we used sawn and treated ‘feathered edge’ fencing boards. These are screwed into place with an overlap of about 30mm, starting close to ground level with the thin sides at the top.
A smoother, but more expensive, option is interlocking tongue-and-groove board, and a cheaper option is plywood; the choice here is a personal one because the outward appearance will be quite different for each.
A dark brown preservative paint was then applied to the outside. If you line the inside of the observatory with plywood or coated hardboard panels, it provides a smooth surface for putting up your sky charts and astrophotos.
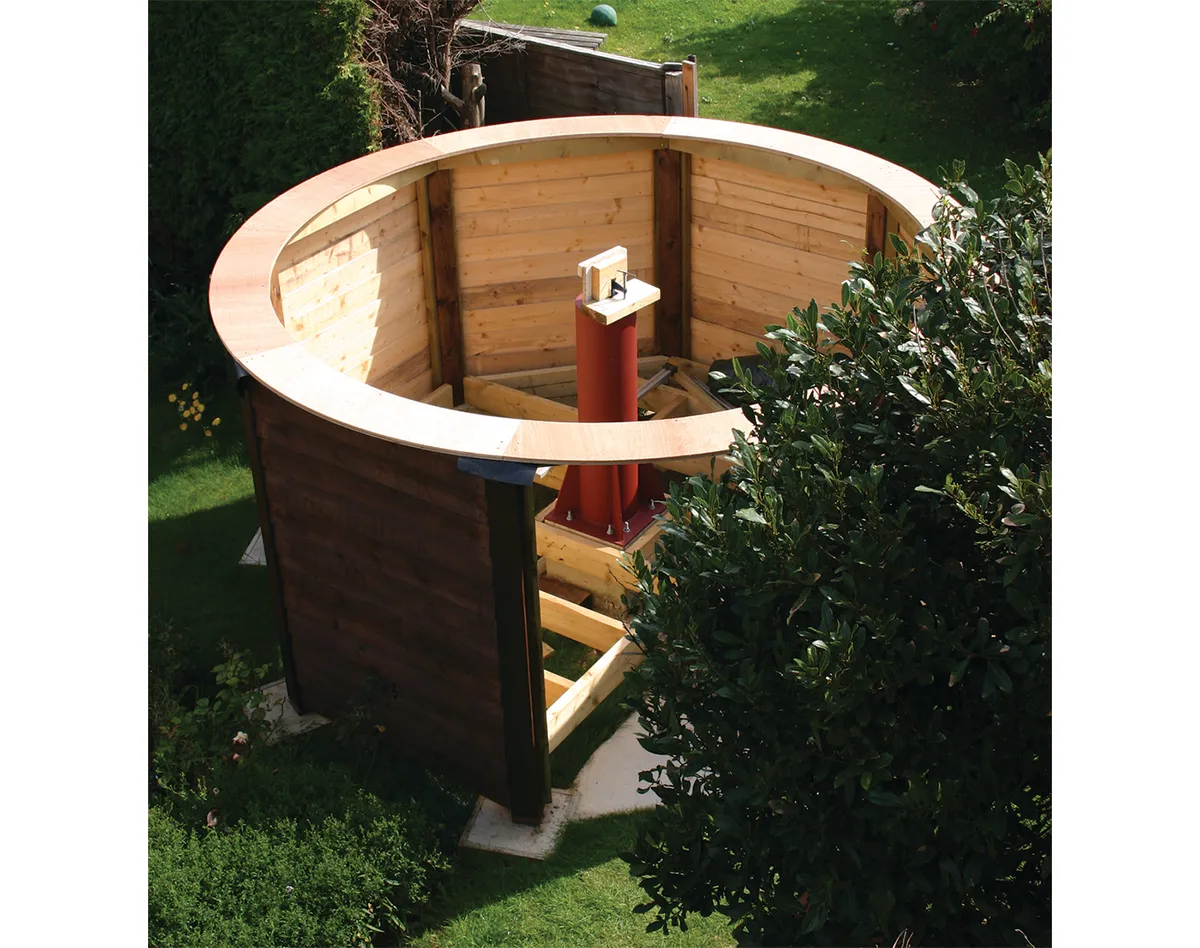
Finally, cut the eight sections of the plywood ring that fits round the top of the posts. These provide a fixing surface for the dome wheels and also make a great shelf for eyepieces and cups of tea.
We made a jig (a frame to hold a piece of wood in position) that enabled us to cut the plywood sheet to the required radius using a router, but it could also be cut with a jigsaw.
At this stage you should also bolt the steel pier to the central concrete column. The top of the pier was used to hold our router on its long arm to trim the ring to a perfect circle once the pieces were screwed to the post tops.
With the ring on, don’t forget to cover up your construction with plastic sheeting to protect it from rain before we show you how to construct the dome in Part 3 below.
Step-by-step
Step 1
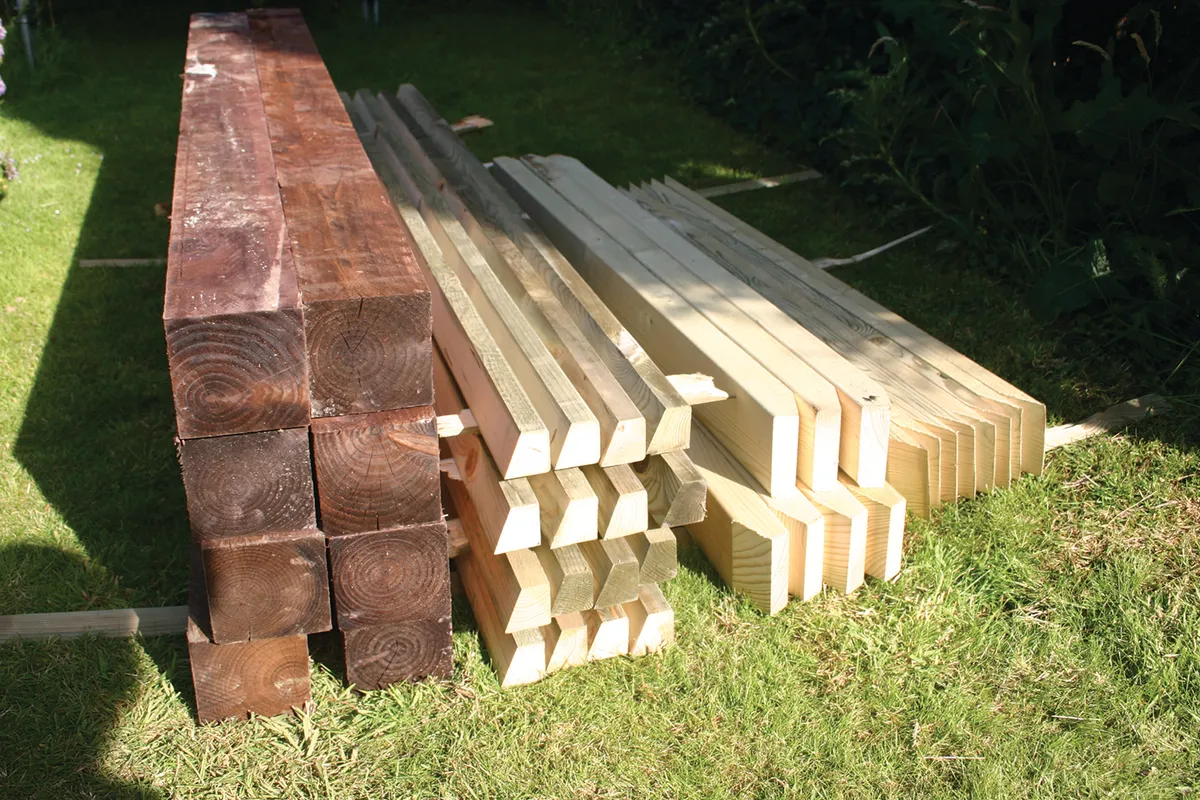
Cut sections of timber for the eight posts, joist supports and top bracing. A circular saw will make short work of the angled cuts, but it can be done with a handsaw. All our timber is pre-treated, but freshly-exposed cuts require preservative.
Step 2

Screw together the sections for each post. Use galvanised coach bolts to hold the hardwood blocks that will support the floor and hardwood pads below the posts as they are more water resistant. Coat all the wood with preservative.
Step 3
Assemble the posts and joist supports. Use one woodscrew for each joint at first, to allow small adjustments to be made. All posts must be upright and evenly spaced. You can still see the wood supports on the central column in this photo.
Step 4
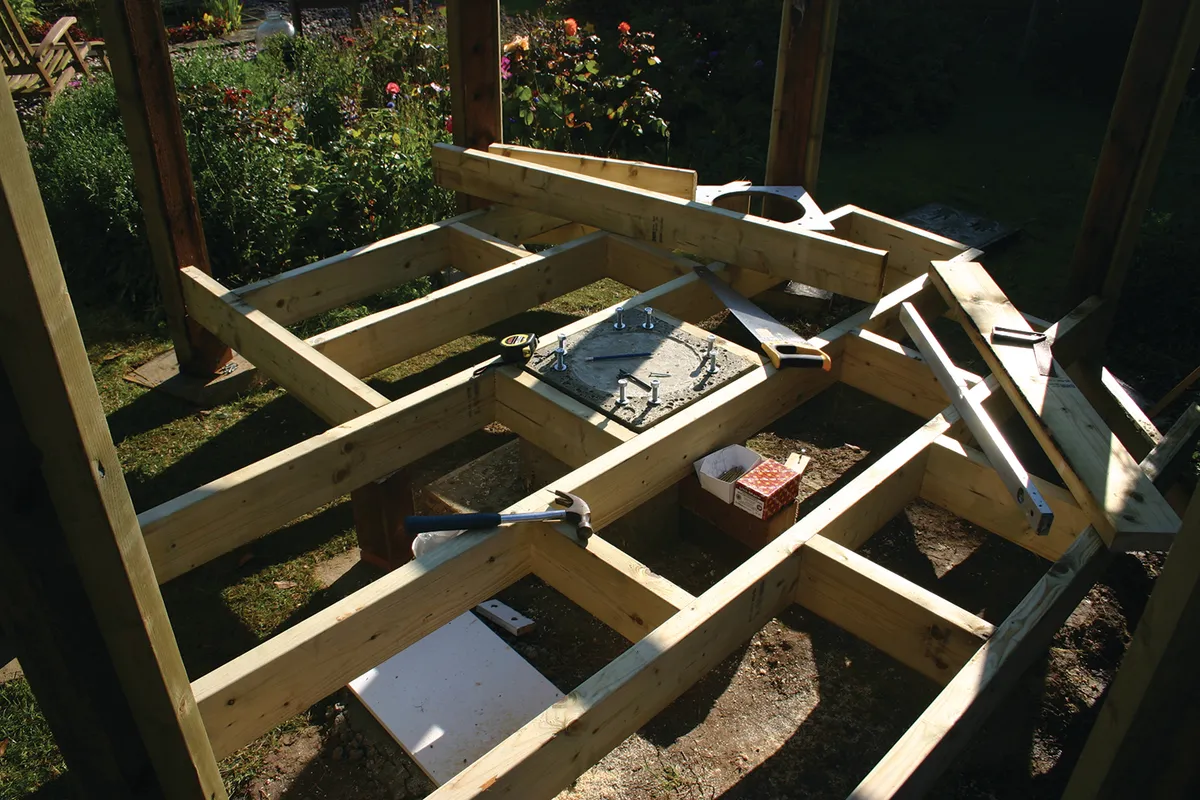
Cut the floor joists and nail them into place. Make sure there is a gap between the column and the joists to prevent vibrations. Short sections of joist between the main lengths stiffen up the structure. Note the gap on the top left for the step.
Step 5

Nail the strips of wall cladding between the posts. Start at ground level and work up, trimming the top board if necessary. Note the optional cast concrete floor inside the entrance to the observatory. The short ‘leg’ under the step provides support.
Step 6

The steel pier is bolted to the column using the protruding threaded rods. A temporary wooden block clamped to the top of the pier (see image on page 81) can be used (with a string line) to help set out and trim the ring sections on top of the walls.
Part 3
In this part, we'll show you how to build and install the dome.
Part 3 of our observatory project, building a hemispherical dome, might sound tricky. But the curved ribs are cut using a simple jig that you can make yourself, and because the dome is coated with a strong, glass-reinforced plastic (GRP) layer, you can get away with a few gaps.
It’s important to build the dome on a level surface, so that it rolls around smoothly on its runner when fitted.
Building ours, we supported it on a ring of level wooden pegs hammered into the lawn. A central peg with a string line is useful for checking that the shape is circular as work progresses.
Spend some valuable time making a jig to hold your router or jigsaw. We made a frame on which to rest the sheets of plywood and added a long swinging arm. Our router was clamped at various positions along the arm to cut different radiuses.
For this part you will need:
- Glass reinforced plasticWe used chopped strand matting to cover the dome and reinforced the joints with chopped strand tape. Resin bonds the matting together
- GRP tools / equipmentMixing buckets, old rollers and brushes, acetone, safety gloves, overalls
- Power tools A router or jigsaw to cut the curved plywood parts of the ring
- Timber12mm plywood for the ribs and main ring. Thin (2mm approx) plywood for the skirt and shutter skin. Hardboard for the main dome panels
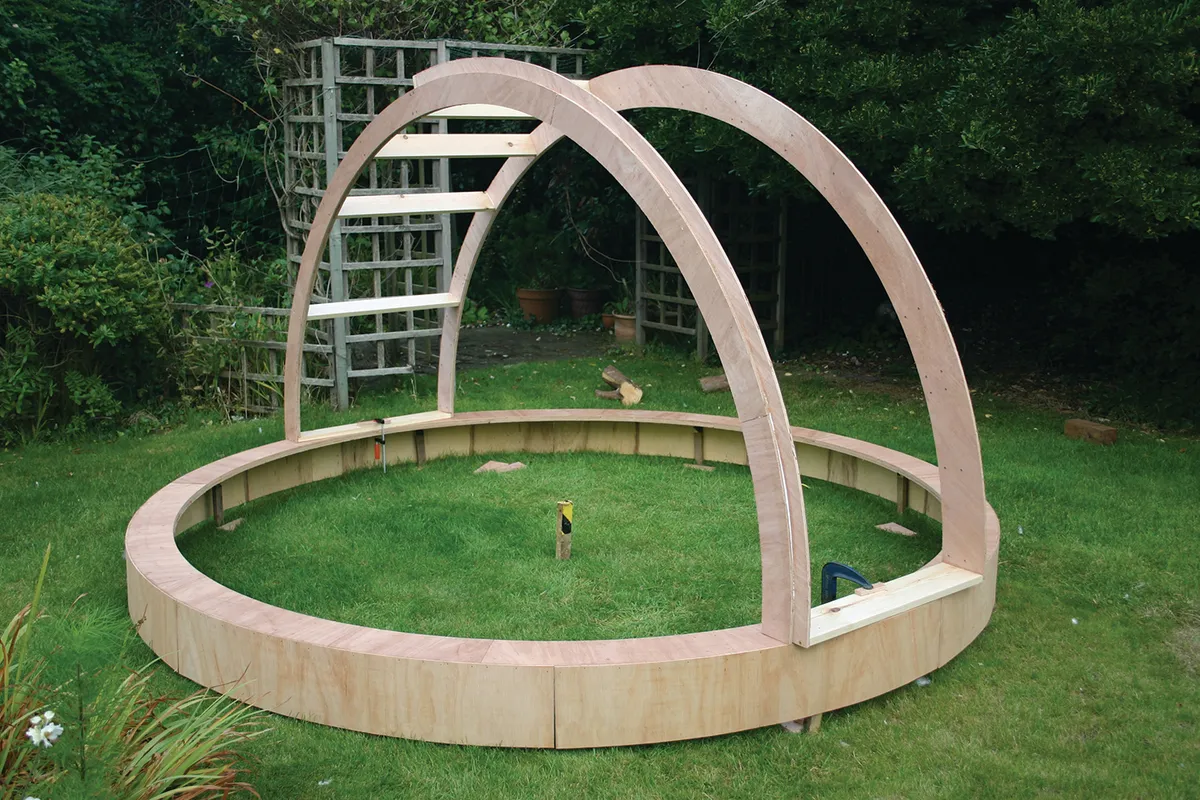
The main ring is made from two layers of 12mm plywood, and each layer is made from eight segments. Glue and screw the layers together with the joints staggered to form a rigid, 24mm thick ring.
A thin plywood skirt was glued and nailed to the outside edge. Because the ring was supported on raised pegs, the skirt didn’t have to take any weight during construction.
Next, two continuous rib sections were cut to form the shutter opening. These were reinforced with a second layer of plywood.
Around the opening, this second layer protrudes to form a lip that keeps the rain out. Two similar ribs were then added at 90° to the shutter ribs.
We used pre-drilled steel brackets and screws to fix them at the top and bottom. Temporary wooden spacers inserted between the shutter ribs kept the opening parallel.
The four remaining ribs were cut from one layer of plywood and fixed at 45° to the shutter ribs using butt hinges.
Because of the geometry, the hinges don’t move, and using them means you don’t need to make a tricky joint!
Putting your observatory together
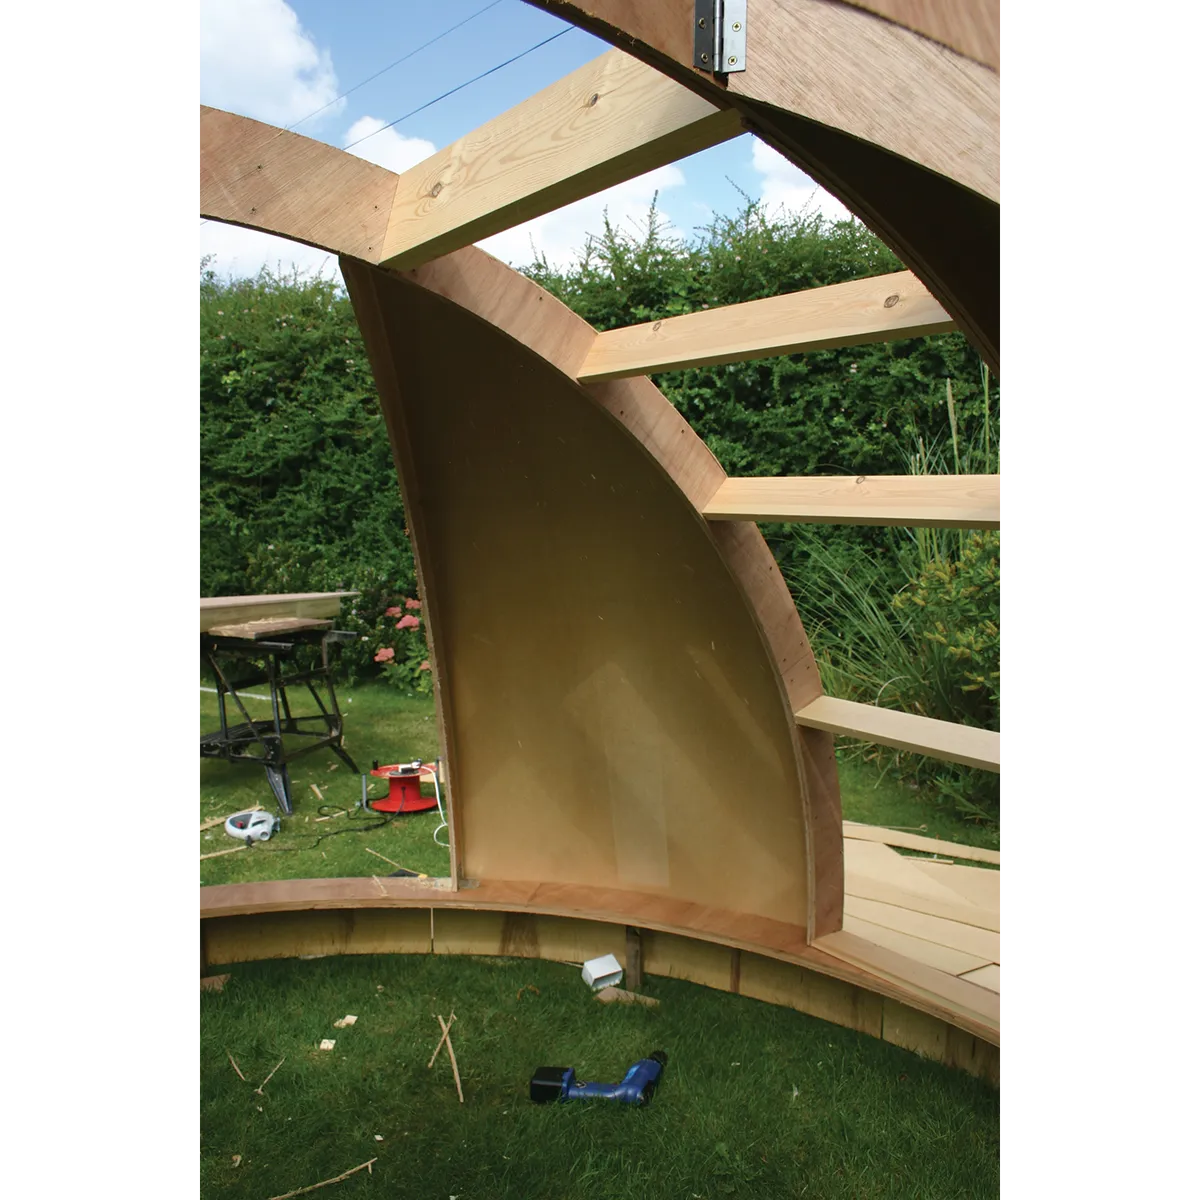
Adding the hardboard skin is easier with an extra pair of hands. We held a whole sheet in place over the relevant ribs and traced the shape from inside with a pencil.
Then we cut out each panel using a jigsaw and held it up to the ribs to check the shape, before gluing and nailing them in place.
A similar technique is used to make the two sections that form the shutter. Tubes of gap-filling adhesive (available from builder’s merchants) are excellent for this.
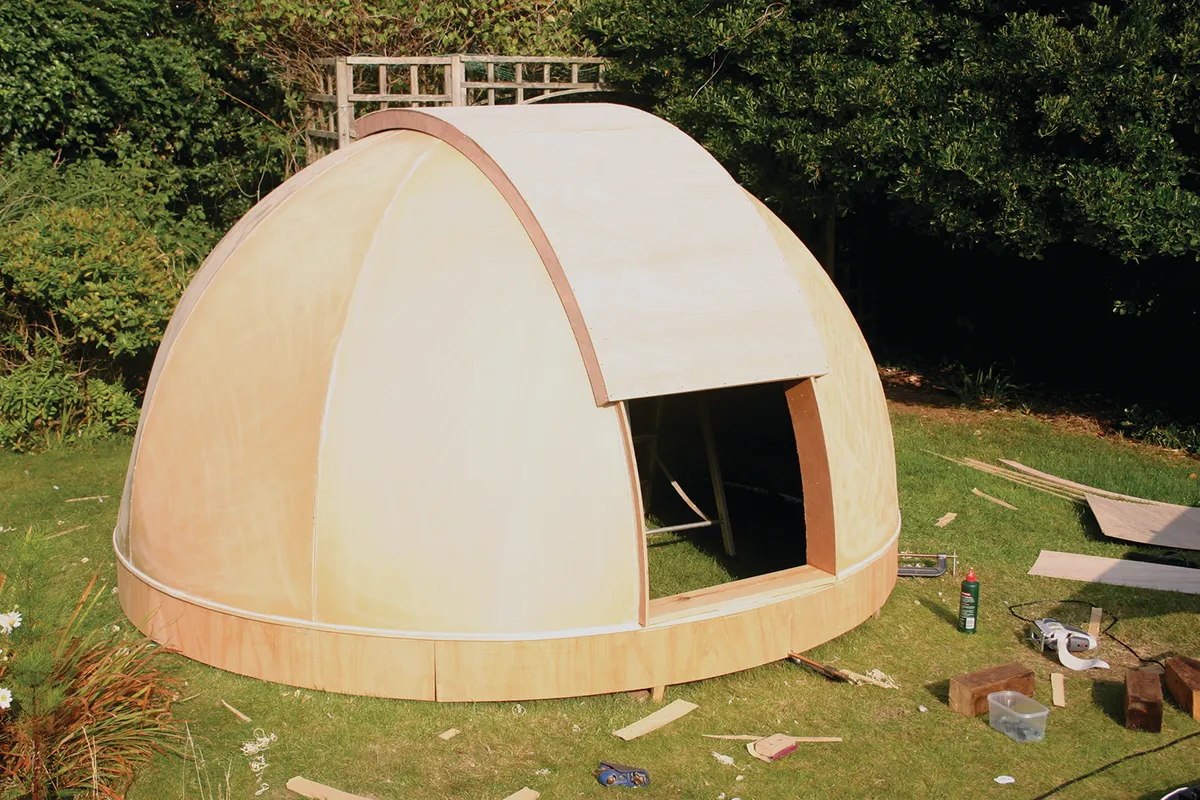
Once all the panels were fixed, a generous squirt of glue was used to seal and reinforce all the joints and any rough edges were sanded down. Rough-sanding the whole surface helps the GRP resin to make a good bond.
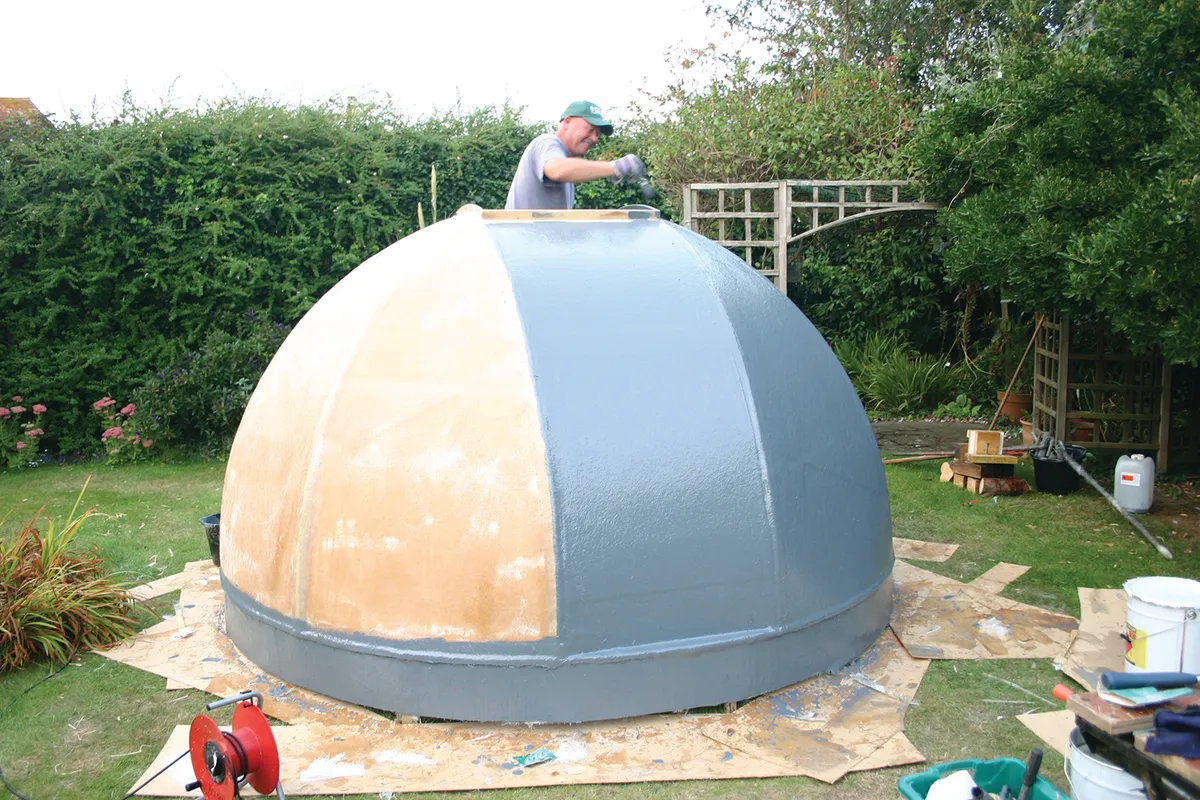
Adding the GRP layer is fun, but messy and sticky. Do read the manufacturer’s safety guidance, work in a ventilated space – preferably outside – and certainly avoid contact with the skin.
The process involves applying resin to the whole surface, sticking strips of GRP matting over each joint to make them smoother and stronger, then sticking a layer of GRP matting over the whole surface of each panel, working it into the resin with a roller.
Lastly, we applied a layer of grey-coloured gel coat, which seals the surface and provides the required colour.
When this is set, there may be some trimming and sanding to do, but the dome will require no further finishing and becomes rigid, waterproof and strong.
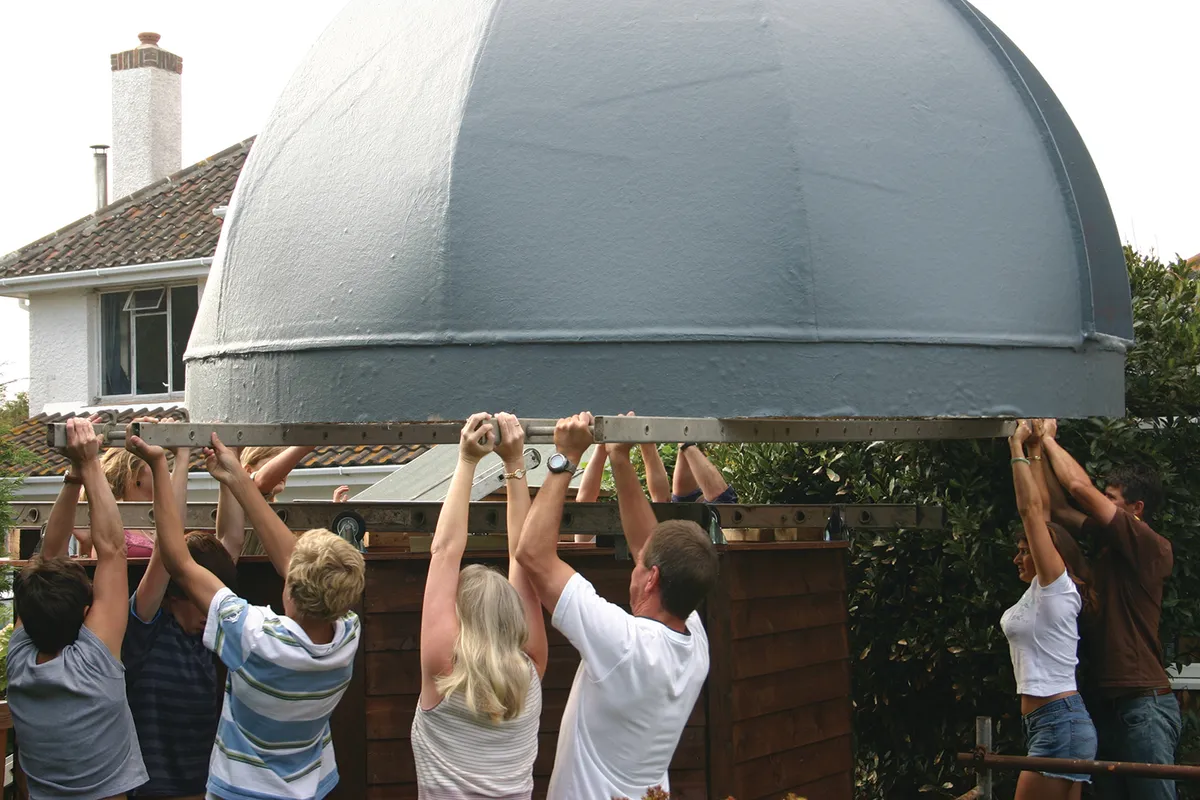
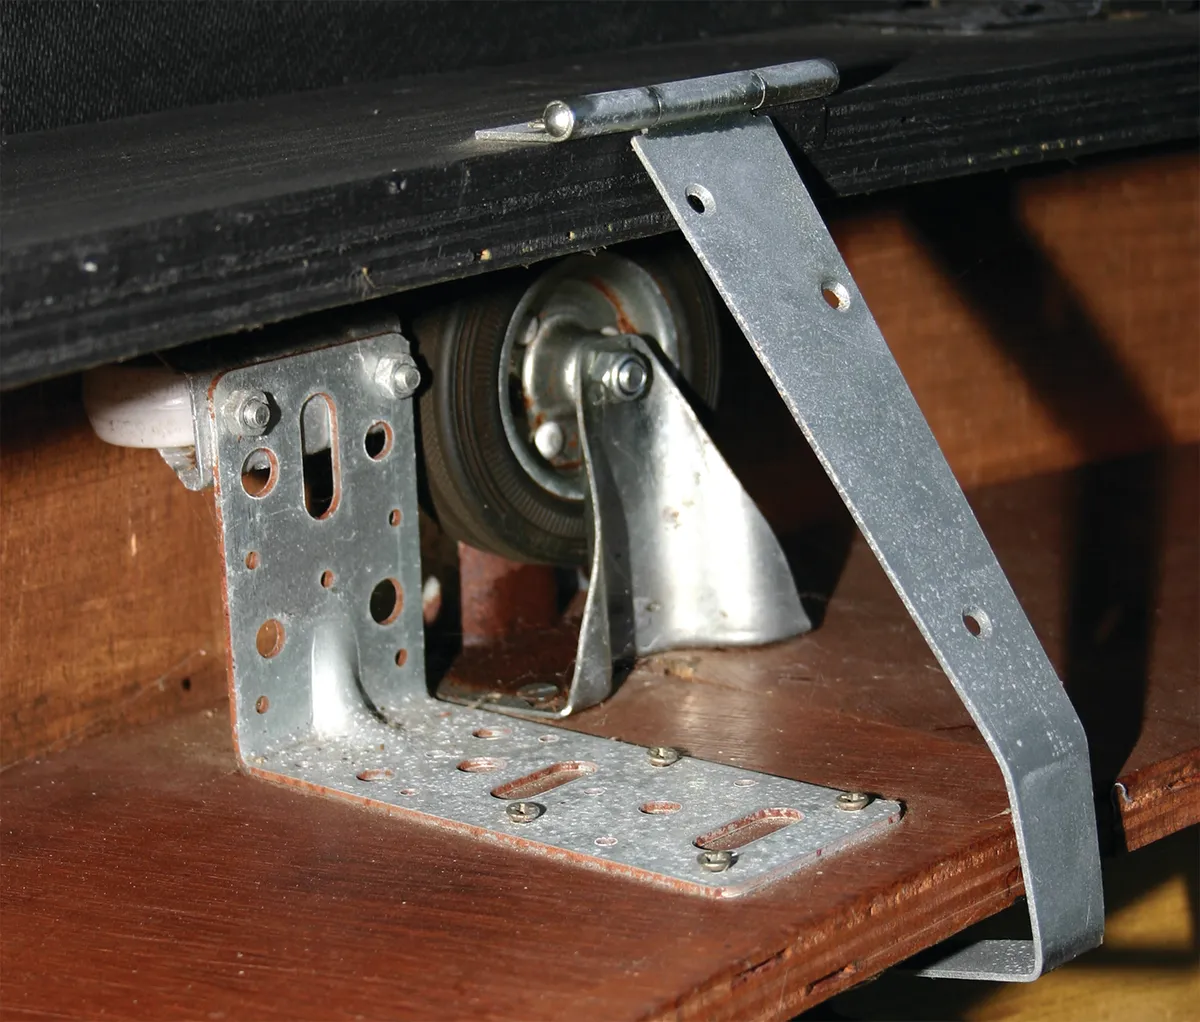
Our dome runs on eight pairs of rubber-tyred wheels, eight supporting the dome and eight facing outwards to guide it round.
Once these are fixed to the wall ring above each post, enlist the help of as many friends as you can muster to lift the dome onto the structure.
We found it easiest to lift and manoeuvre the dome when it was supported on two aluminium ladders. One team lifts it from outside, while those inside the observatory take the weight while the ladders are slid away, before lowering it onto the wheels.
In Part 4 we'll show you how to fit out the interior and complete the project.
Step-by-step
Step 1
Build a double-thickness plywood ring, supported on wooden pegs. The joints are staggered to improve the strength. Bend thin plywood around the edge to form the skirt. Run a length of string from a central peg to check the shape is circular.
Step 2
The two main ribs are screwed to the main ring using metal brackets. A raised lip around the opening is formed by an inner layer of plywood. The rear spacers will stay in place, but temporary spacers will help keep the opening parallel.
Step 3
Three further ribs are fixed on each side of the main ribs. We used normal hinges to join them at the top and bottom. Cut the ribs a little long, then trim them to suit the position. A stepladder comes in handy for reaching the top!
Step 4
Cut out the hardboard panels and fix them to the ribs with nails and gap-filling adhesive. The panels will form curved ‘facets’ rather than a perfect hemisphere. Sand down any ridges then use more adhesive to reinforce joints and fill gaps.
Step 5
Roughen the surface of the hardboard, then coat with resin, chopped strand matting and more resin. Don’t mix too much resin at a time or it will set in the bucket. Work it in well using rollers, and complete the job with a coloured gel coat layer.
Step 6
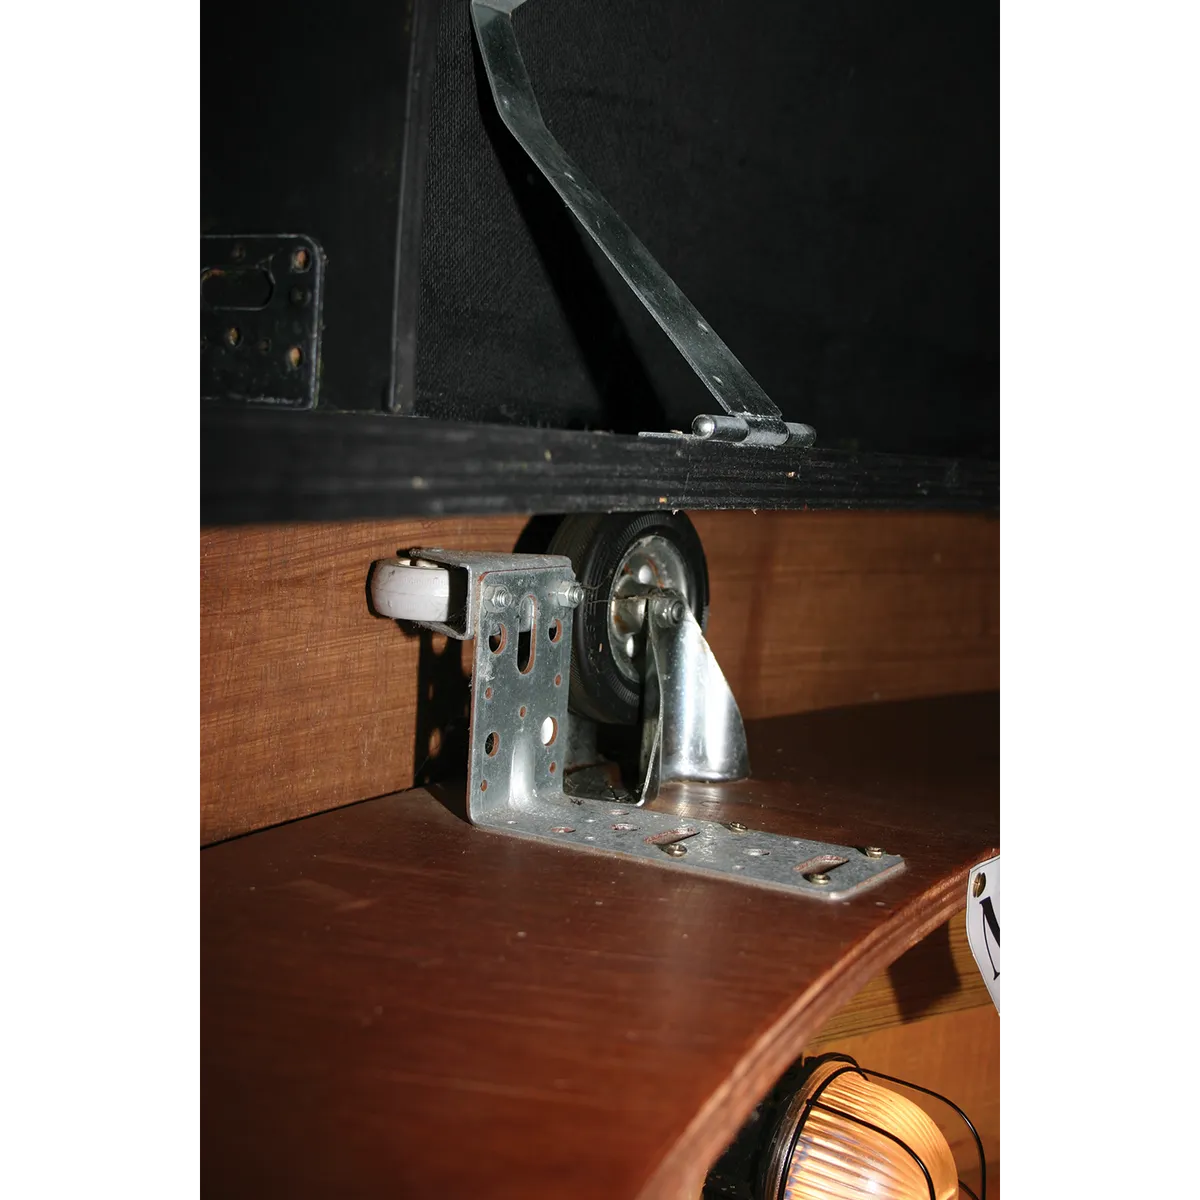
Eight heavy-duty 100mm fixed casters with rubber tyres above the posts take the weight, while eight smaller horizontal wheels, held by steel brackets, guide the dome round by touching the skirt. Once these are in place, the dome can be lifted on.
Part 4
You’re almost there. Now we just need to add the finishing touches to start enjoying the night sky from your garden dome.
Now that your project looks like a completed observatory, you’ll be anxious to get inside and start observing. However, there are still a few final details to get sorted.
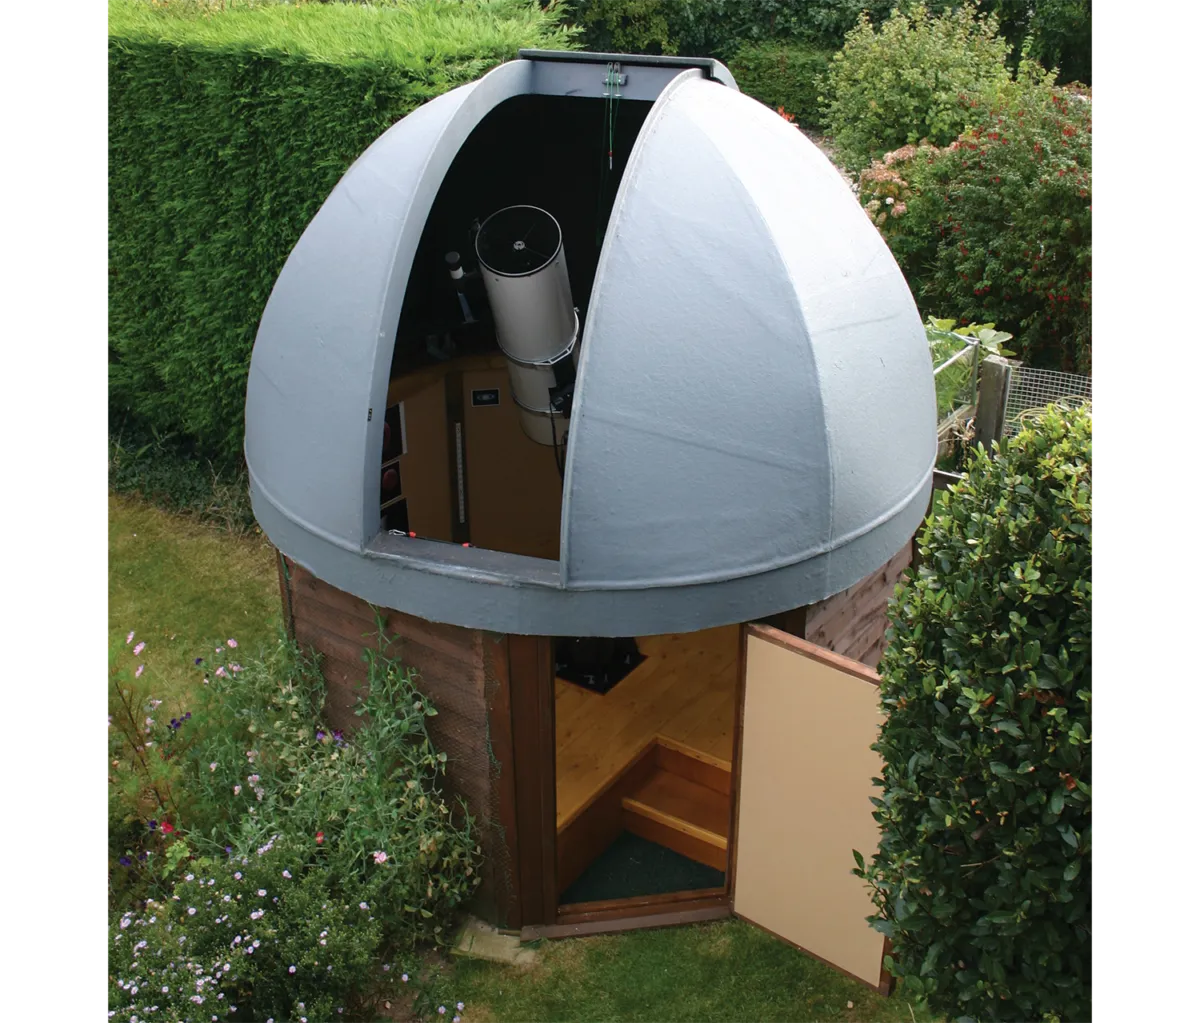
First comes the shutter, which is made in two sections. The main section rolls back beyond the opening, allowing a clear view overhead.
In order to see down to the horizon, the lower section can be lifted out. The shutter’s main section is fitted with small, fixed caster wheels that run directly on the dome’s surface.
Additional wheels, mounted sideways between the inside edge and the lip around the opening, guide the shutter while closing.
You could open and close it with a long pole, but for a touch of sophistication we installed a pair of pulleys and a strong cord to operate the shutter. A cleat is used to tie off the cord and hold the shutter closed.
For this part you will need:
- Decorating equipmentRollers and brushes, black emulsion paint and varnish; gloves and overalls
- ElectricsA pair of mains outlets, dimmable red lights, white lights, buried armoured cable and a protective RCD device; telephone and network cable
- Timber 18mm floorboards – tongue-and-grooved, or plain; thin plywood or MDF (3-6mm)
- ToolsHand tools for cutting and fixing the floorboards
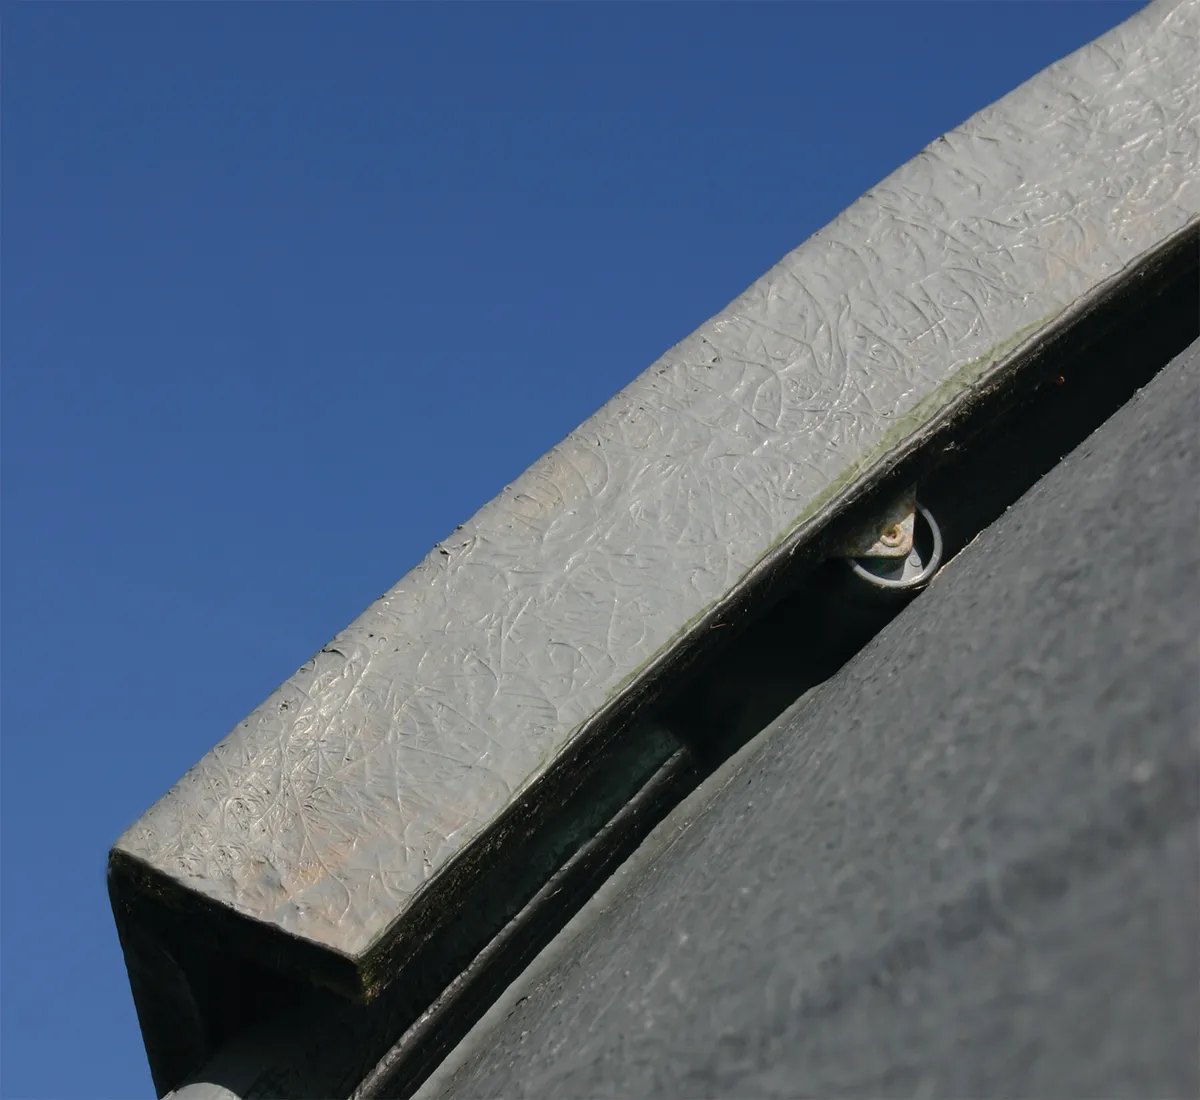
Although the dome and shutter are heavy, it is important to provide methods to keep them in place during strong winds. We used sliding bolts to secure the shutter and four long, bent strip hinges that flap down over the wall ring to stop the dome lifting.
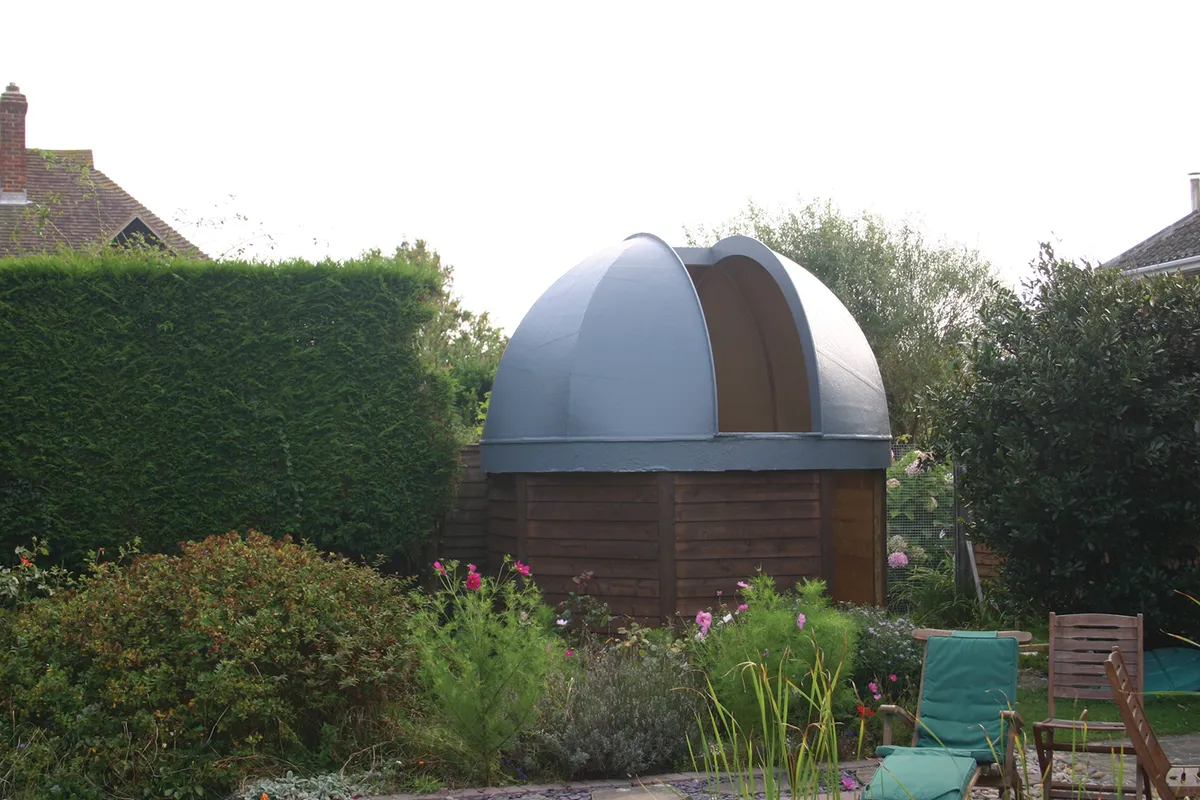
A step is desirable if your floor is high. We opted to build a step to bridge the distance between the ground and the floor, and also fitted a useful door mat (as you can see in the open doorway of the observatory in the picture above).
Fortunately, we have never fallen down the step. But if you sense this might be hazardous in the dark, you could make a removable floor panel to cover the gap.
The door is built from a 75x50mm timber frame with cladding to match the walls. Strong hinges and a good-quality lock are recommended for security and durability.
Power and lighting requirements are a personal choice. Many observers use portable batteries for poweringmounts and red torches for lighting.
However, we opted for mains power and chose to install two dimmable red lights, two white lights for maintenance work and a pair of mains sockets so we could use a computer.
The power comes from the nearby house via armoured cable running in a deep trench and is protected by a residual current device (RCD) circuit breaker.
All the electrical work should be carried out by a registered electrician. You might also consider installing network cabling so you can use the internet in your observatory.
Decorating the observatory interior
Once the services were installed, we painted the inside of our dome with a wood preservative, followed by a matt black emulsion. The interior woodwork was given a gloss varnish.
Then we laid a tongue-and-groove wooden floor, which is nailed to the joists. If you expect to lift your floor to make future changes, straight-sided boards fixed with screws may be preferable.
We lined our walls with thin (3mm) MDF panels. You don’t need to insulate the walls, but lining does make it easier to pin up charts and photos.
A pale wall colour helps you find your way around when the lights are dimmed.
Finally we added some useful furniture. Space dictates what is possible, but a small desk is good for your laptop, eyepieces and charts,and a stool is welcome for resting your legs.
If you have a tall mount you may also wish to make some moveable steps to reach the eyepiece.
Most of our equipment spends its time on the northern side of our dome, but we recommend not fixing anything permanently as you will inevitably want to move it at some point.
Step-by-step
Step 1
The shutter panels overlap the opening like a lid. They could be lifted on and off, but small casters fitted to the edges run smoothly over the curved surface of the dome so the main section can simply roll back. We painted the inside matt black.
Step 2

Fit a pair of pulleys near to the top of the shutter opening. A strong nylon cord (4-6mm thick) is used to open and close the shutter. A cleat fixed to the lower edge enables you to tie the cord off, securing the panel when closed. We also fitted sliding bolts.
Step 3
As well as a good quality door lock and bolts, we used long, strong, bent hinges to make the observatory secure. These flap down from the dome and prevent it lifting or being lifted. To rotate the dome they are simply flipped back up.
Step 4
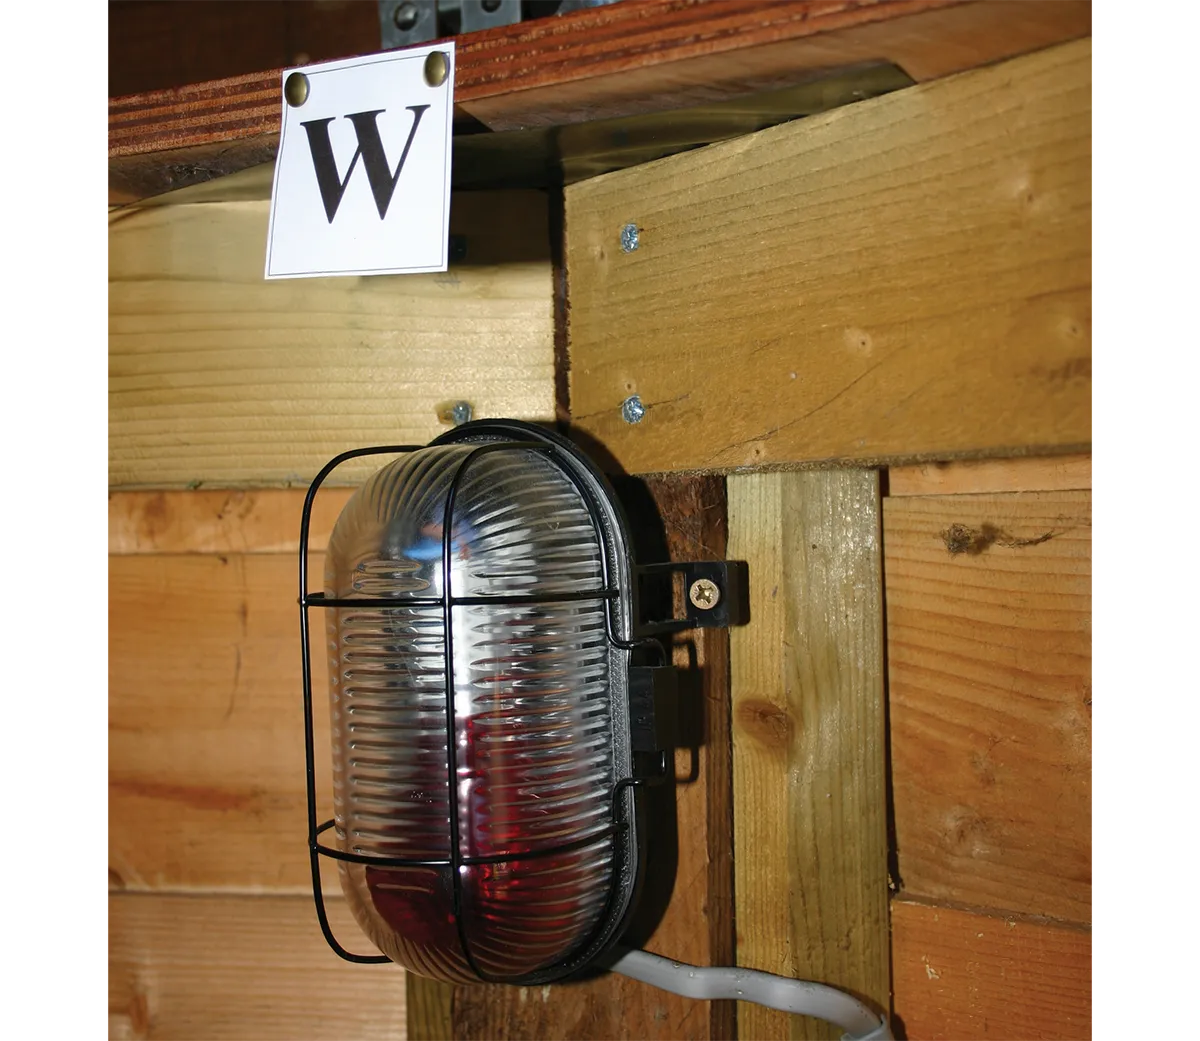
Lights, power sockets and communications cables will enhance your experience. We selected tough bulkhead lights to resist knocks. Some have dimmable red bulbs to preserve night vision. A qualified electrician should carry out this work.
Step 5
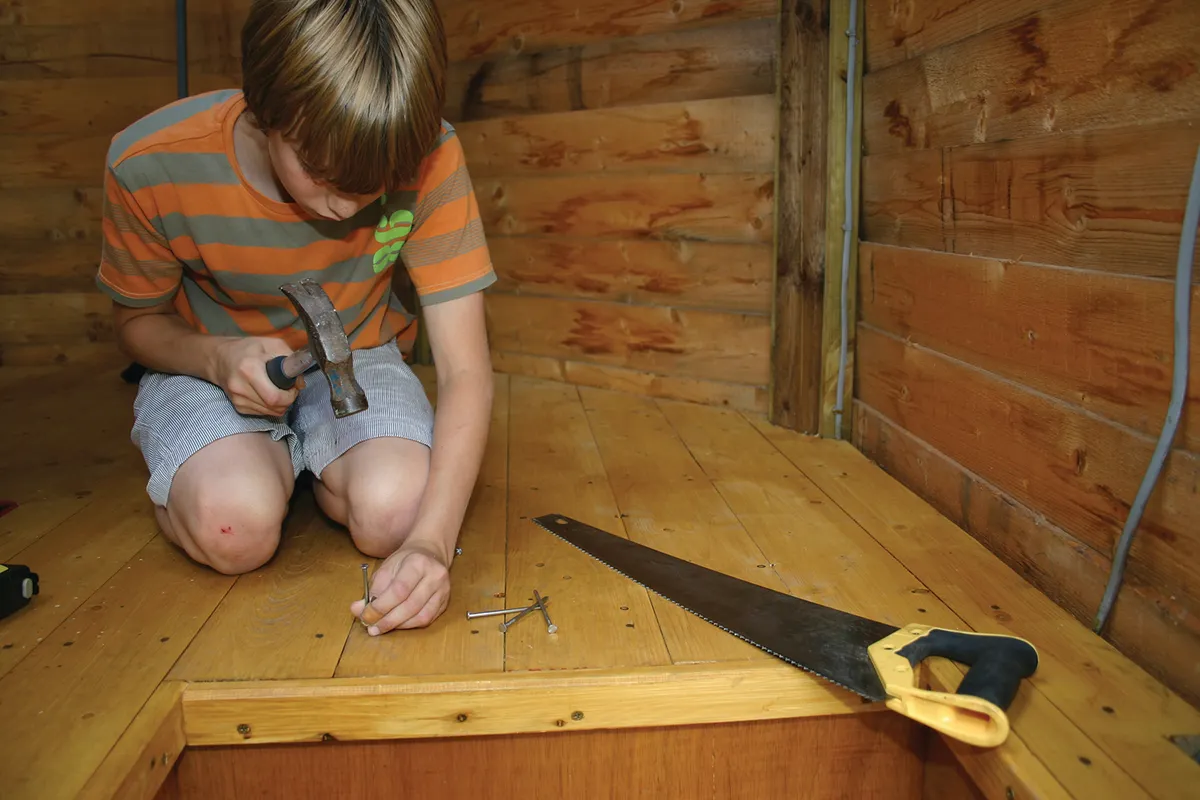
Once all the painting and wiring has been done you can fit the wooden floor. Nailing the boards in place is fun and a sign that you are nearing the end of the job. If you want, you can line the walls with thin wooden panels.
Step 6
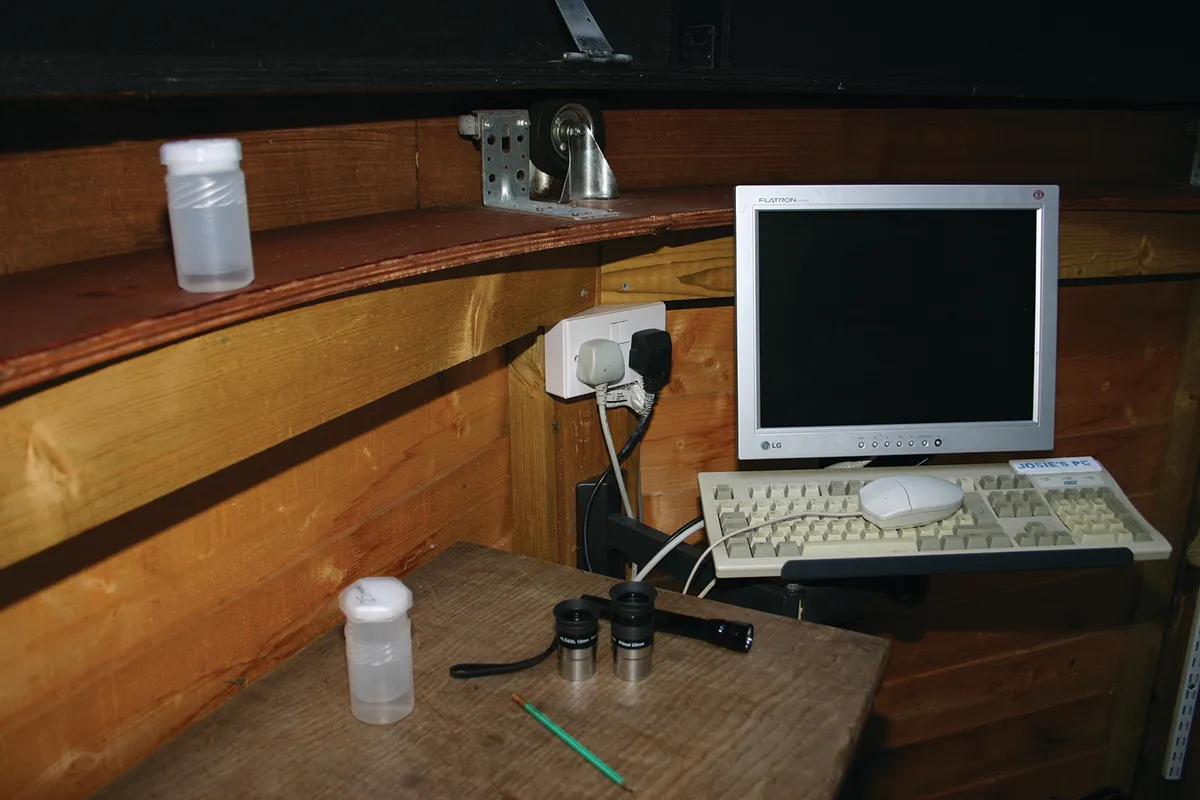
Small items of furniture and equipment (depending on requirements) can now be installed. Make sure you leave enough room to operate your telescope. It is wise not to permanently fix anything, as you will inevitably need to move it around.
Hopefully you’ll soon be observing from your very own dome. You may opt for a different design, but many of the issues will be similar.
If you have made the effort, your enjoyment of the night sky will be even more satisfying, but it's worth remembering to keep it in tip-top shape. For tips, read our guide on how to clean your observatory.
And to make your new build really high tech, read our guide on how to automate your observatory.
This How To originally appeared in the September - December 2009 issues of BBC Sky at Night Magazine.


