The biggest enemy of the astrophotographer is noise, the unwanted artefacts that appear in images. We often hear about how deep-sky images can be stacked to improve the signal-to-noise ratio (SNR) – where the ‘signal’ represents the real features in an image we want to keep – but it can also be a problem when we are imaging our nearest neighbour, the Moon.
With a DSLR, noise will still be present even at lower ISO settings and this can spoil the appearance of a lunar image (see example images below).
Keep your camera in tiptop shape: read our guide on how to clean a DSLR camera.
Get more out of your camera with our DSLR guide or find out how to attach a DSLR camera to a telescope..
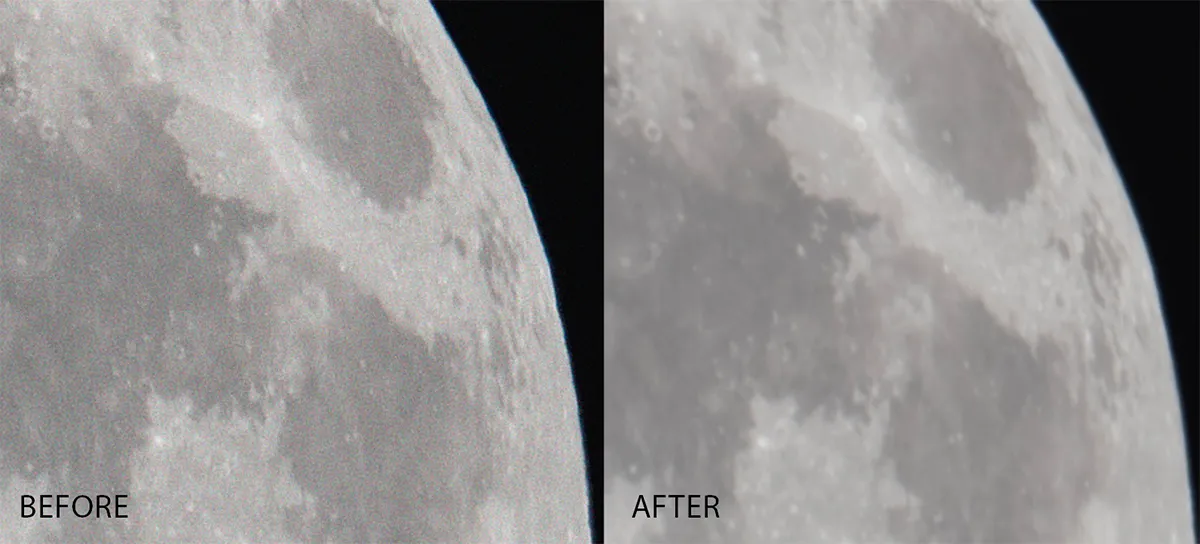
Fortunately, there are ways to reduce the amount of noise present so that the image looks cleaner and sharper. This process involves stacking several images to produce a combined one.
As more images are stacked, the signal is enhanced and stands out more. Noise, on the other hand, being random in each image, becomes less noticeable.
Below we’ll look at how the stacking process can be performed on a lunar image with the freeware AutoStakkert!
To begin, use the lowest ISO setting your camera has, such as ISO 100, to take an image of the Moon. Adjust the exposure settings to ensure that the histogram peak is near or just left of centre.
Once you are happy with the captured image, take several identical images, one after another. If your camera takes RAW images, you will need to convert them to TIFF or PNG files before stacking, as AutoStakkert! cannot stack RAW images.
We also recommend that you avoid stacking high-resolution JPEGs, as these are compressed and will not produce the best final images.
How to stack with AutoStakkert!
Open the AutoStakkert! software and check that the latest version is installed, which can handle stacking DSLR images.
The program opens in two separate windows: one contains the control panel, the other the image panel.
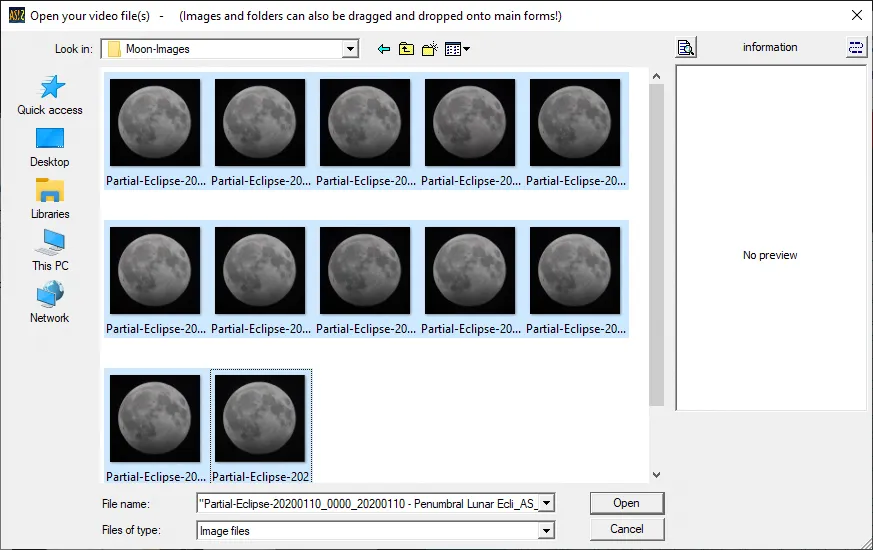
Once the software is running, click the 1) Openbutton in the control panel and then browse to the folder that contains the images that need stacking. At the bottom of the window, use the drop-down menu to select images.
Select all the images and click ‘Open’ (see image above). Our example uses images taken during the partial lunar eclipse on 10 January 2020.
One of the images will now be visible within the image window. If the image cannot be viewed properly, there is a ‘Zoom’ slider towards the top left of the image panel.
Move this to the left to make the image look smaller to fit the window (this doesn’t affect the image). At the top of the image panel there is a Frames slider button; by scrolling backwards and forwards you can review each loaded image to check it for quality.
If any images are of inferior quality, re-load the other images, leaving those images out. Once you’re happy that the images are of a quality suitable for stacking, return to the control panel.
The following stacking options are a good place to start, but you can make changes as you progress to suit the images your camera produces.
To begin, use the following settings as a guide. First, save your images as TIFF files before you stack.
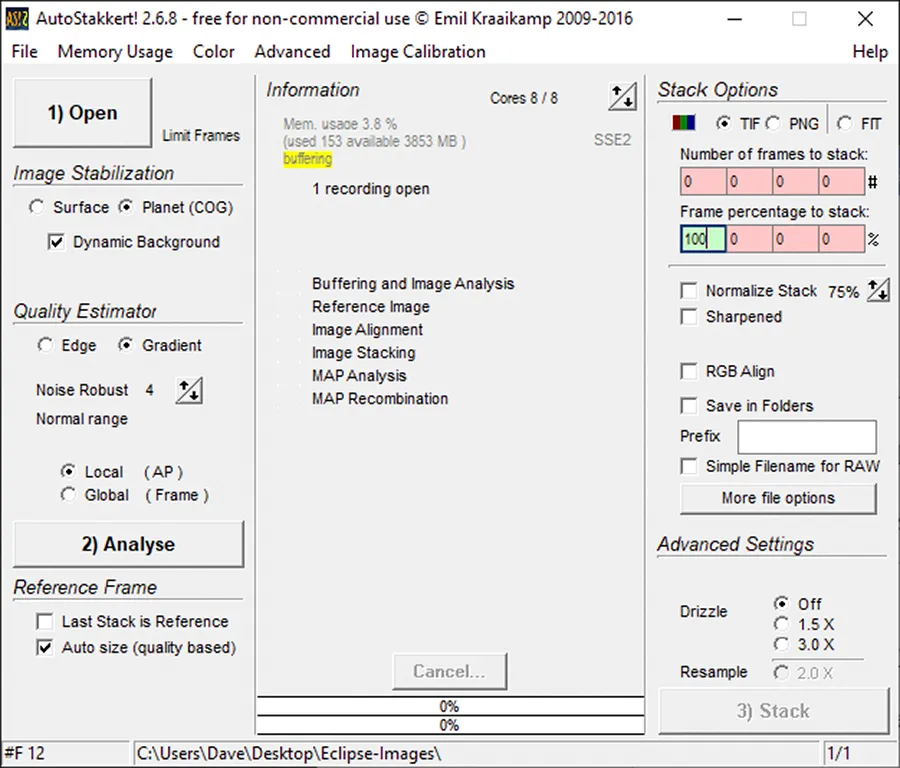
Next, in the control panel (see image above) under Stack Options set the Frame percentage to stack at 100% and untick Save in Folders – to avoid having to scroll through folders to find your images.
Make sure the Drizzleoption is off, because the software crashes if this is used on large DSLR images.
Now click 2) Analyse and AutoStakkert! will look at each image. Once it has finished a green tick will appear beside Buffering and Image Analysiswith the time taken to perform the action.
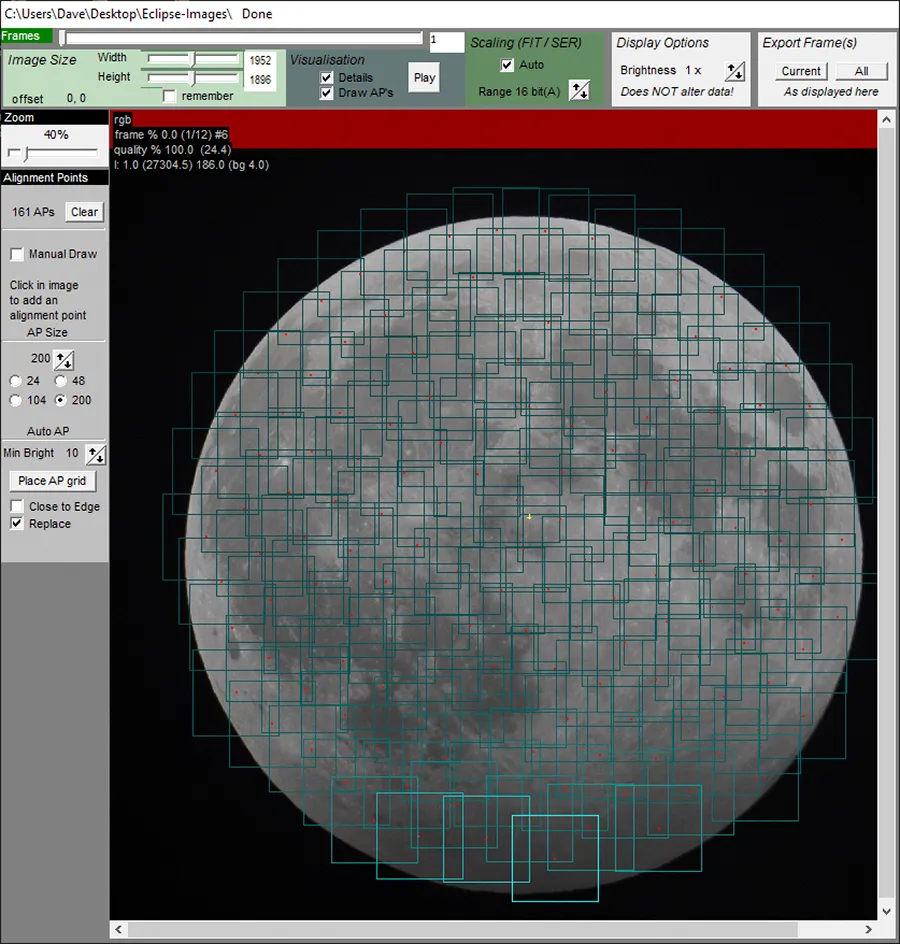
Next, go to the image window (see image above) and look on the left-hand side under AP Size to select one of the sizes. For a DSLR this is usually 200.
Finally, click the Place APgrid button and a number of overlapping green squares will appear over the image. These are the Alignment Points (APs) that AutoStakkert! uses to align each image.
Finally, go back to the control panel window and click 3) Stack.a series of progress bars will indicate the software is now stacking and more green ticks will appear against the different processes, until the stacking routine is complete.
The stacked image should have been automatically saved in the same folder as the images used, ready for any final image tweaking and processing using RegiStax or your preferred image-processing program.
3 tips for stacking images
1 Use a low ISO setting and ensure images are correctly exposed so as not to over-expose brighter parts of The Moon.
2 Always stack the sharpest images possible. A mirror-up function will reduce camera shake.
3 Pre-crop the blank sky surrounding the Moon from full-format images before stacking to reduce image file sizes.
Dave Eagle is an astronomer, astrophotographer, planetarium operator and writer. This guide originally appeared in the December 2020 issue of BBC Sky at Night Magazine.