In this guide we'll show you how to photograph the Moon, revealing the astrophotography equipment you need and techniques to help you to capture it with a DSLR camera or a smartphone.
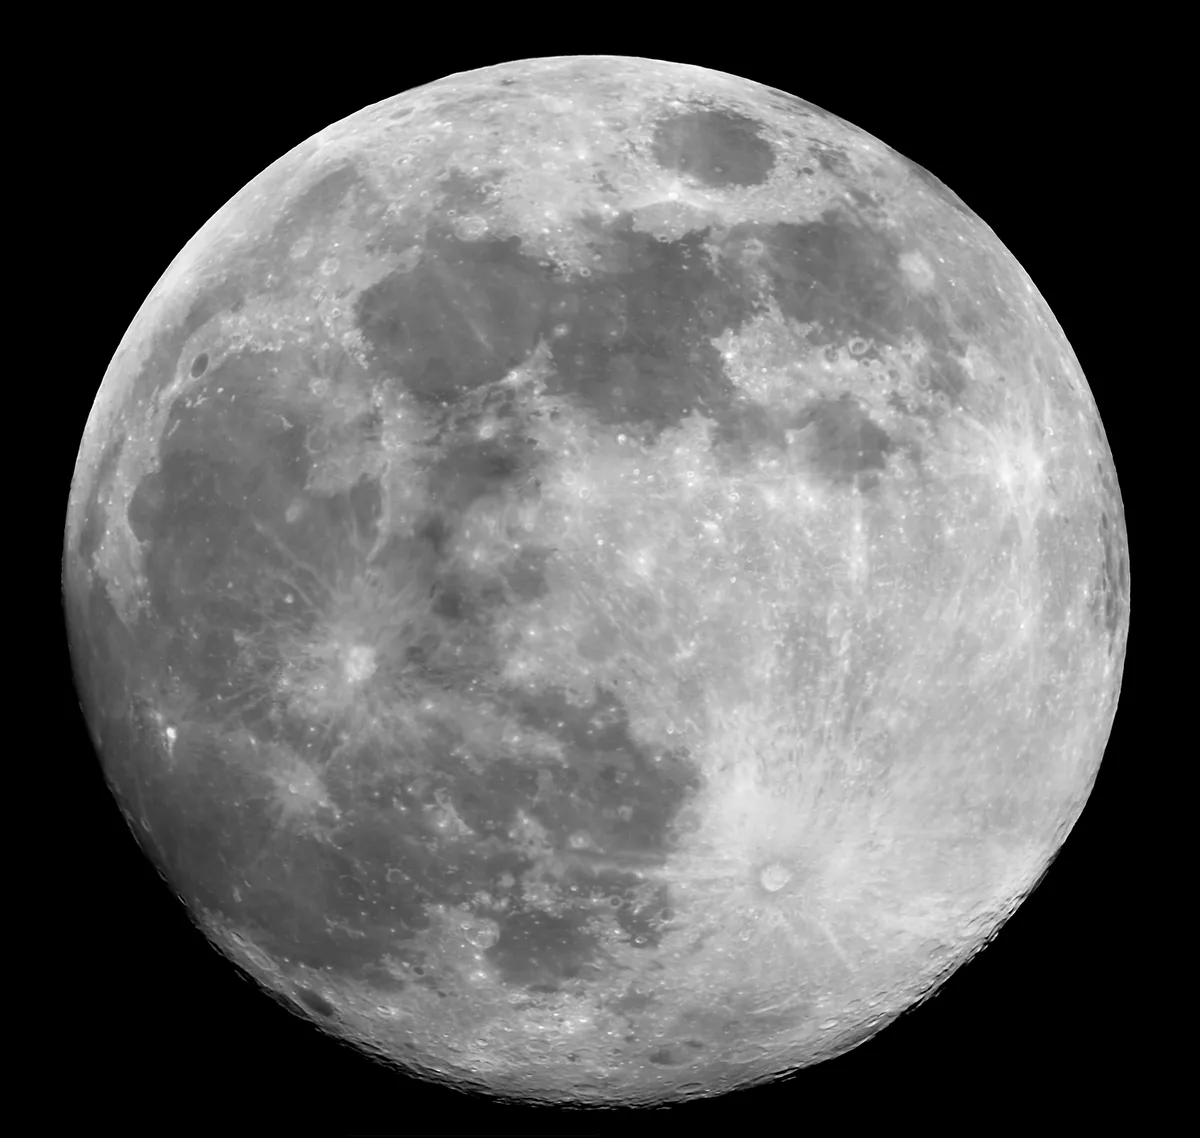
With its shifting phase and the wobbles of libration bringing myriad new features into view each night, the Moon is a wonderful target for photographers of all abilities.
As the largest object in the night sky seen from Earth, the Moon an obvious place to start when you’re learning to take photos of the night sky.
Find out how to photograph the Moon with a smartphone camera. Want to go large? Read our guide on how to photograph a full Moon mosaic.
We'll also look at how to create a Moon mosaic, how to photograph craters on the Moon and how to photograph a crescent Moon.
If you’re stuck for ideas, we'll also look at 6 classic sights on the Moon that everyone should have a go at photographing.
And if you're already a seasoned lunar astrophotographer, have a go at capturing images of the Moon for science.
For more info, read our guide to the phases of the Moon. And for weekly lunar phases delivered directly to your email inbox, sign up to the BBC Sky at Night Magazine e-newsletter.
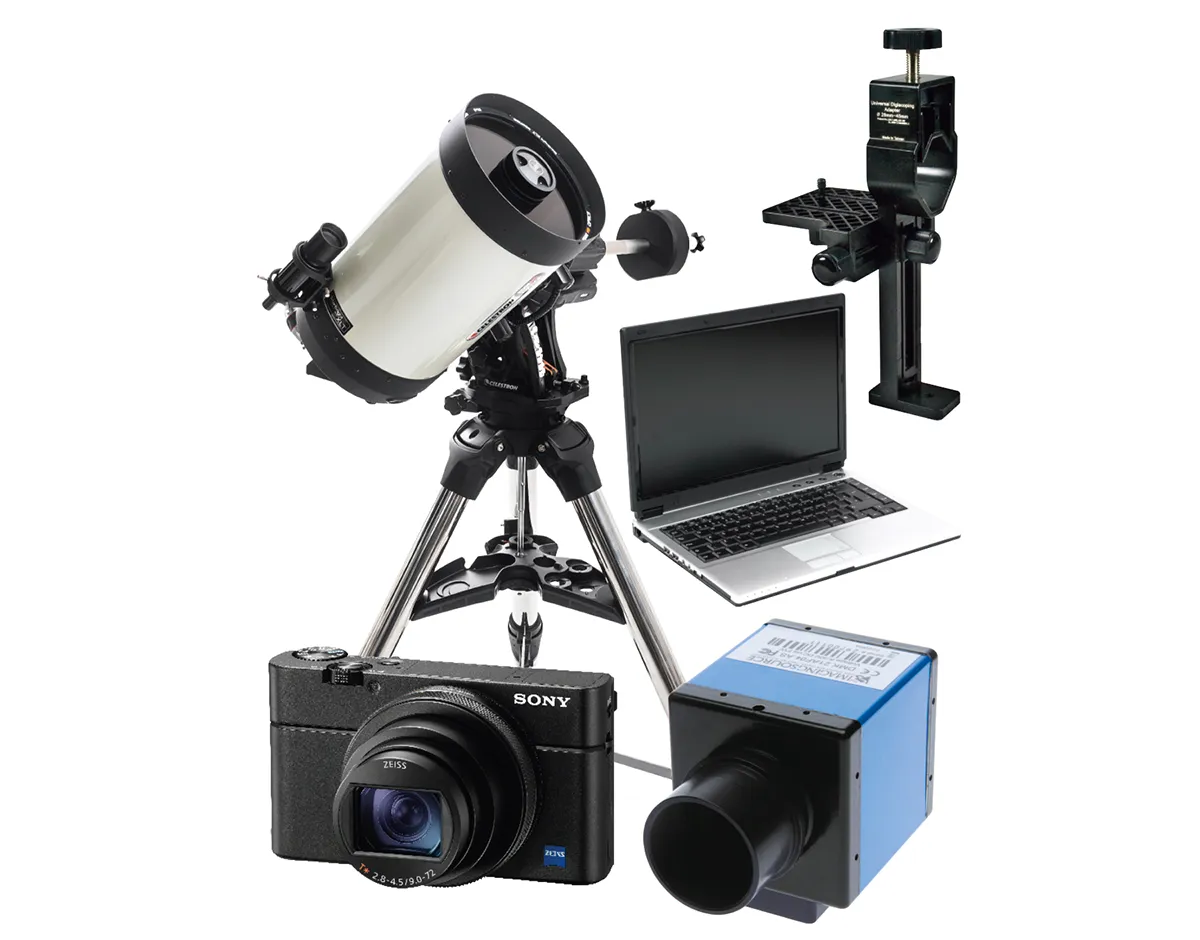
Equipment for photographing the Moon
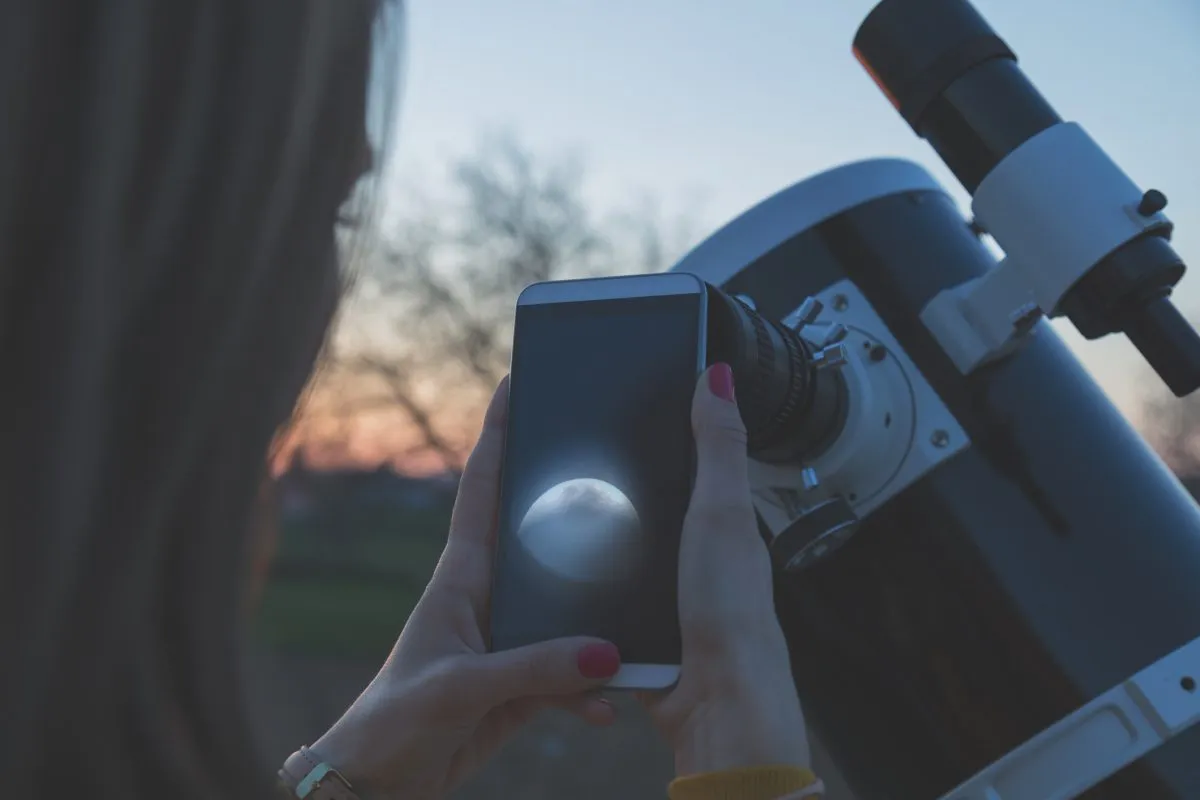
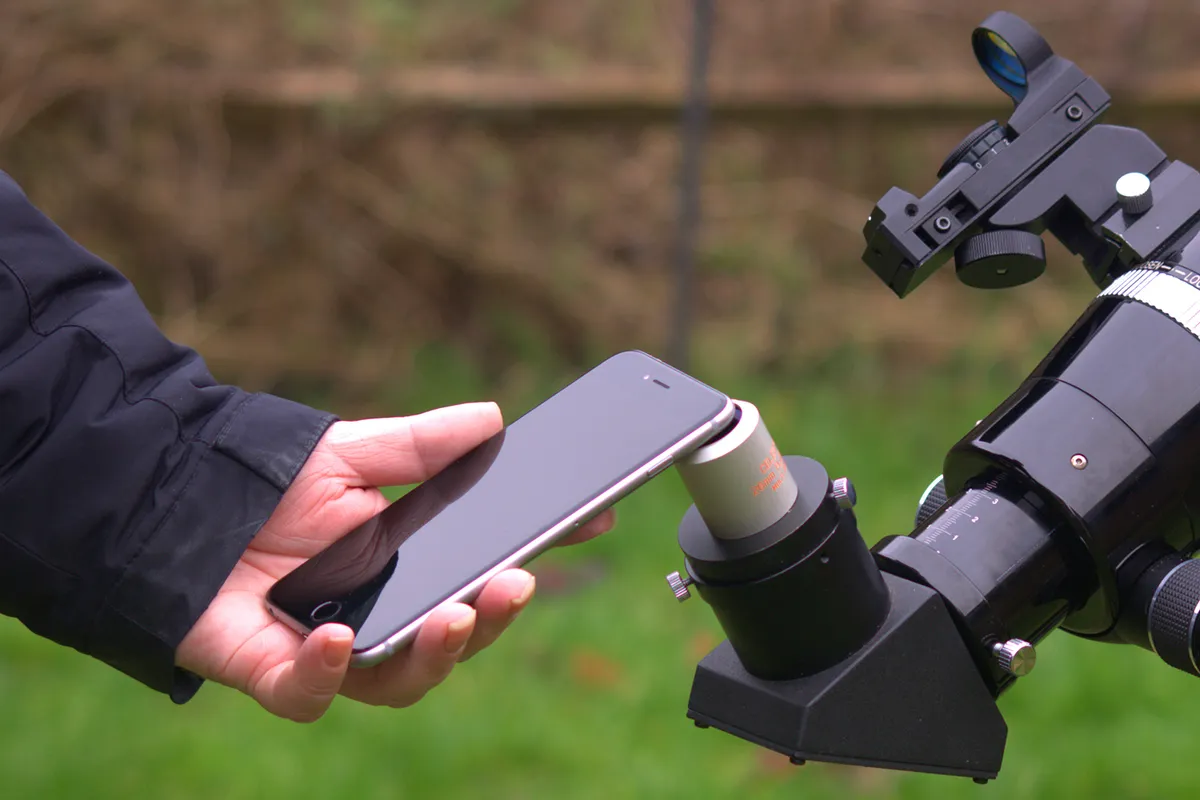
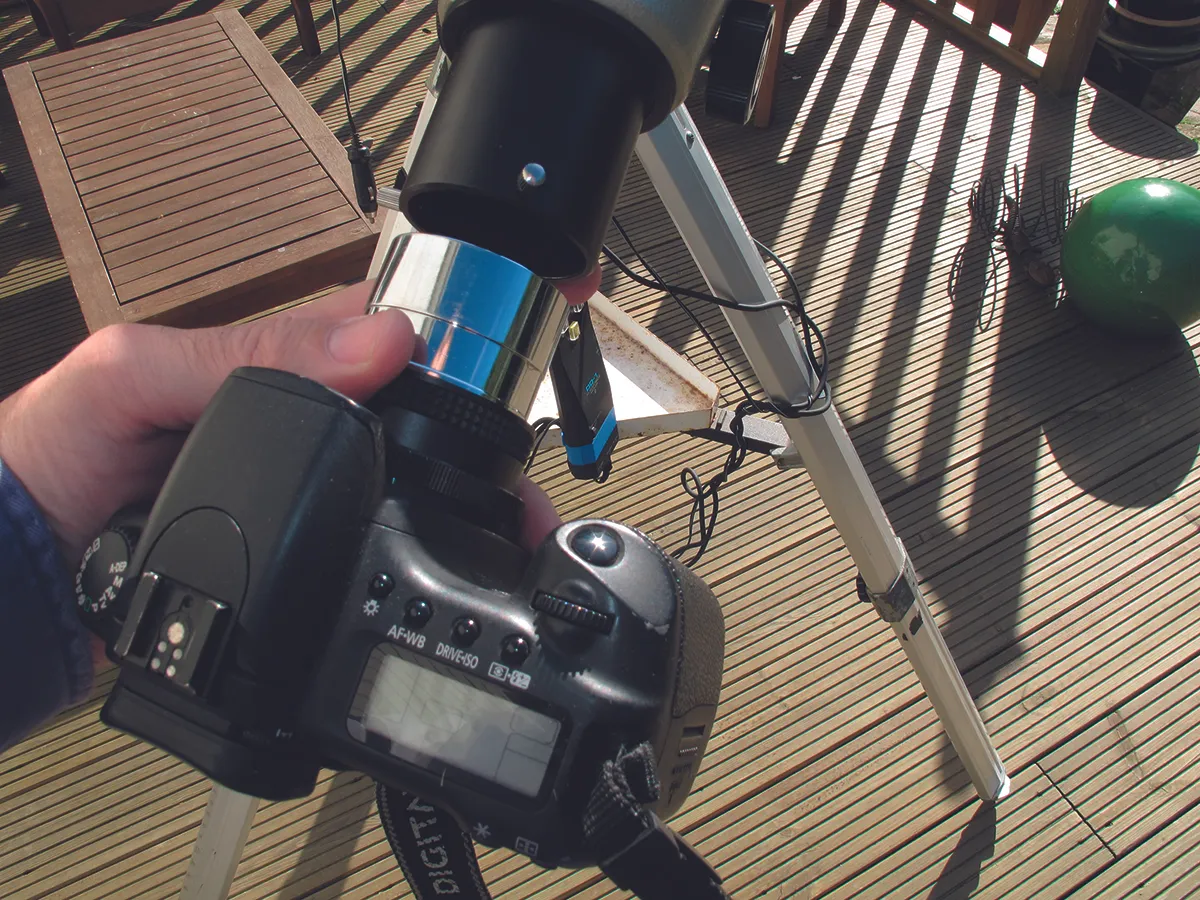
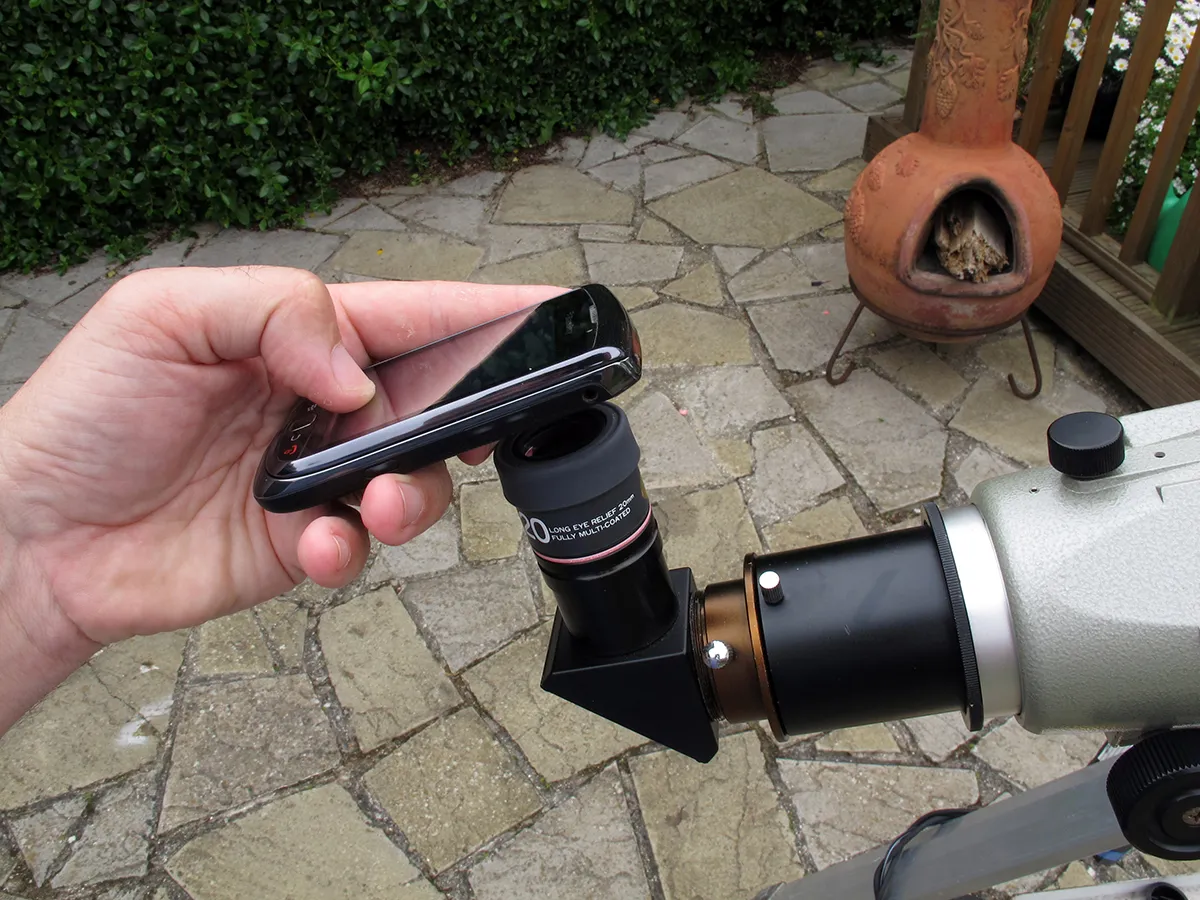
Anyone with a telescope and either a smartphone or a compact camera can take a decent image of the Moon. Just hold your camera up to the telescope’s eyepiece and start snapping away.
This technique is known as ‘afocal photography’ and if you already have a camera and telescope, you don’t need anything else to get started.
A DSLR provides you with several options. They can be used to take afocal shots, just like smartphone and point-and-shoot cameras. Or they can be turned directly to the night sky to capture nightscapes. For more on this, read our DSLR guide.
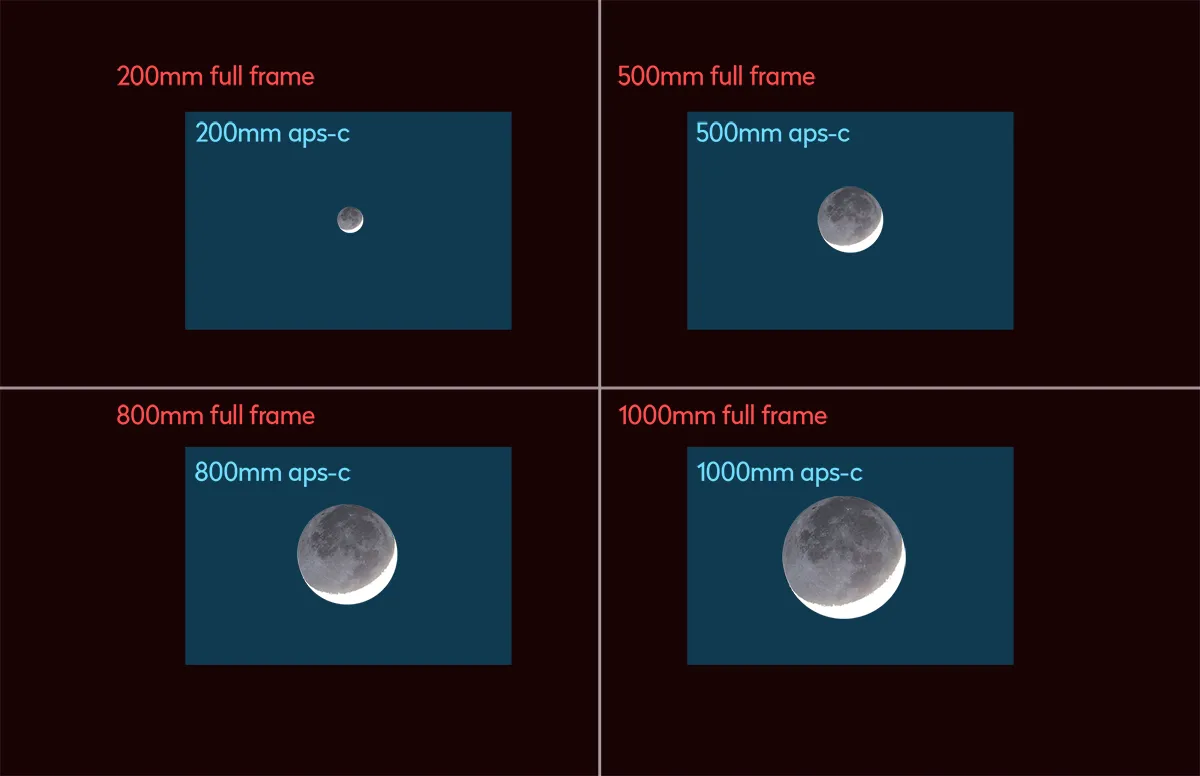
Bear in mind that the Moon will appear small in such an image taken with an APS-C camera’s standard 18-55mm lens.
To increase the size of the Moon’s disc in your images and reveal more detail on its surface, you’ll need a longer focal length lens.
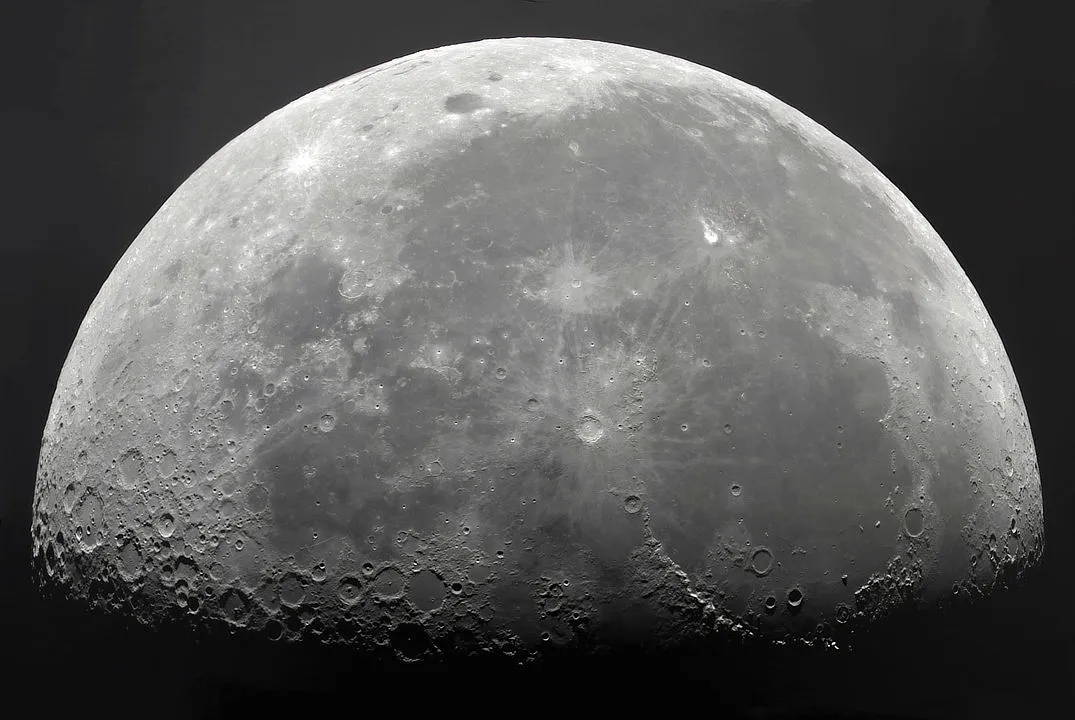
A lens with a focal length of 300mm or more will show the lunar maria as well as some of the more prominent craters and mountains. For more on this, read our guide to photographing craters on the Moon below.
That DSLRs have detachable lenses means that they can be connected directly to a telescope, essentially turning the telescope into the camera lens.
You’ll need a T-adaptor and a T-ring. The T-ring is brand-specific. It mounts on your DSLR and screws into the T-adapter, which then attaches to your telescope.
Although the newest models of DSLRs can shoot video, they’re not ideal for high-resolution lunar imaging, and this is where high frame rate planetary cameras come in.
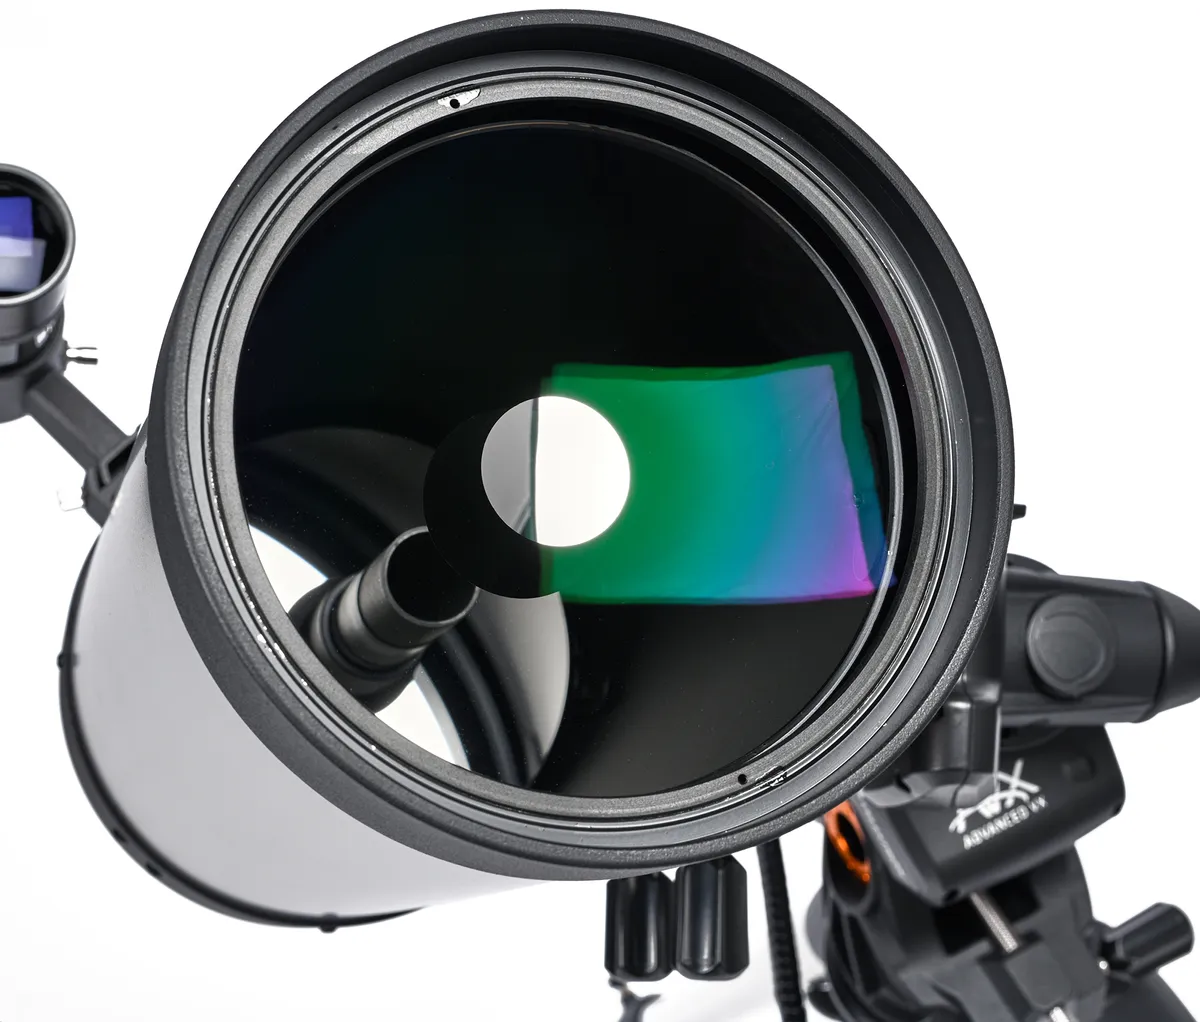
These cameras are capable of taking short videos and shoot many frames per second. You can use any telescope you like, although large aperture Schmidt-Cassegrains and Maksutov-Cassegrains are popular choices with top lunar photographers.
This is because their longer focal lengths are well suited to close-up imaging of the Moon, and compared to a high-quality refractor telescope you get a much larger aperture for your money.
For advice on which telescope to use, read our guide to the best telescopes for astrophotography.
Whatever type of telescope you use, make sure it’s well collimated, by ensuring that its optics are carefully aligned to produce the sharpest image possible. Your telescope’s instruction manual will show you how to do this.
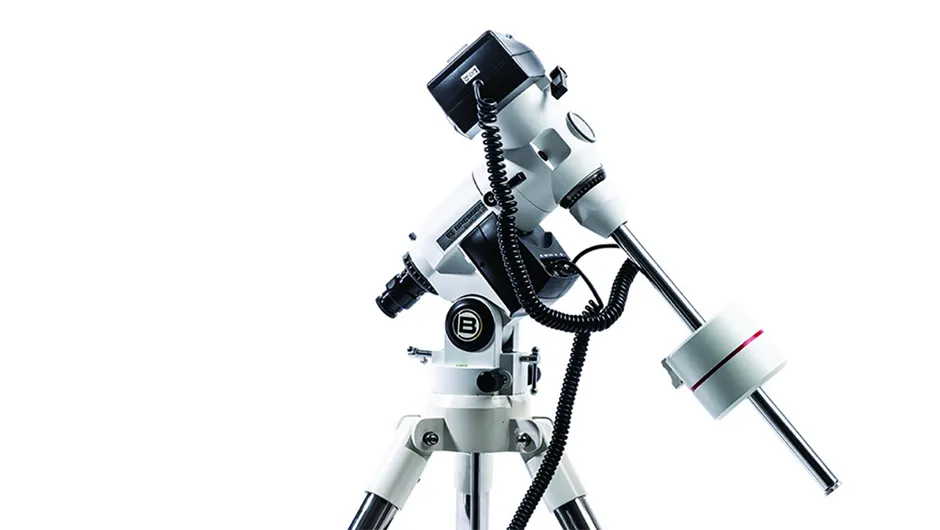
As in any area of astronomy, your telescope’s mount needs to be rock solid and stable. The ability to track the Moon – either with a motor drive or with full Go-To capability – is a must if you’re using a high frame rate camera.
If you're on the lookout for a new mount, read our guide to the best telescope mounts available.
A mount’s drives should be set to track at the lunar rate, not at the rate the stars move across the sky.
If you’re using a Go-To mount, take time to set it up properly, otherwise you may find yourself having to make continuous, tiresome tracking adjustments when imaging.
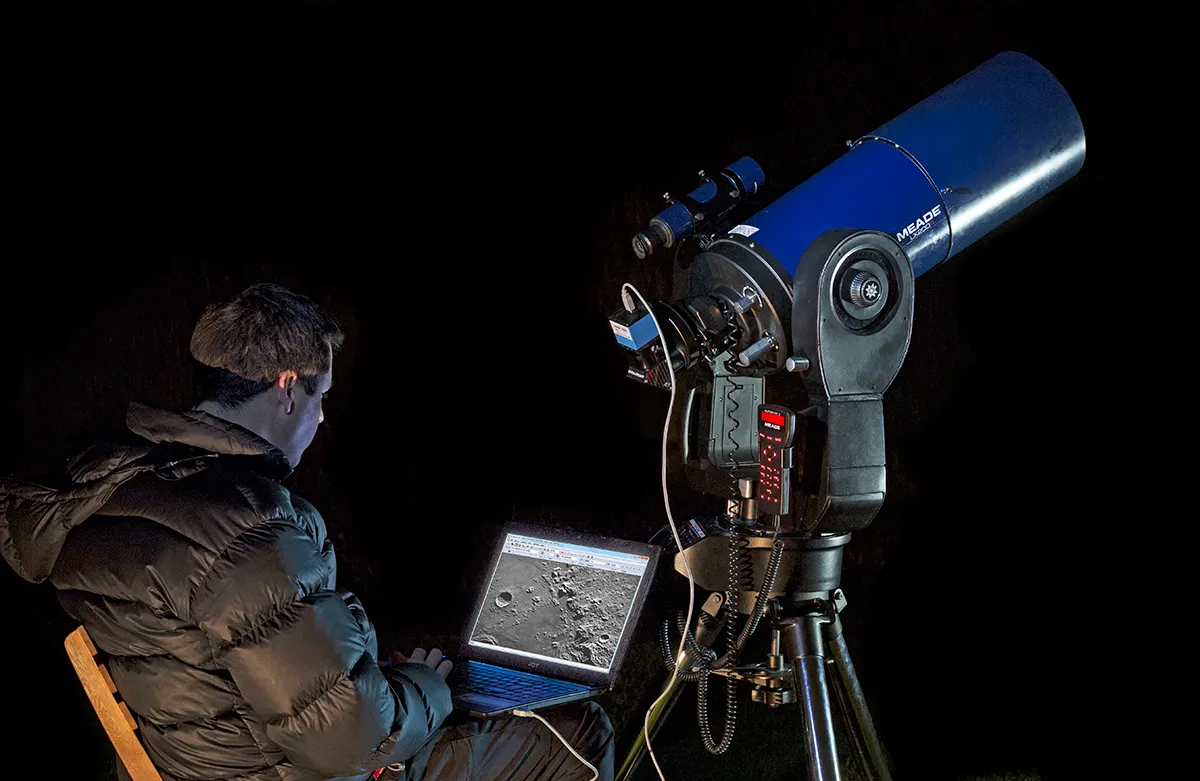
If you’re using a high frame rate camera you’ll need a computer to run it. This computer will also need capture software installed if your camera doesn’t have any of its own.
Essential accessories for photographing the Moon
Red filter
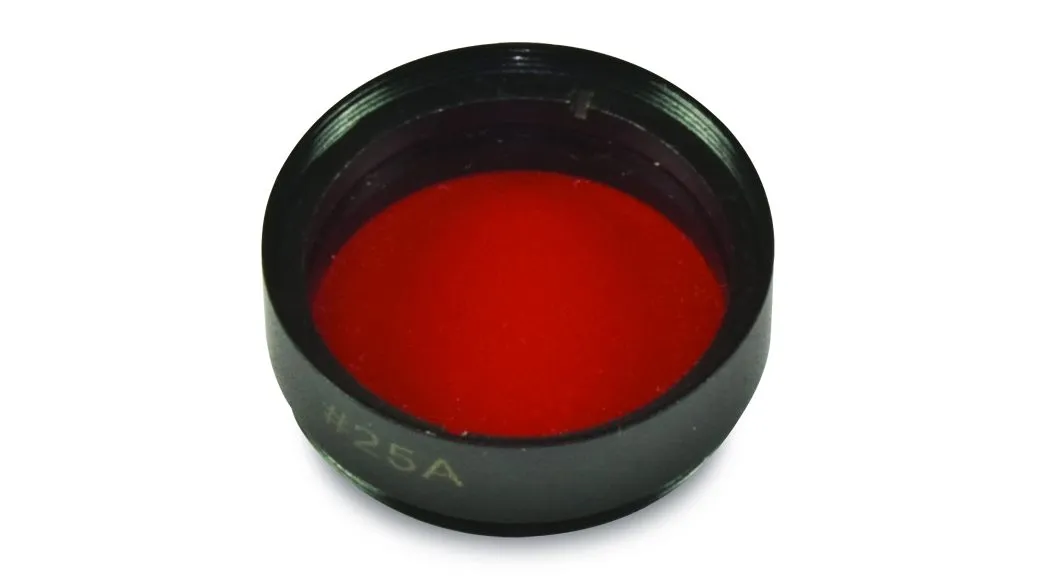
If you’re using a monochromatic planetary camera you might find it helpful to fit a red filter when capturing lunar images. Using one can help produce a crisper final picture. For more info read our guide to telescope filters.
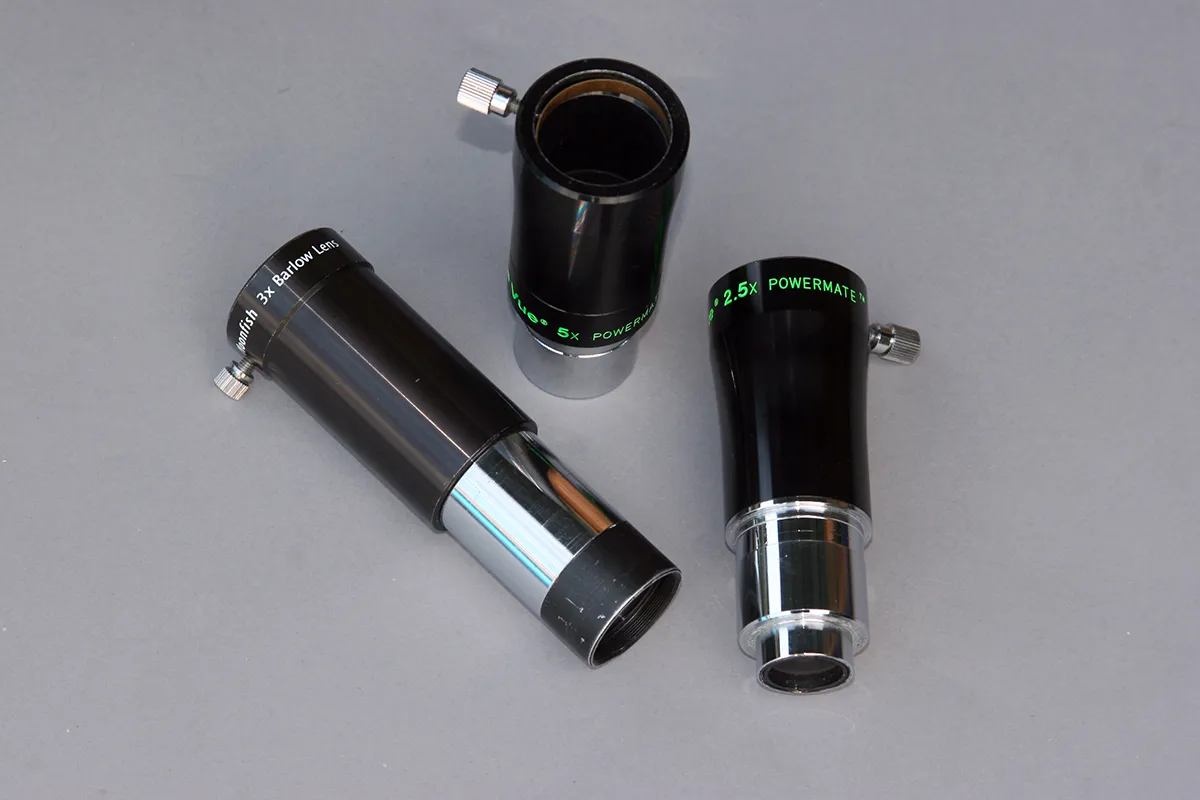
Barlow lens
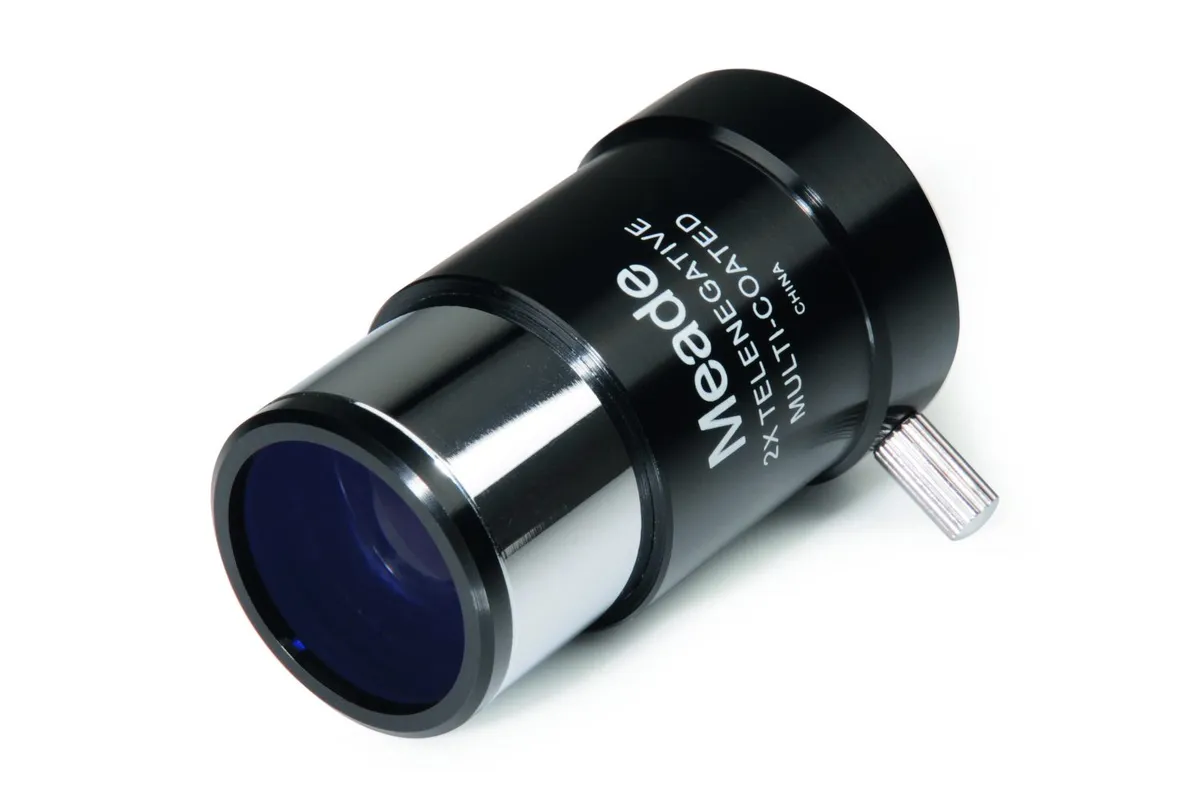
A Barlow lens is must for detailed close-ups of the lunar surface and its craters, whatever camera you use. It increases the focal length and the magnification of your system, typically by two or three times.
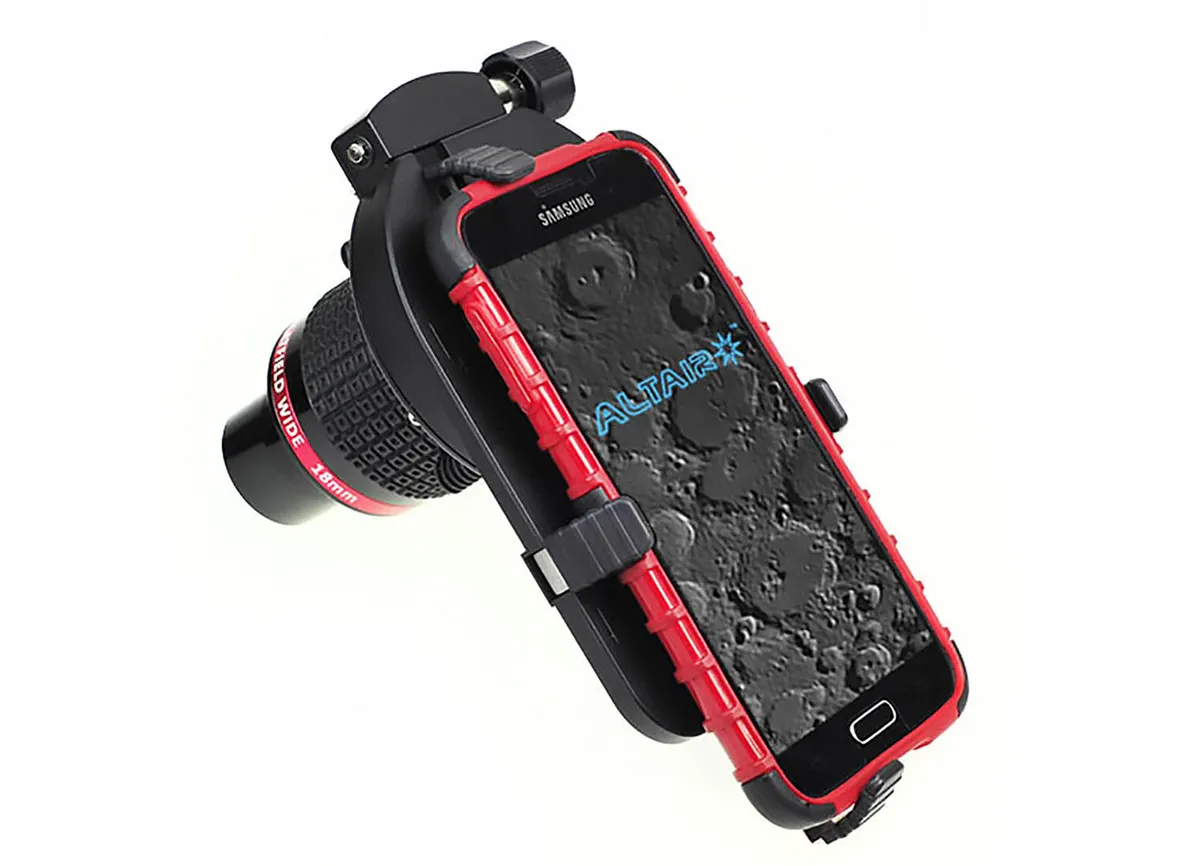
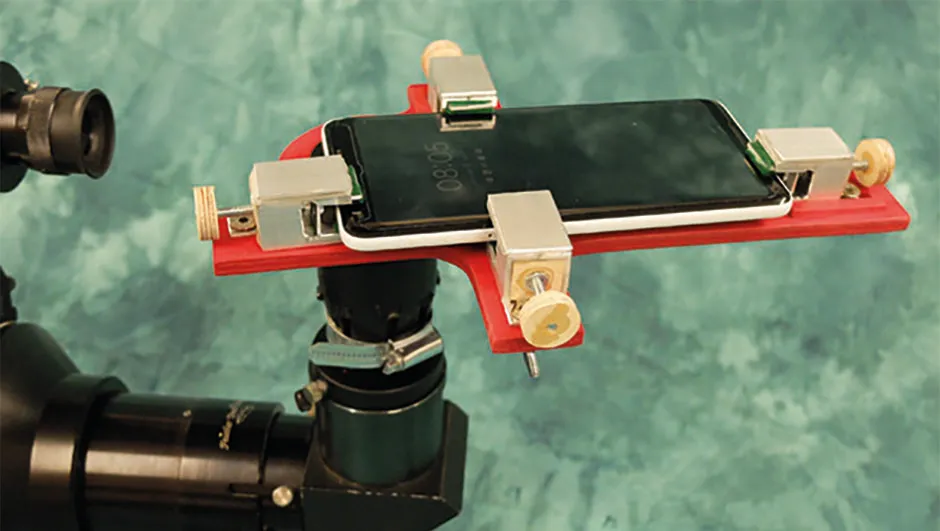
Smartphone bracket
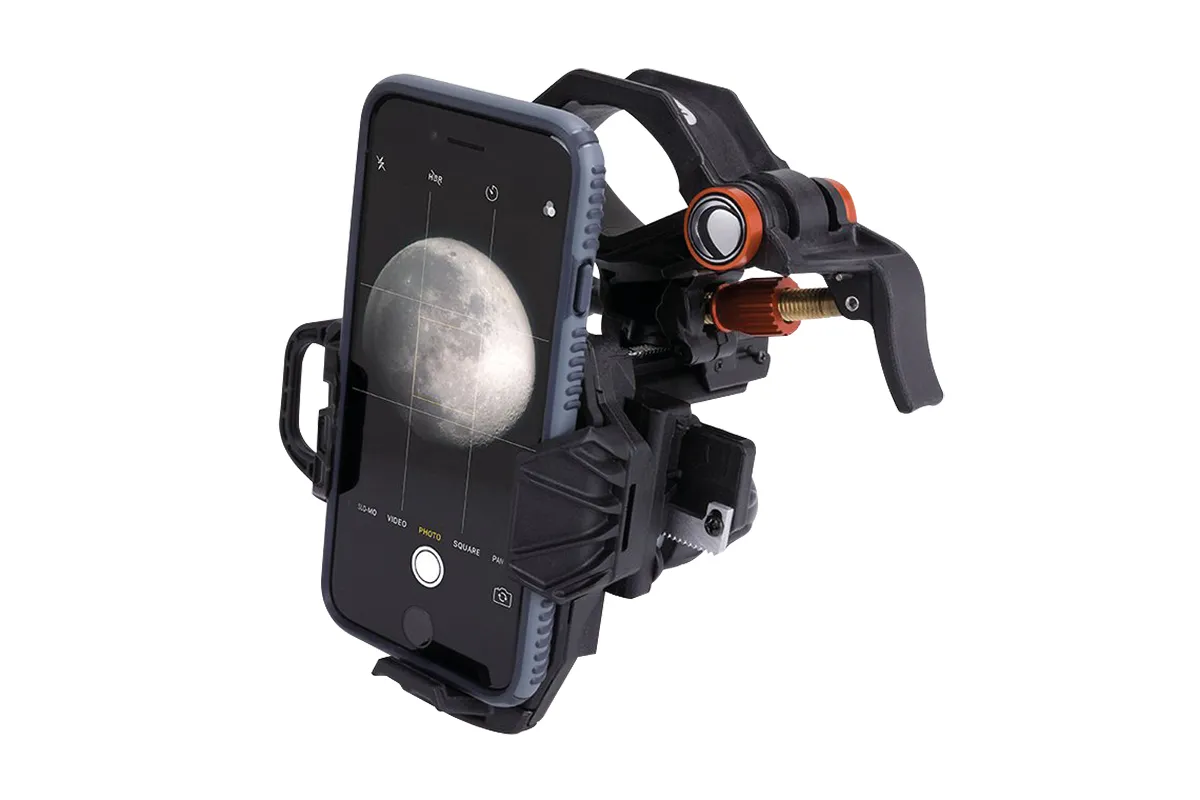
Holding a smartphone squarely over an eyepiece while you take a photo is a delicate art. You can make things easier with a dedicated bracket to do the job for you. Follow our guide to build your own smartphone holder.
Photograph the Moon: step-by-step
- Decide what your target on the Moon is and work out the best time to capture it.
- Use astronomy apps or software to decide what date and time to photograph
- Pick a date when your Moon target is near the line between the illuminated and dark portions: the terminator.
- Shoot when the target is lit from an angle to reveal surface textures and rugged lunar crust, craterlets and other subtle features like rilles.
- Check the seeing conditions: atmospheric turbulence that can blur and distort your view of the Moon
- Leave your telescope outside to cool down before you start. This will reduce wobbling in your image caused by heat rising
- Never take images from indoors: heat escaping will cause the view to shimmer wildly
- Connect your computer equipment and start imaging
- If you need to make minor corrections on your Go-To or driven mount, be sure you know which button to press
- Check by rotating the camera in the eyepiece holder so when you press the left or up button the image moves left or up
- If using a camera with a monochrome chip and seeing conditions aren’t perfect, use a red filter on the camera to improve the view
- Make sure your capture software is set up and recording to a hard drive with sufficient free space.
- Record each night’s captures to a fresh folder so they can be easily located later.
- Use the live window in your capture software to help focus
- Focus the camera: make sure it’s locked in the eyepiece holder
- Pointing the telescope at the Moon’s terminator and adjust the focus knob. The high contrast between light and dark will show when the image is sharpest.
- Move the telescope to your target, knowing it’s in focus.
- Take a short video of just over a minute. At 15fps (frames per second) this should give over 900 frames
Why video is best for imaging the Moon
To end up with a high-resolution close-up of the lunar surface it is better to record a video than take stills. Why is this?
The answer doesn’t lie out in space but closer to home, in Earth’s atmosphere. When looking at the Moon at high magnification on an average night, you’ll notice the view undulating, with moments of steady, sharp views and then brief blurred instants.
Since they generally only take single still images, the shots from a DSLR or point-and-shoot camera risk being blurred by this atmospheric turbulence at the moment when the shutter fires.
A short video taken with a webcam or planetary camera, recorded in the AVI format, has many frames each second. It enables the sharpest moments of clarity to be selected.
You can then stack these frames together using specialised software and process them further to bring out tremendous detail on the Moon’s surface.
So for wide-field shots of the Moon, DSLRs are fine. But when it comes to high-resolution close-ups of its mountains and craters, it’s the dedicated planetary cameras that come up trumps.
Best free apps and software for photographing the Moon
Moon Globe
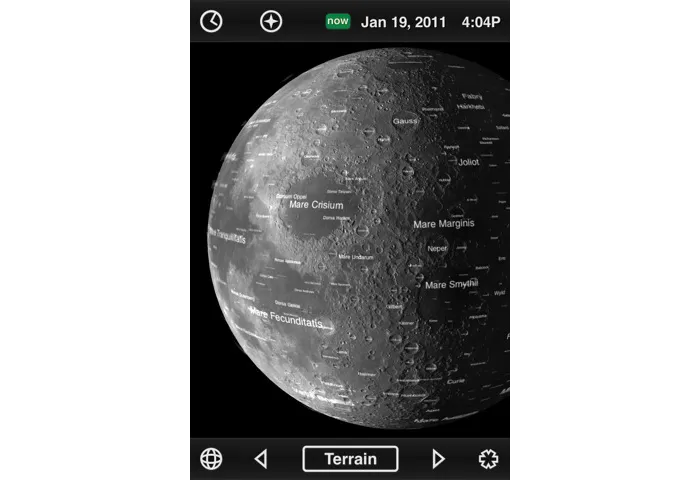
This great free app can be used on your iPhone, iPod Touch or iPad and is also available on Android. It shows what the Moon looks like for a given date and time, complete with shadow details.
Where to get it Your app store
Stellarium
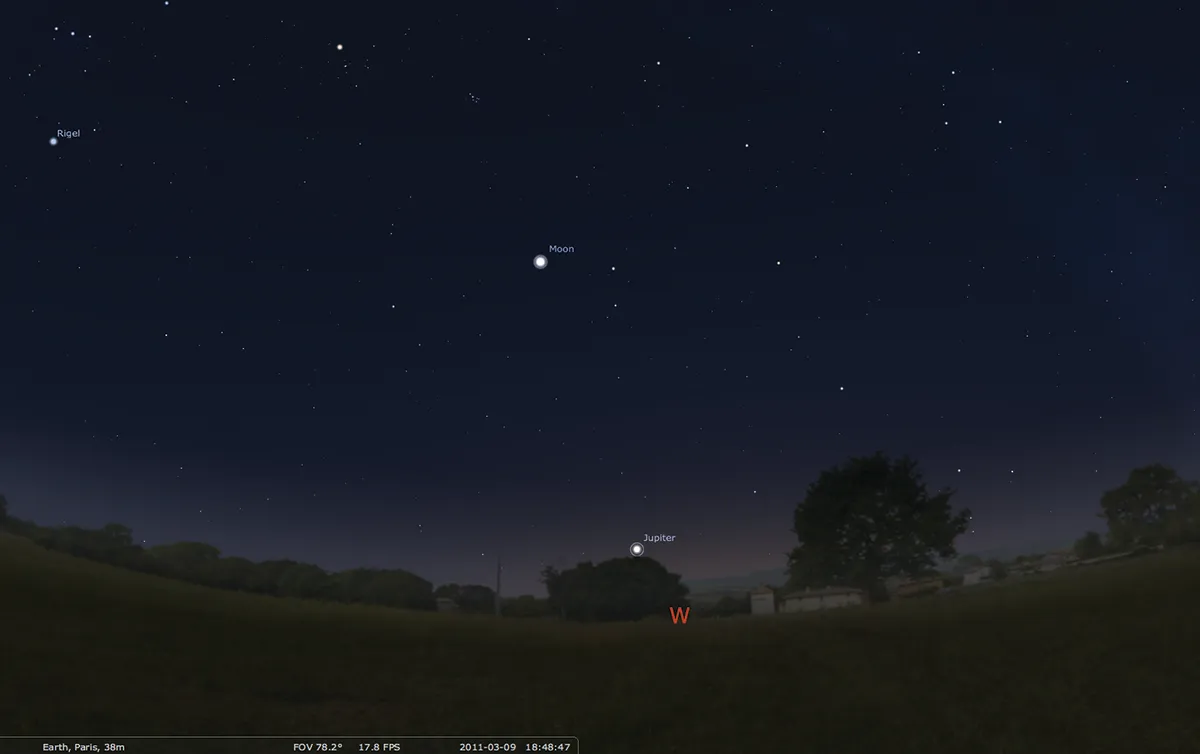
This free planetarium software is handy for working out where the Moon will be. It’s great for when you’re planning a long night of imaging to create a lunar mosaic. For more help, read our guide on how to install and use Stellarium.
Where to get it stellarium.org
Virtual Moon Atlas
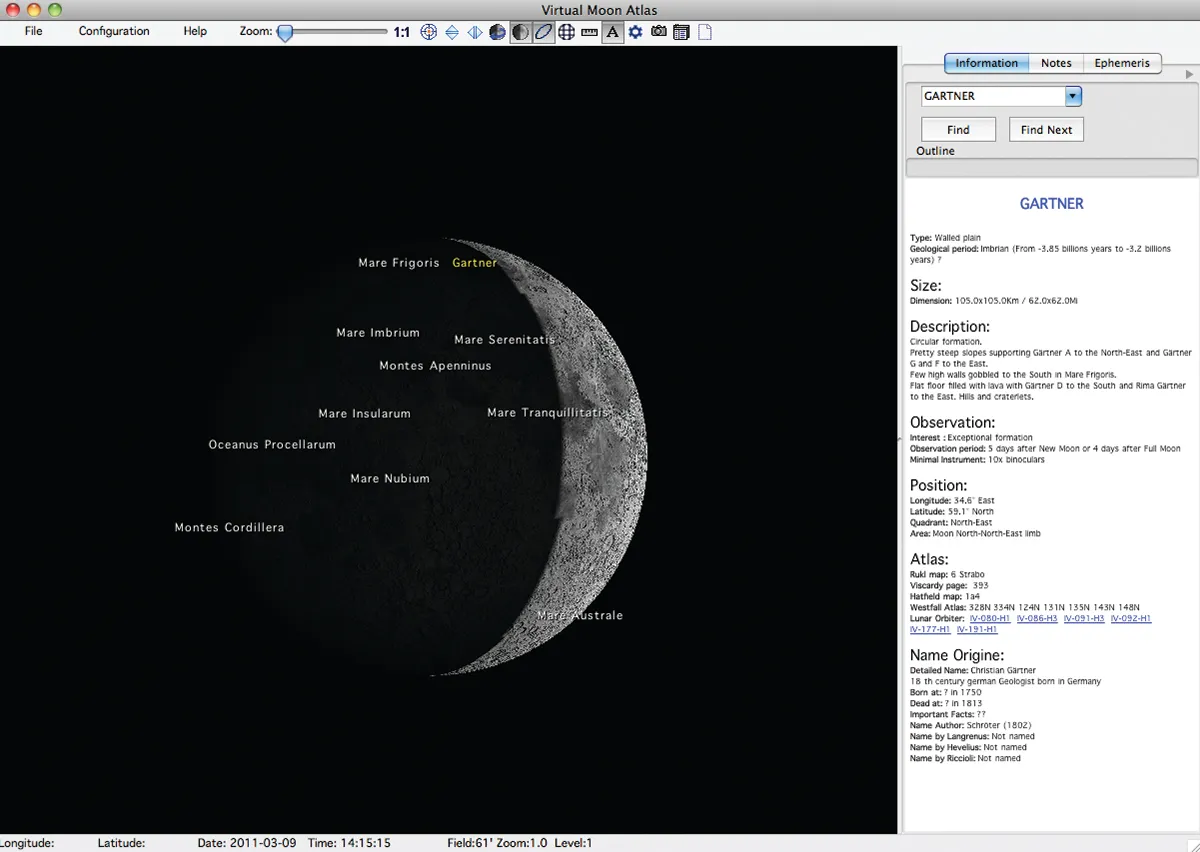
An authoritative piece of freeware for planning your observations in detail using an interactive atlas and feature-rich information panel.
Where to get it ap-i.net/avl/en/start
5 targets to photograph on the Moon
For more sights to observe and photograph on the lunar surface, read our guide to the Moon's best features.
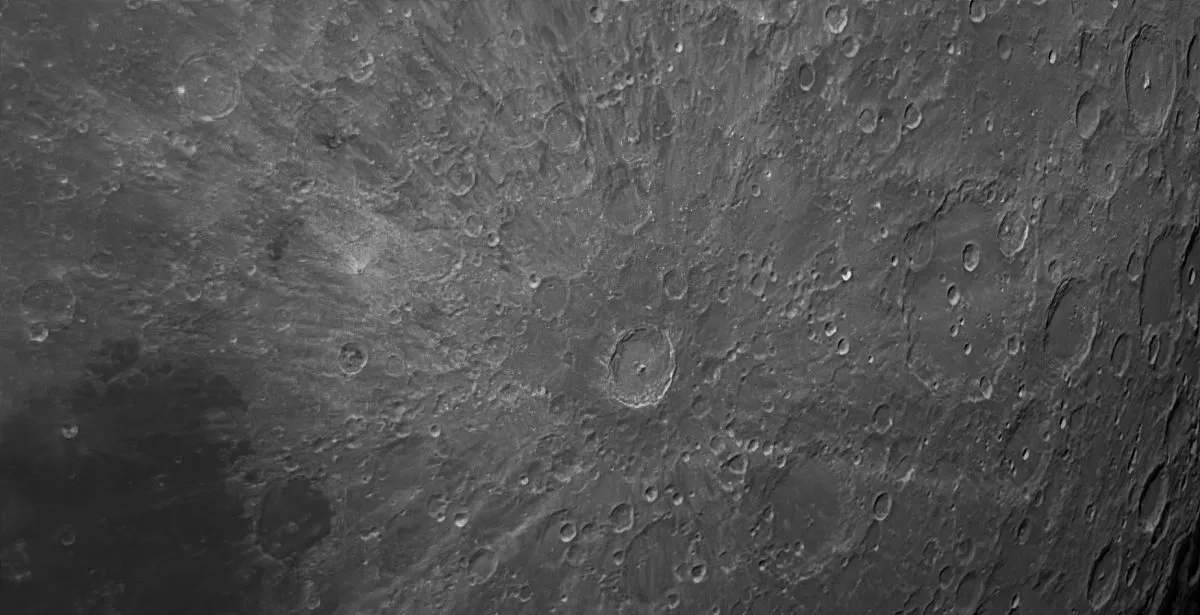
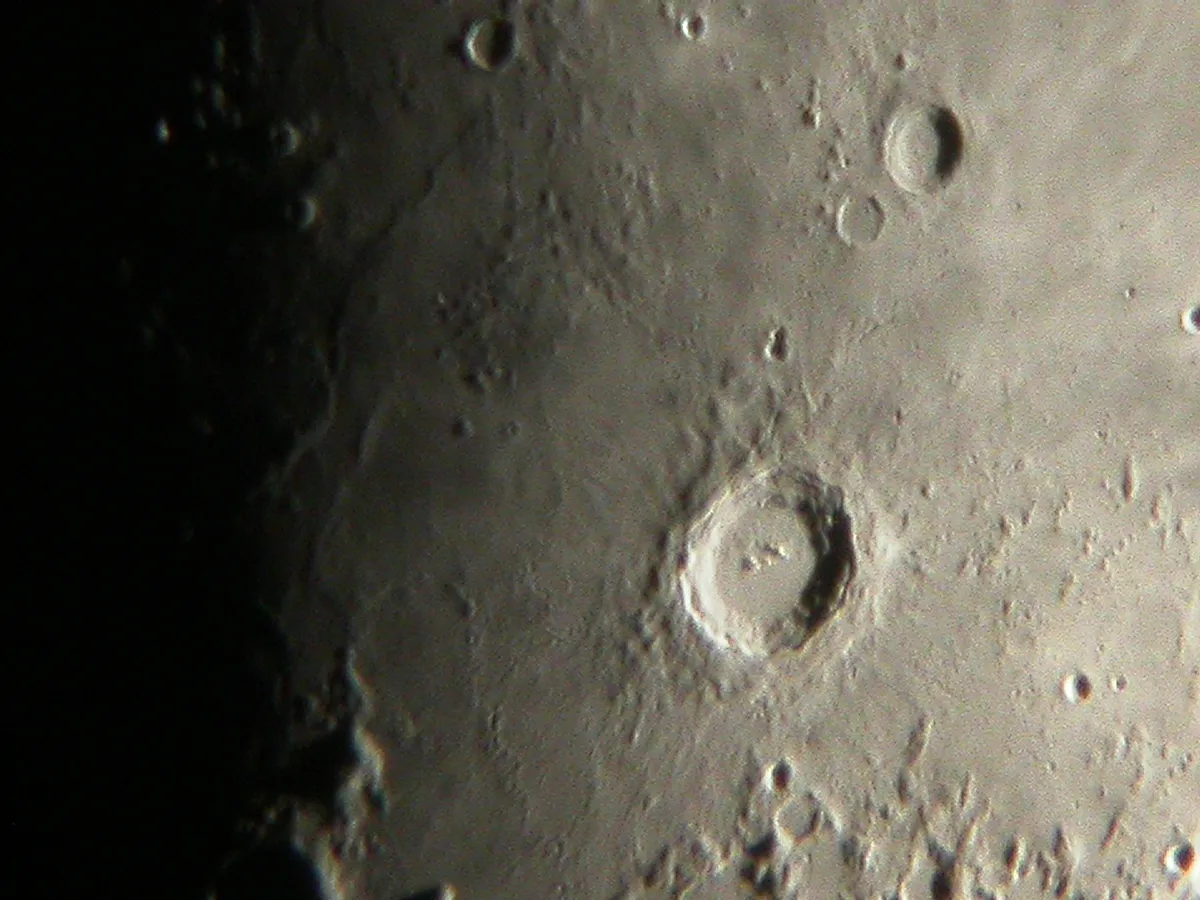
Crater Copernicus
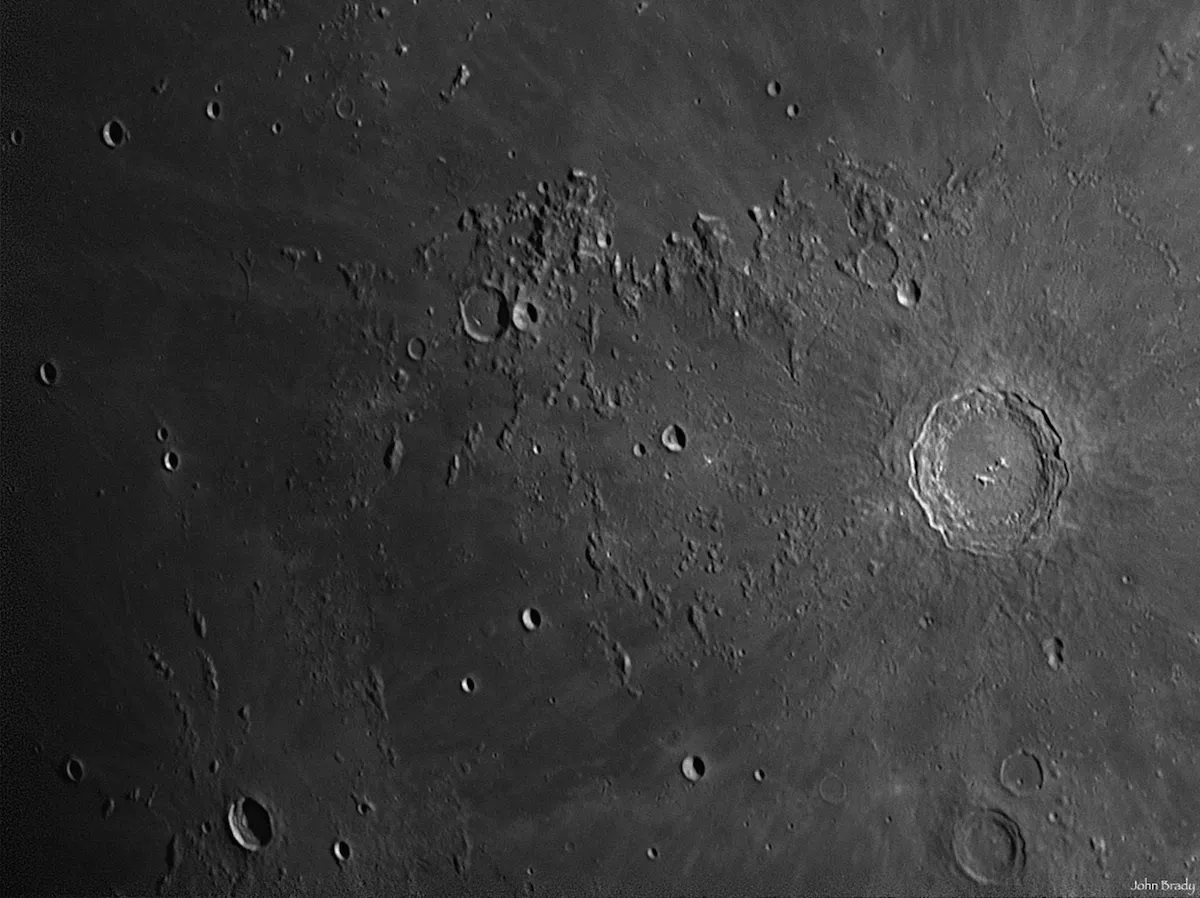
Being one of the most stunning craters on the Moon, Copernicus is a wonderful imaging target. See if you can capture its magnificent terraced walls.
Montes Apenninus
This chain of peaks is one of the great lunar mountain ranges and a good target for afocal photography. It stretches 600km across the Moon’s surface.
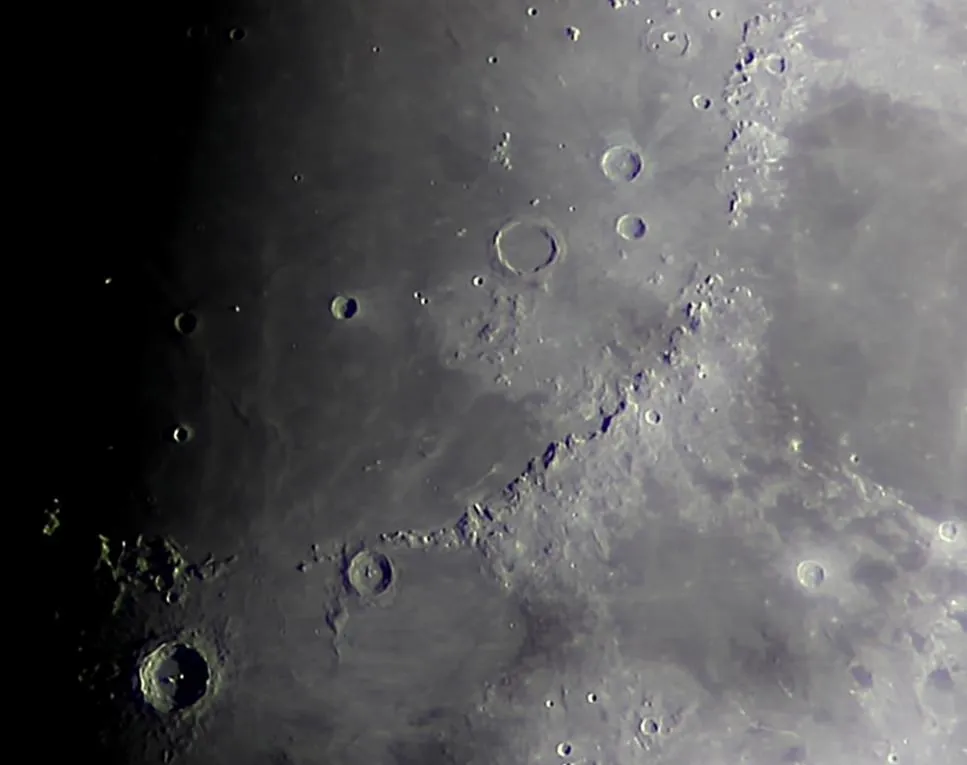
Rupes Recta
Also known as the ‘Straight Wall’, Rupes Recta is an enormous fault on the lunar surface. The trick is to catch it under the right illumination to see it clearly.
Vallis Alpes

This valley cuts straight through the lunar Alps. The challenge here is to see if you can capture the elusive rille that runs all the way along its length.
Crater Tycho
Crater Tycho is surrounded by ejecta rays – brighter material that was flung out by the impact that formed the crater. It has a huge peak at its centre.
Photograph the Moon with a smartphone
Here we'll show you how to use a smartphone to take images of the Moon with afocal imaging, the technical term for simply aiming your smartphone’s camera down your telescope’s eyepiece.
There are two ways to do this: one is to simply hold your phone’s camera over the eyepiece, the other is to use a smartphone adaptor, which attaches to your telescope’s eyepiece to provide greater stability.
You wouldn’t think it would be difficult to point a smartphone camera down the eyepiece of a telescope, but there are techniques that need to be mastered.
For more info, read our guide to smartphone astrophotography or the best gadgets to turn your smart phone into an astrophotography camera. Our find out the science behind a supermoon.
You’ll need to hold the phone squarely over the eyepiece and keep it steady without touching the telescope.
Once you’ve got this bit right, the tricky part is pressing the shutter button without moving the phone. Be prepared for some mediocre shots at first but persevere – they will get better.
Whether you hold your phone or use an adaptor, you’ll have to set your telescope up with an eyepiece, ideally one with a low to medium magnification to start with. 25mm is normally a good choice.
If you’re using a short focal length telescope with a low-power eyepiece, you should be able to get a shot of the Moon with the telescope on a fixed tripod.
A driven and polar-aligned equatorial mount makes things easier, keeping the Moon centred and allowing you to use higher magnifications without your images suffering from motion blur.
Point the telescope at the Moon and focus the view through the eyepiece. With the Moon centred in view, hold your smartphone so it’s pointing squarely down the eyepiece.
Try not to touch the eyepiece as this may move the telescope, nudging the Moon out of view.
Once you’ve got the Moon on the phone’s screen, check that the camera lens is looking squarely down the eyepiece.
If you get it right, the light from the eyepiece will be at its brightest and evenly spread as it enters the phone’s camera lens.
If it’s slightly tilted, you’ll get a gradual degradation of brightness across the image.
When you’re all lined up, take the shot. Be gentle, though, as it’s easy to move the phone as you press the shutter button.
Some smartphone earphones can be used to operate the shutter via their in-line volume controls, while others offer voice control to prevent movement at this crucial moment.
For extra stability, a smartphone adaptor can take the strain out of holding your smartphone so are well worth your consideration.
Modern smartphone cameras are starting to offer more ways of altering exposure, often by photo apps. But the Moon should be bright enough to trigger your phone’s autoexposure functions so that the shot comes out correctly.
Photograph the Moon with a smartphone: step-by-step
Prepare
Anticipate the Moon’s movement and point your telescope just ahead of it in the sky (you’ll take the shot when the Moon becomes centred). Focus the scope as accurately as you can, making sure the features on view are sharp.
Line up and shoot
Hold the phone squarely to the eyepiece until you get a bright blob on the screen. Carefully alter the distance between camera and eyepiece until the view focuses and isn’t overexposed. With the image on the screen, take the shot.
Use a smartphone adaptor
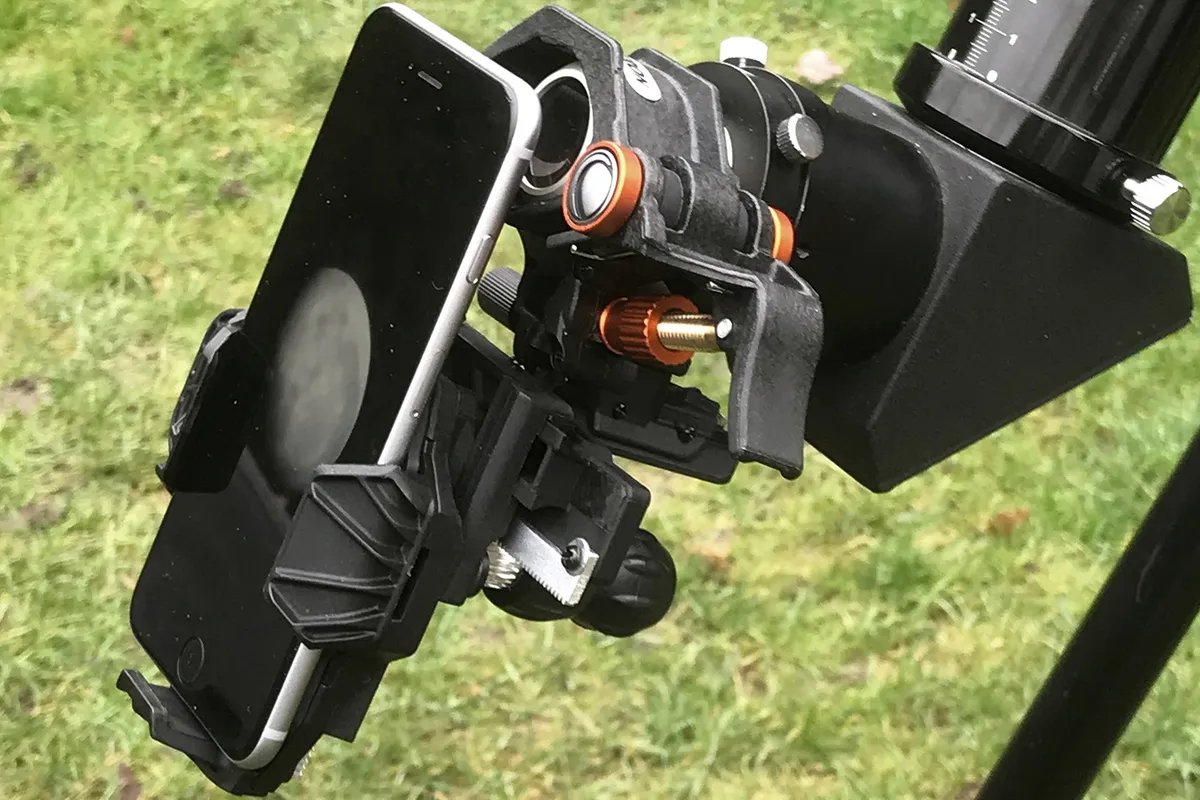
A smartphone adaptor takes the strain out of holding your phone and keeping it lined up. Once attached it can be adjusted until the smartphone lens is lined up with the eyepiece. Once aligned, you can take the shot.
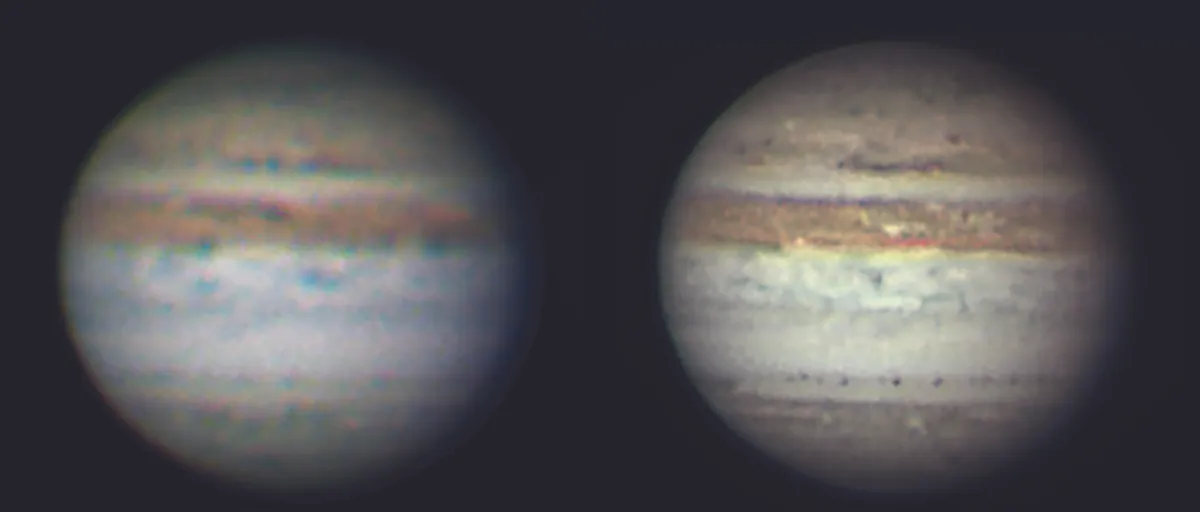
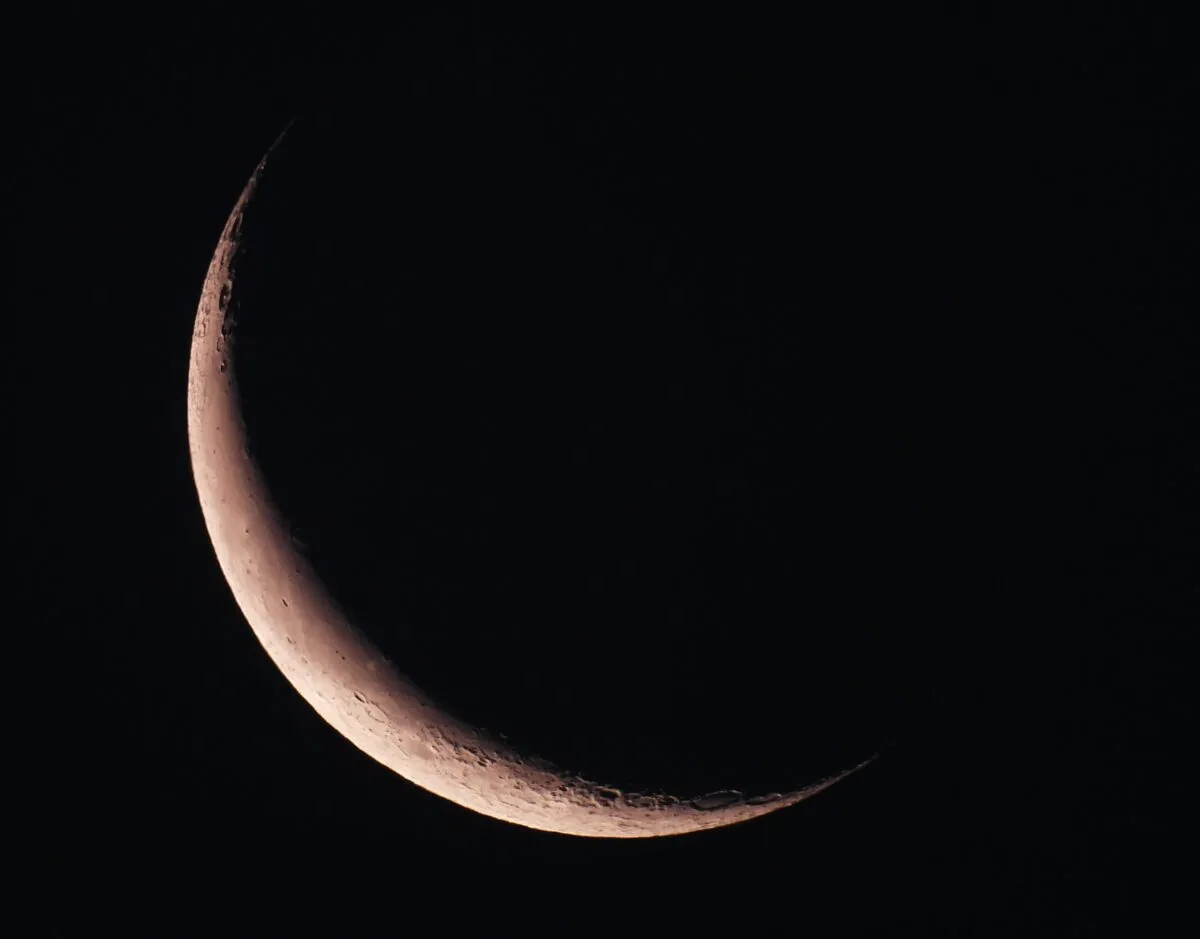
Photograph the crescent Moon and Earthshine
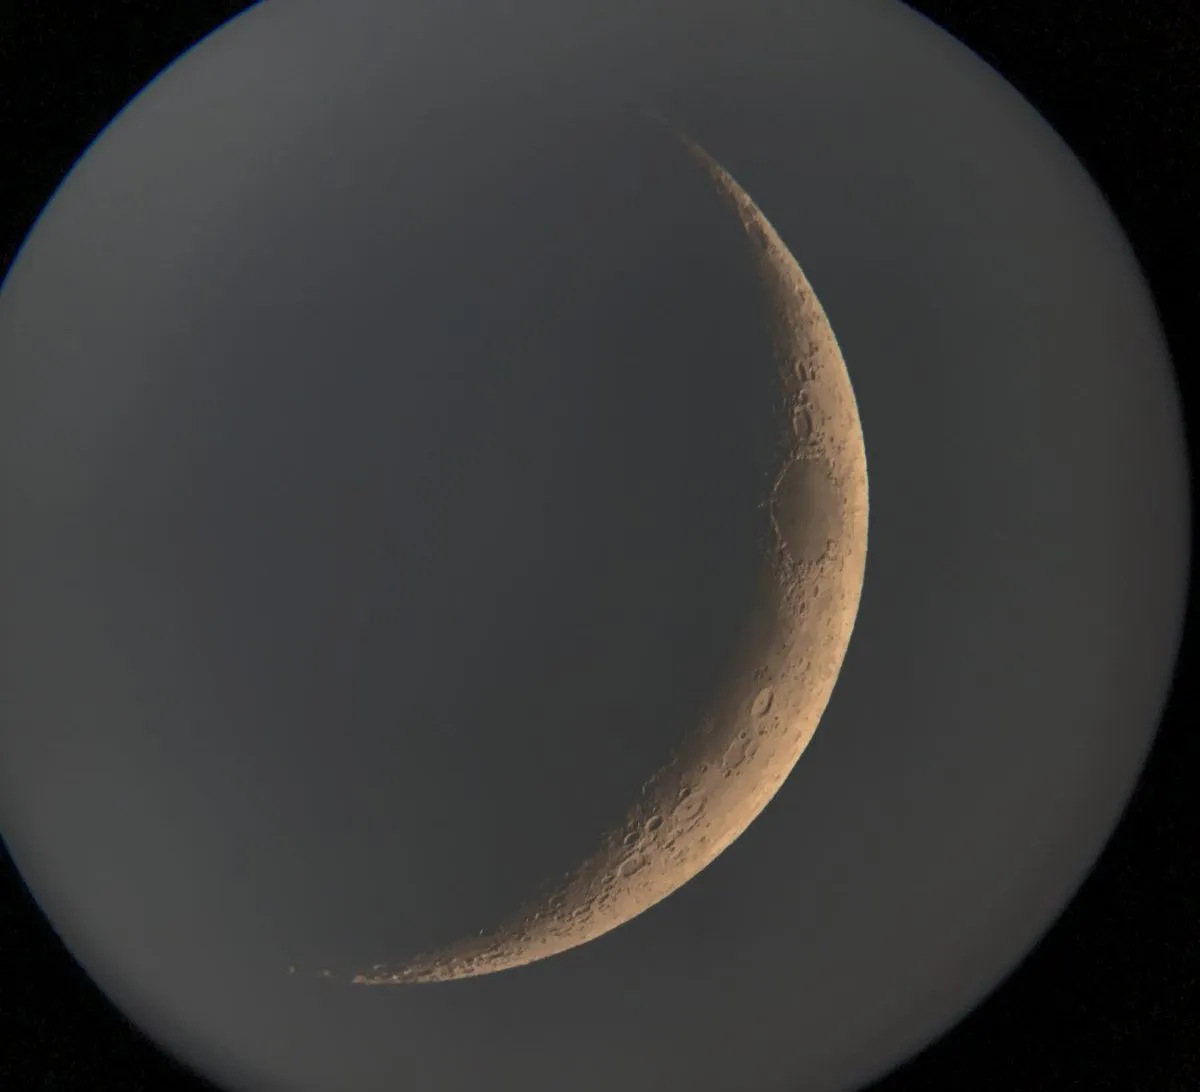
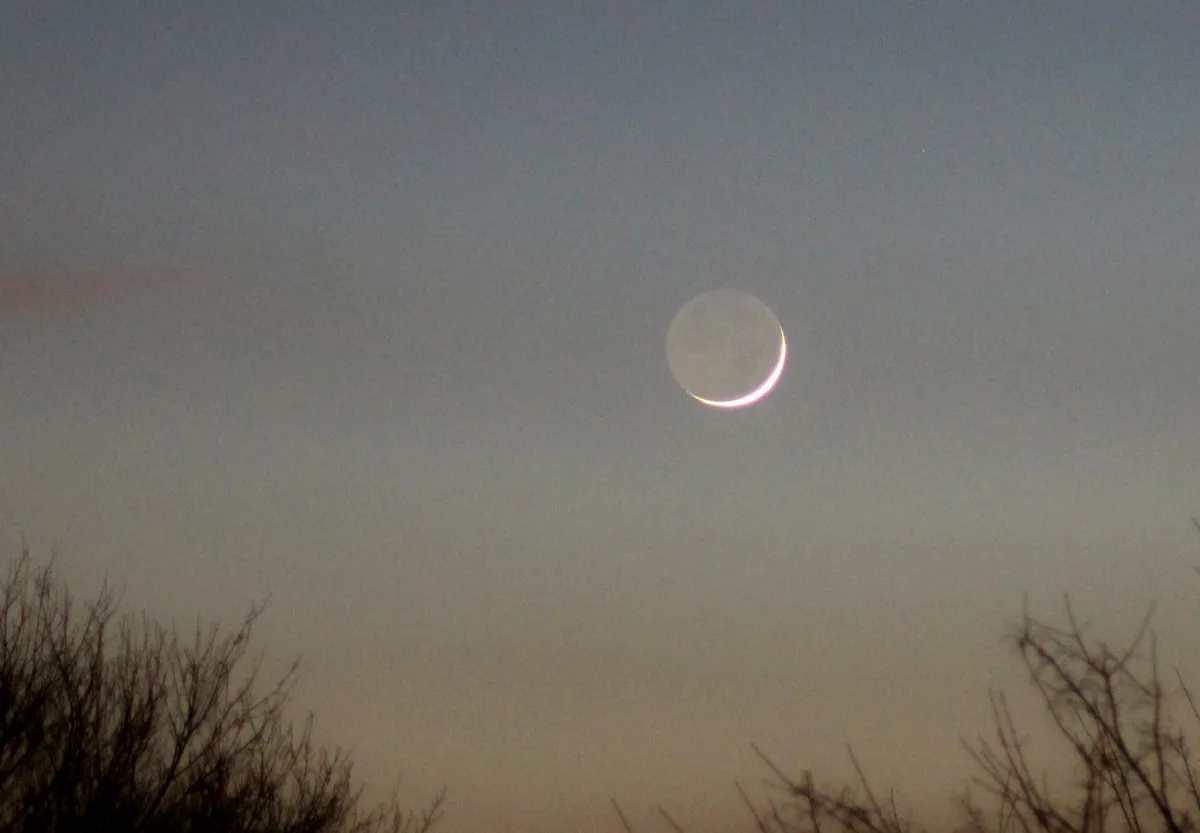
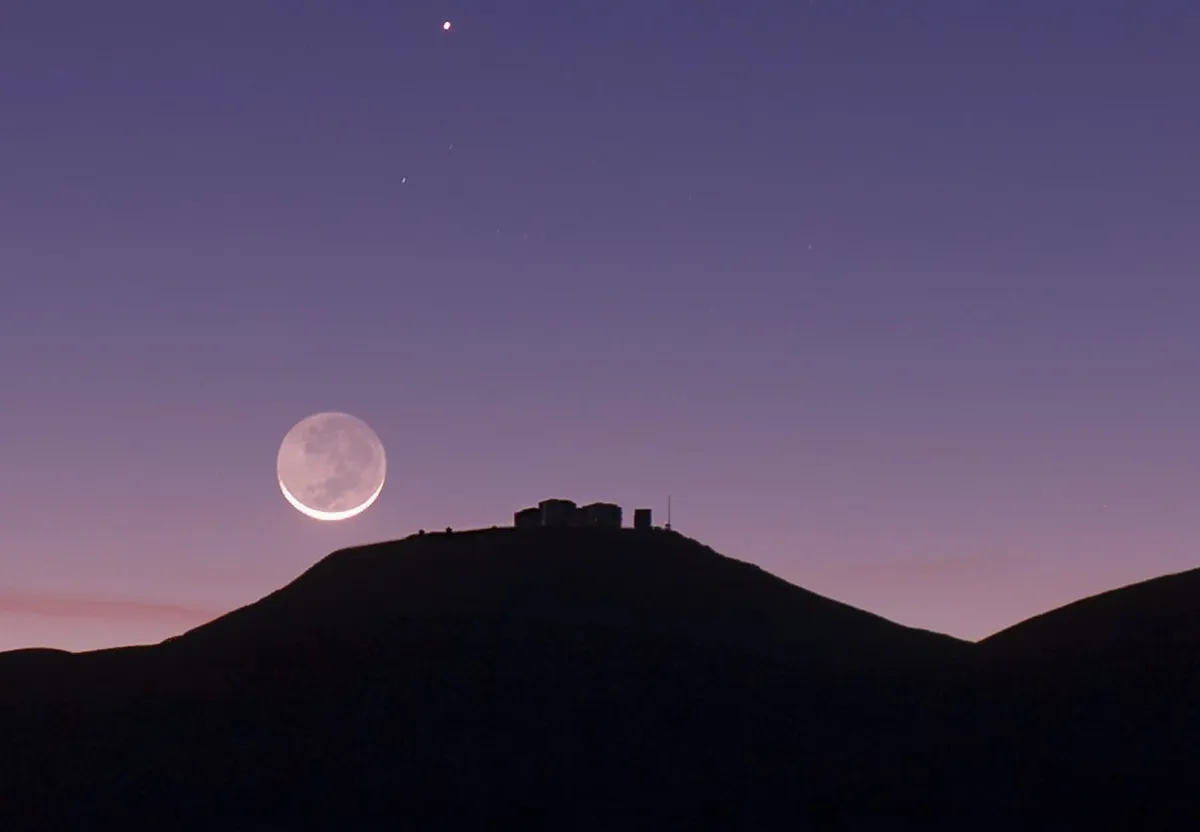
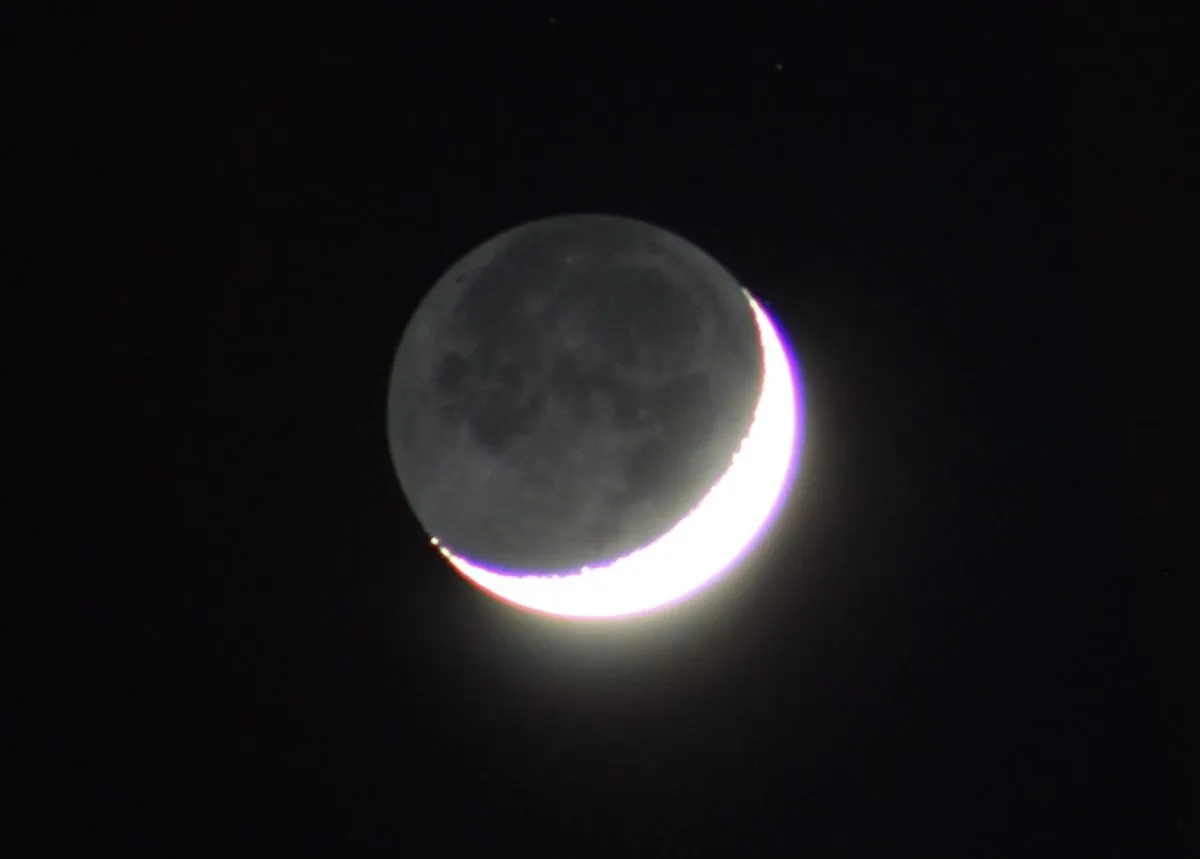
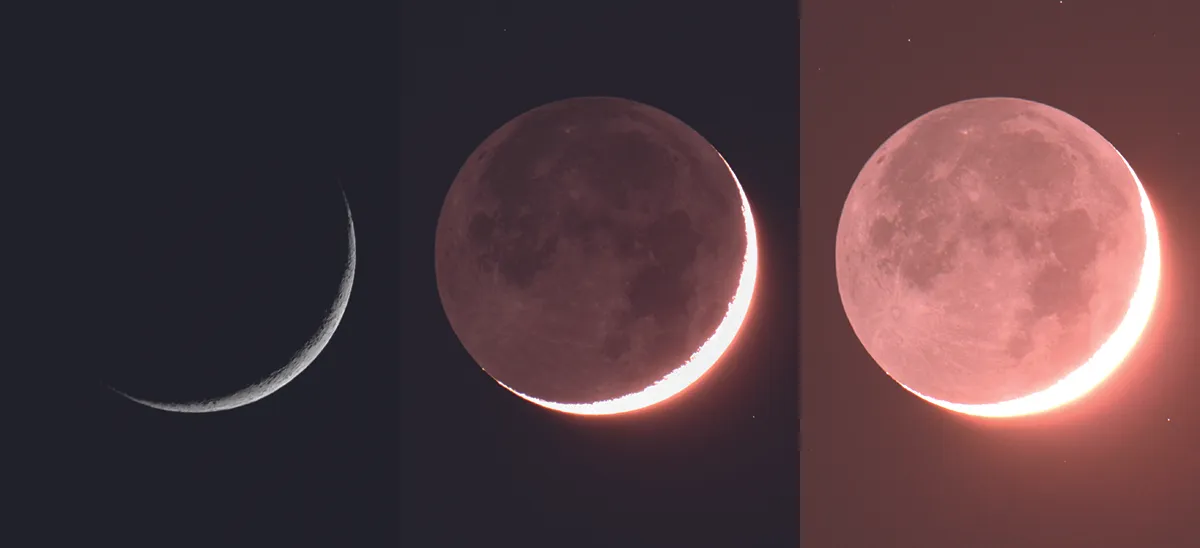
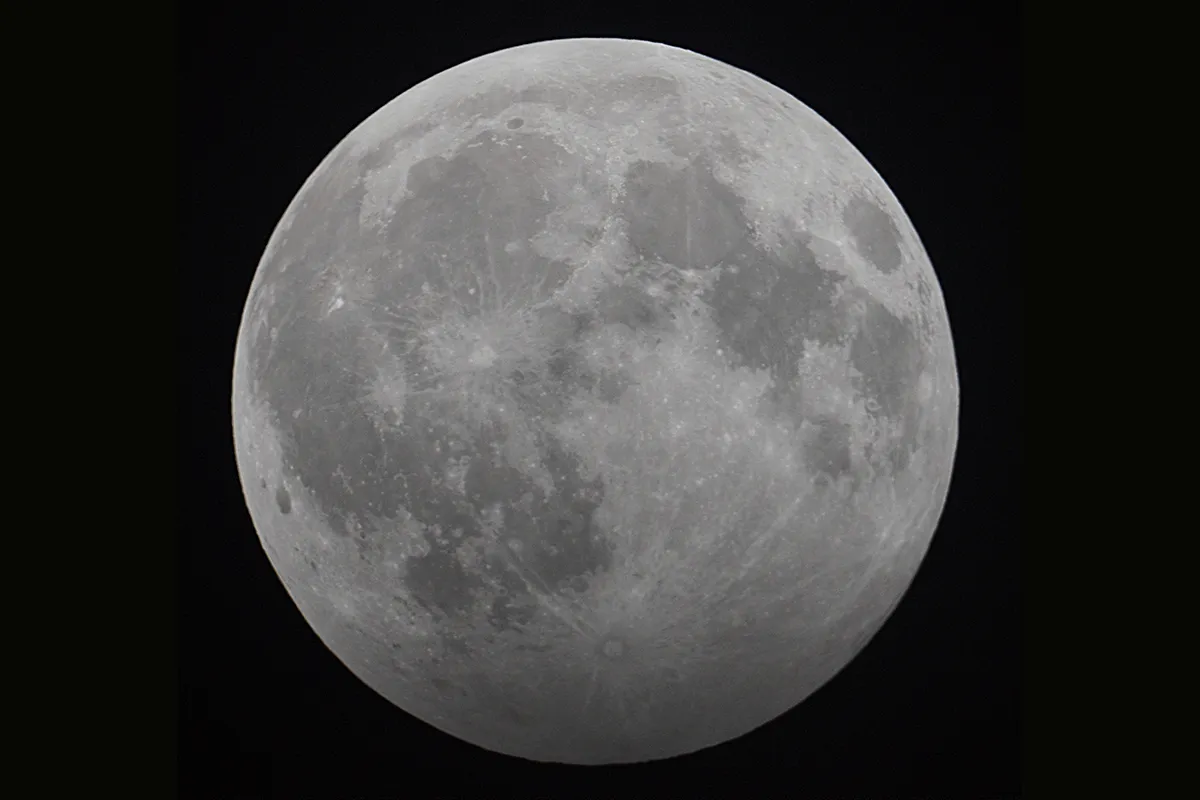
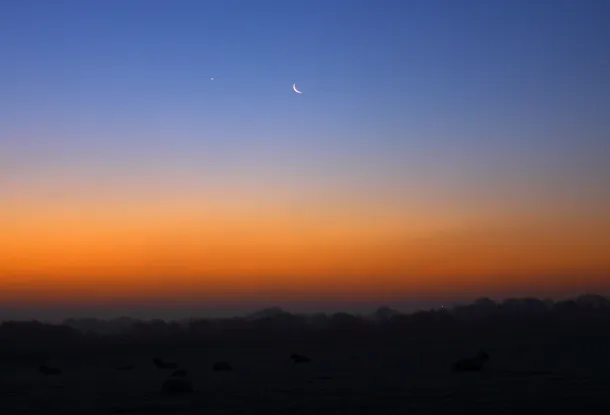
We’re going to show you how to capture a full-disc shot of the crescent Moon, along with its accompanying earthshine, using a DSLR camera.
The image we’re aiming for, like the ones below, depicts the Moon with a slim edge illuminated by light directly from the Sun and the rest of its face dimly lit by light reflecting off Earth.
As is often the case with astrophotography targets, it involves more than simply pointing your camera up at the sky on the appropriate night and pressing the shutter release.
But before we explain how to catch a shot like this, it’s worth explaining how this elegant scene comes about.
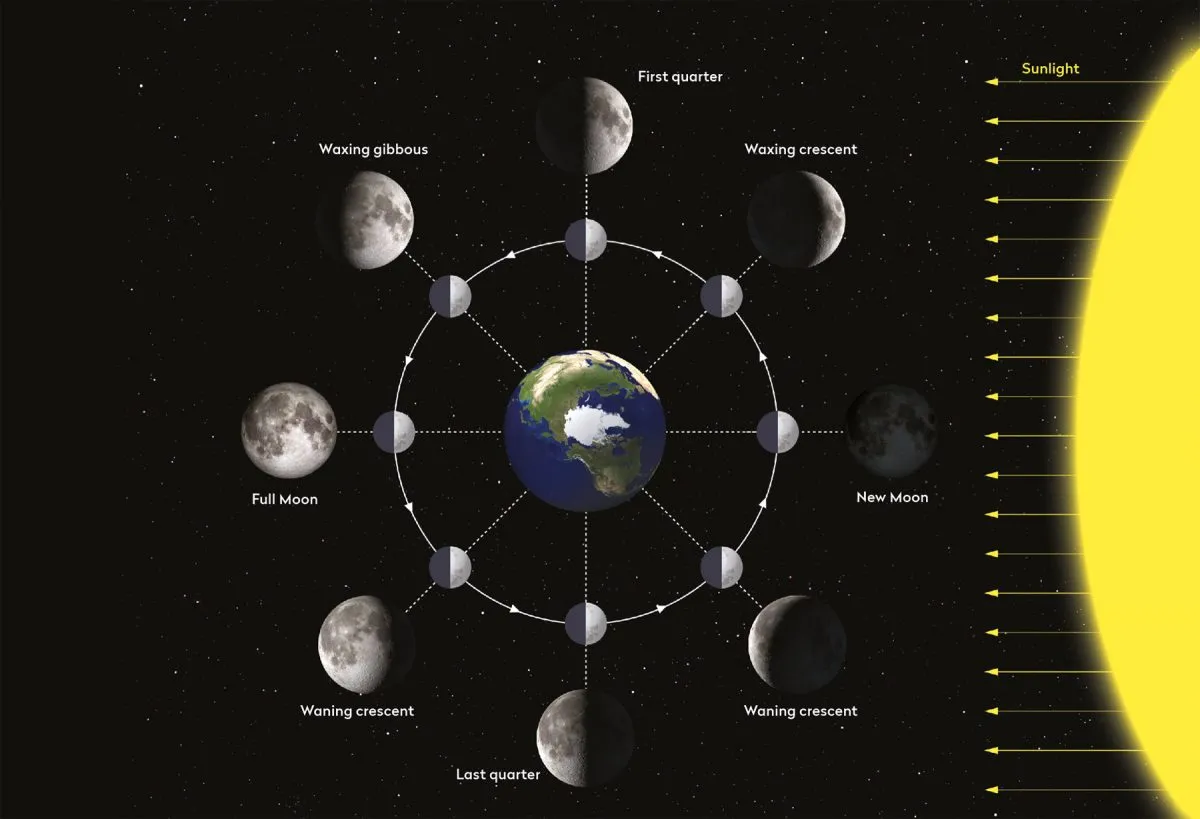
At the point of new Moon, the lunar disc lines up with the Sun, while appearing slightly above or below it in the sky.
In this position, the Sun’s light is only able to reach the far side of the Moon directly, so the lunar face (the side seen by us on Earth) is bathed in darkness.
It’s not possible to see the Moon at this point in its monthly cycle as it is lost to the Sun’s glare.In the days following new Moon, the Moon appears to gradually separate from the Sun.
As the Moon slowly moves eastwards and its separation from the Sun increases, more of the Sun’s light is able to creep around its edges and we get to see more of its face illuminated with each passing night
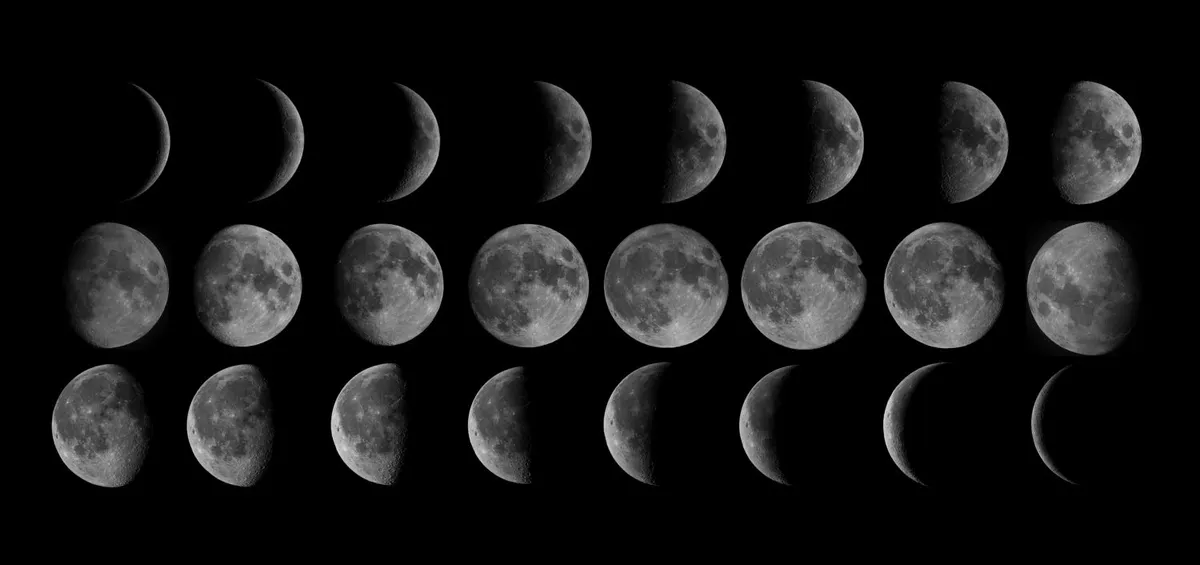
This process is what gives us the Moon’s familiar phases, starting with the new Moon, followed by the crescent Moon, then the first quarter and the gibbous phases, before reaching the full Moon phase, when it’s opposite the Sun in the sky.
The sequence then plays out in reverse, before reaching the next new Moon, 29.5 days later.
During this cycle we can often see the dimly illuminated portions of the Moon thanks to earthshine but the contrast between the portions is perhaps most dramatic during the crescent phase.
Imaging the earthshine is pretty straightforward: you use a longer exposure than for the crescent. This overexposes the crescent but will bring out detail on the earthshine-lit portion.
If you were to capture an image exposed for the crescent and another for the earthshine, you’d think that they would line up and produce a view similar to that which you’d see with the naked eye.
But achieving this can be difficult. The human eye has an amazing dynamic range.
When you look at a thin crescent Moon with the glow of earthshine, it’s easy to take for granted just how much work your eyes are doing to see both the crescent and the earthshine so naturally.
A camera will struggle to see this contrast in one image: you’ll need to combine two exposures.
This technique, known as high-dynamic-range imaging, is a key astrophotographic skill that can help with tricky targets such as this. The steps below will help you capture the necessary shots and blend them.
Photograph a crescent Moon, step-by-step
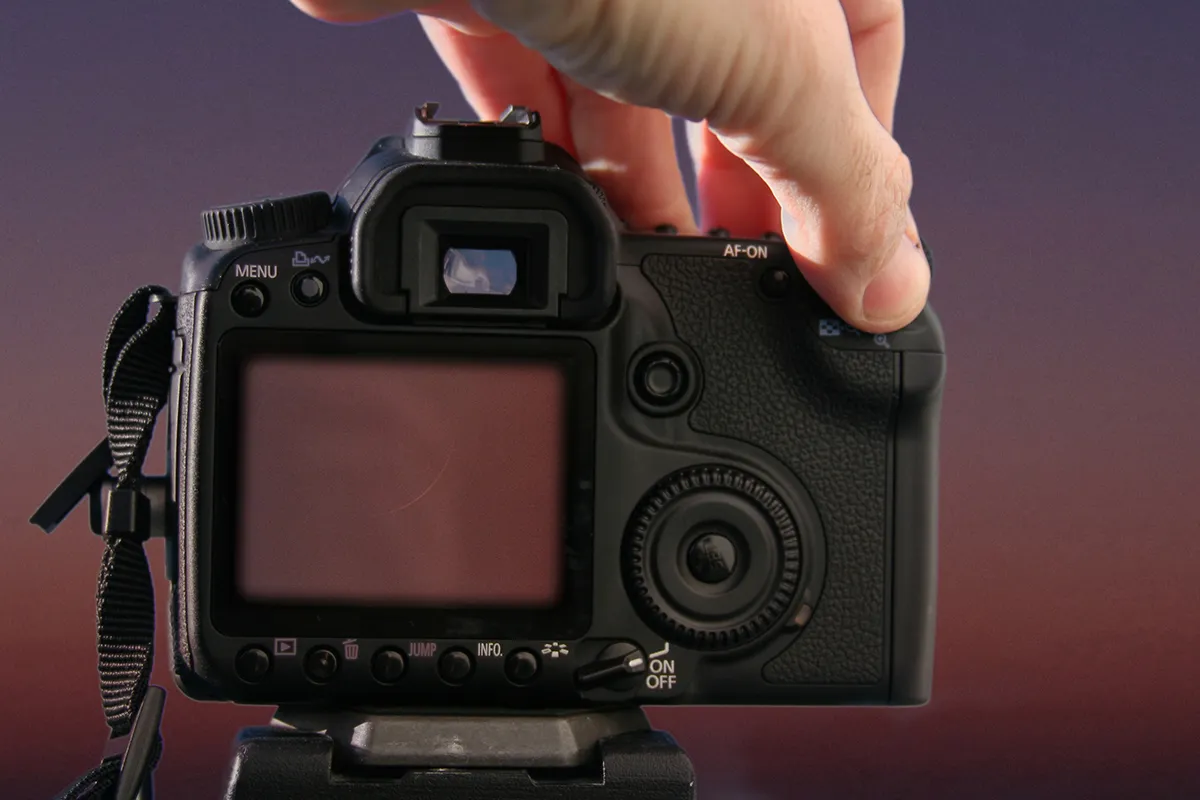
Attach your camera
Attach your DSLR to a telescope or lens with a focal length of at least 300mm – this will give you a large enough image to see the Moon’s disc with some detail on it. A telescope or lens with a focal length of around 1,000mm is ideal.
Set the ISO
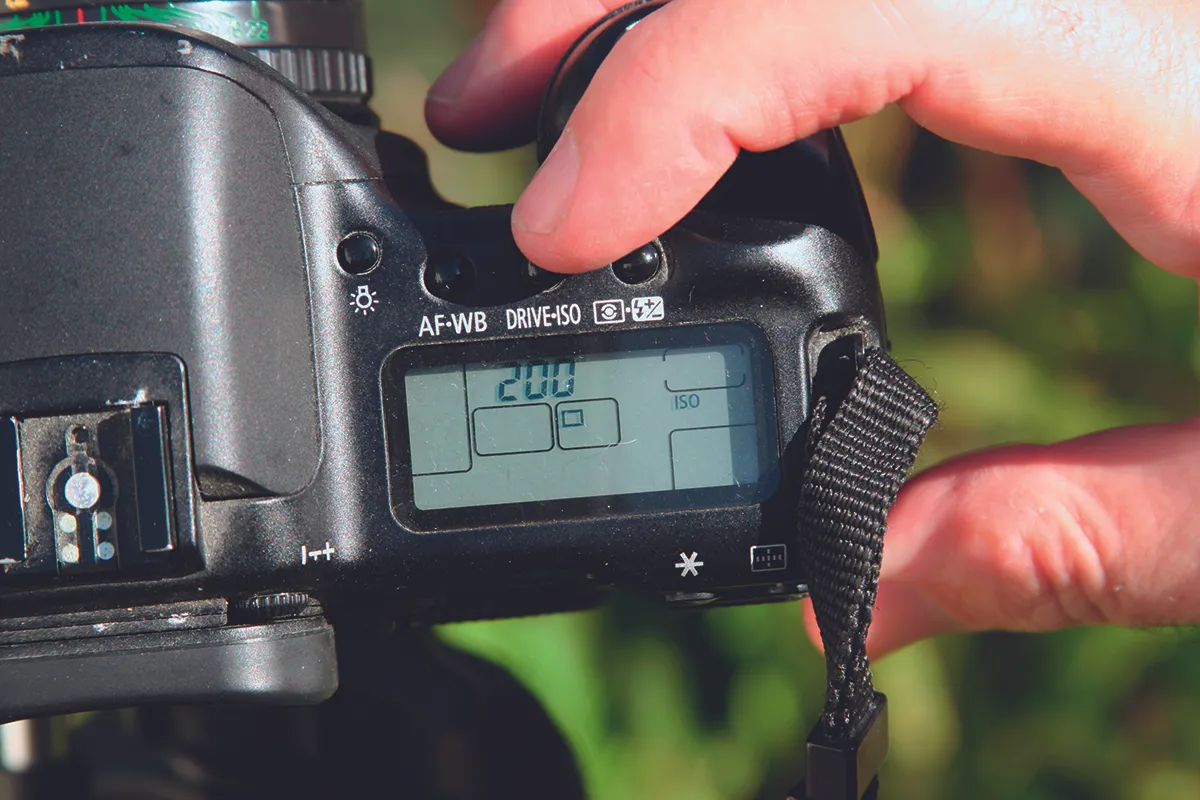
Focus the camera as accurately as possible and set an ISO of 200-400 for the crescent shot. The exposure you’ll need will depend on your equipment. Take a test shot of 0.5 seconds and review the result.
Adjust exposure
Adjust the exposure so that the crescent comes out bright but without any white in it: check by looking at the image’s histogram on your DSLR. Take several shots increasing the exposure as you go until the image looks really overexposed.
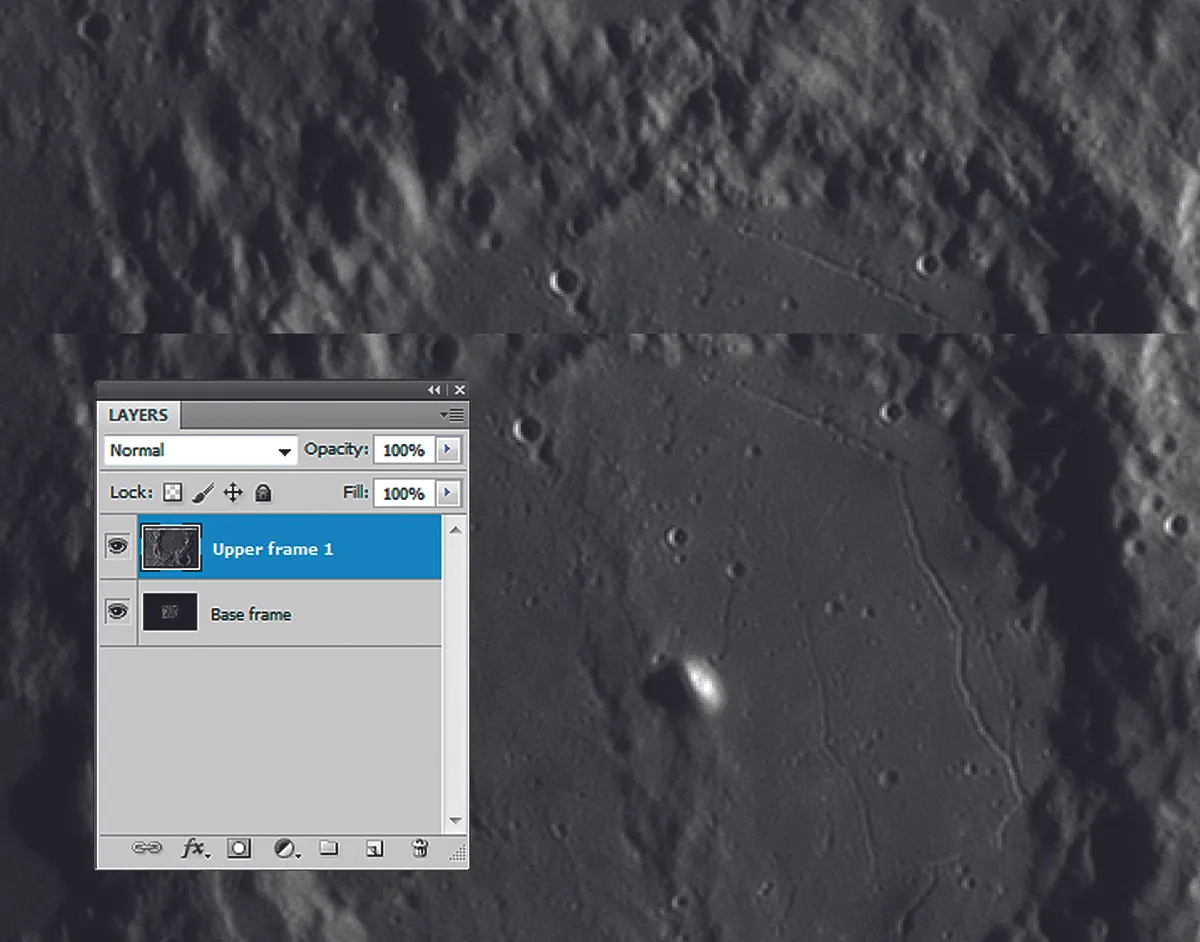
Layer up
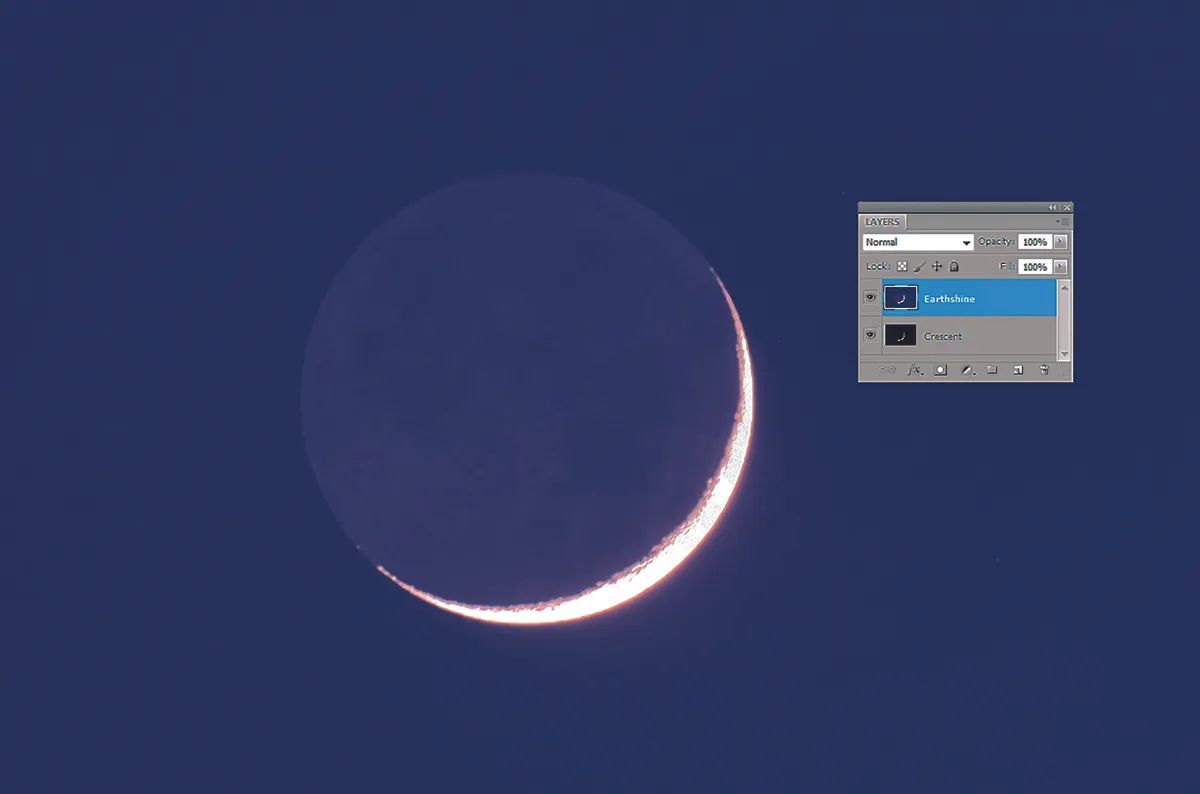
Pick the best crescent shot and open it in Photoshop or GIMP. Then pick a sharp overexposed shot of the earthshine without too much glare from the crescent. Load it as a new layer and align the two – reduce the opacity of the upper layer to do this.
Magic masker
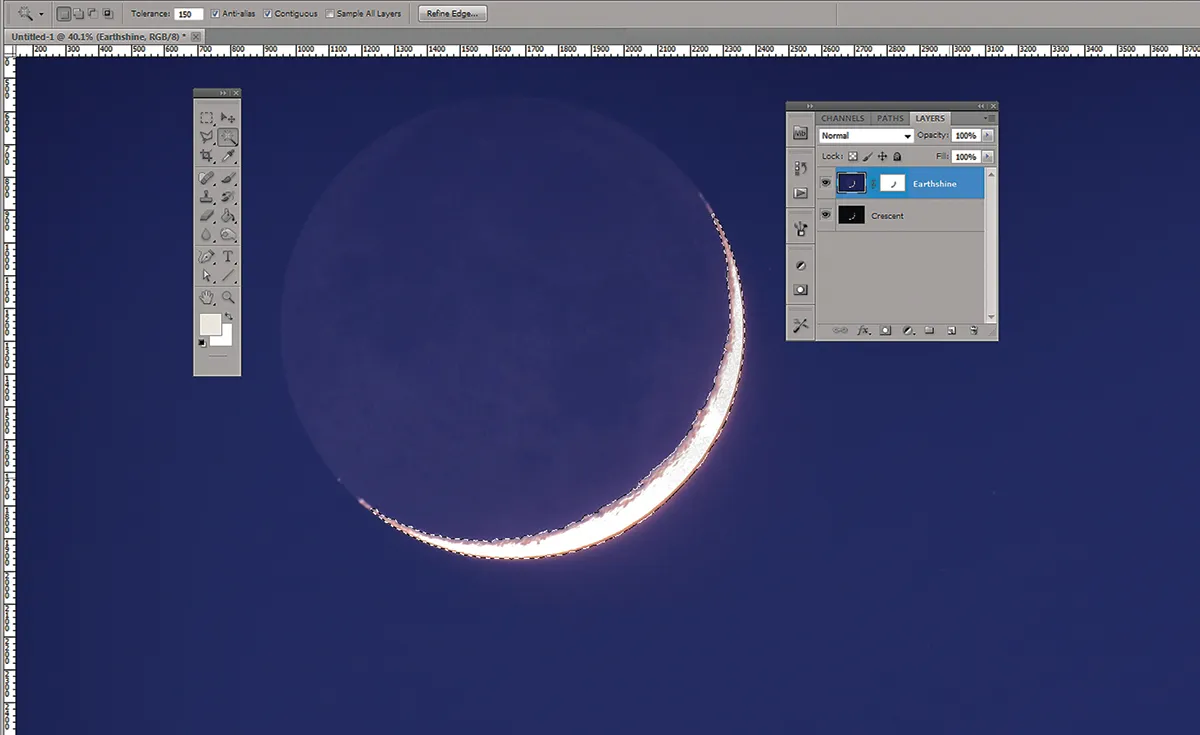
Make the upper layer opaque, then use the magic wand tool to select the crescent (adjust the tolerance if it’s not selecting it all). Create a layer mask. In Photoshop, copy the selection, hold down the alt key and click the layer mask button.
Blur and blend
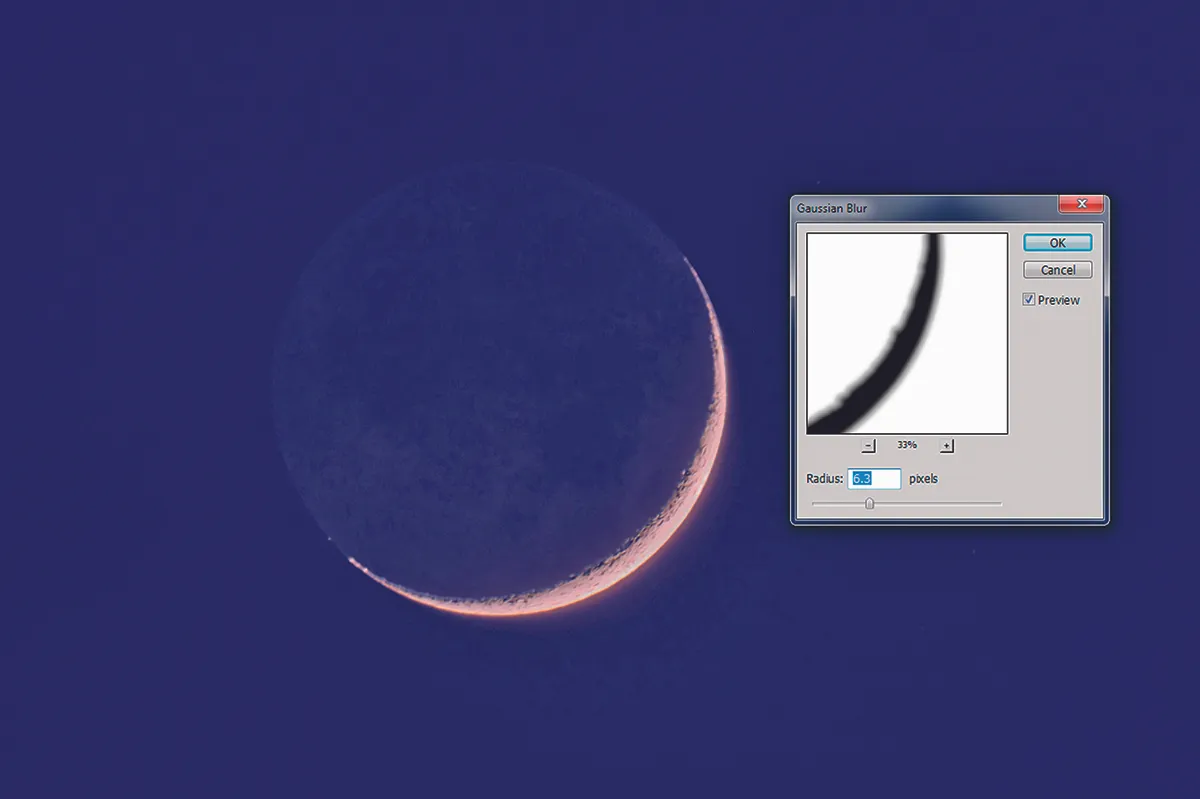
Use the eyedropper to sample the sky colour and use it to fill a layer between the shots. Set the new layer’s blend mode to Lighten and merge with the correctly exposed layer. Apply a Gaussian blur to the top layer’s mask and apply until the images join.
Create a Moon mosaic photograph
Before you can create a mosaic, you need detailed pictures.
A mono, high frame rate camera is the best tool for the job, as it allows you to record a short video of each ‘pane’ (segment of the lunar surface) as an AVI file, the individual frames of which can be stacked into a still image.
If your camera doesn’t have an infrared-blocking filter built in, consider attaching an infrared-pass filter. Doing so can reduce the effects of poor seeing. Alternatively, try a red filter.
Moving across the lunar surface in overlapping panels is something that sounds easy, but there are pitfalls to avoid.
The higher the magnification you use, for instance, the easier it is to get lost and miss a bit out; this is a common frustration when starting out.
It pays to be realistic in terms of image scale. If you’re experimenting with mosaics for the first time, capture a small number of panes to start with so you can get a feel for what’s what.
Image scale can be adjusted using optical amplifiers such as Barlow lenses, but aim to keep your telescope’s overall focal ratio somewhere between f/15 and f/45. Only go higher if the seeing gets really good.
A driven, equatorially mounted scope is ideal. Check your camera’s alignment by slewing in right ascension and rotating the camera so that features move parallel to the bottom edge of the frame. Finally, focus your setup.
There are various ways to move across the Moon, but imaging in horizontal strips with lots of overlap is best. A good overlap is typically 20-25%.
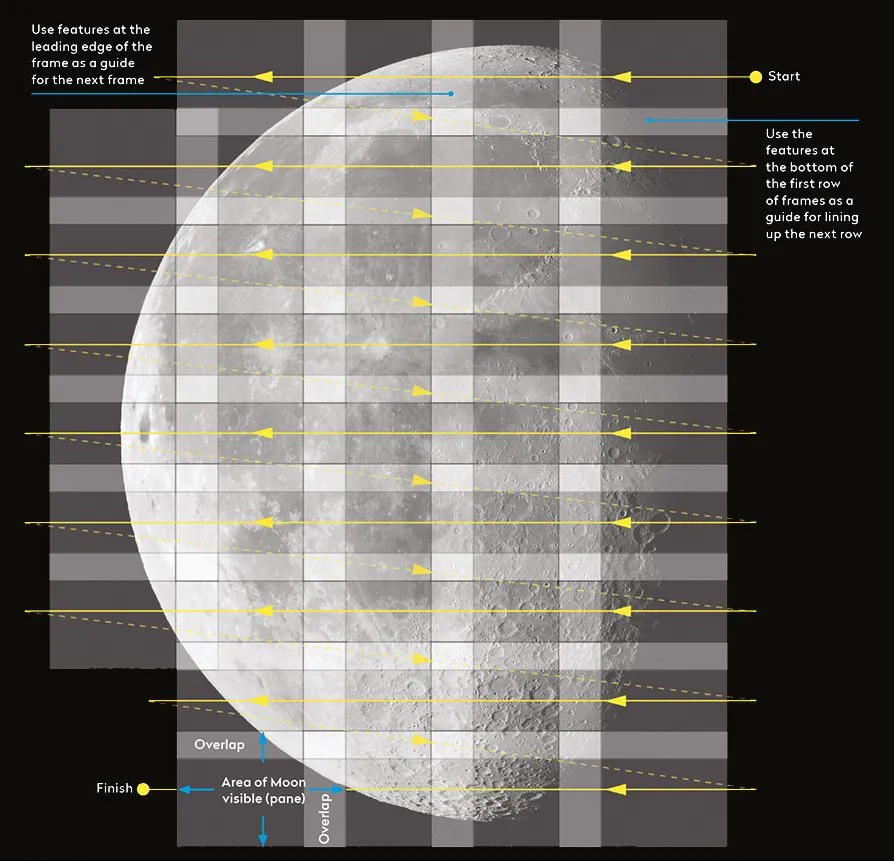
When lining up your first pane, make a note of features close to the corners of the frame and use these as guides when positioning for the next one.
It’s good practice to image the strips in the same direction, moving back to the same starting side of the Moon between strips. Use features in the first strip of panes to make sure your vertical adjustment has plenty of overlap.
A rough sketch of the features in each frame can help. If you lose track, wind back to the last place you know you definitely imaged. It’s better to risk duplication than a gap!
Point your telescope at the brightest part of the Moon and adjust your camera’s gain and exposure so peak saturation is around 90%.
You should now be able to leave this alone. You can adjust the exposure levels for each frame if you want, but this is more time consuming and requires greater effort when it comes to stitching your panes together.
The advantage is less noise in dark regions and extra navigational detail when crossing seemingly featureless areas, such as the lunar seas. For more on this, read our guide on how to remove noise from your astrophotos of the Moon.
What you’ll need to do during a long mosaicing run is refocus often. This is essential to prevent defocusing caused by temperature variations.
A 12V camping hairdryer is also invaluable for removing moisture from dewed-up optics during long runs. For more on this, read our guide on how to stop dew forming on your telescope.
Two final tips: mosaic captures typically take up lots of computer hard drive space, so make sure you have plenty free. Plan ahead to make sure the Moon doesn’t disappear behind by a tree or rooftop part of the way through your imaging session.
Below we'll show you how to process your panes and create your Moon mosaic. For more info on this, read our dedicated guide to creating a Moon mosaic.
Stack your moon images
The next step is to process each AVI file to produce one still image, ready for assembly into the final mosaic.
For a large mosaic made with many panes this can be a daunting and tedious task, but there are ways to speed things up.
The first step is to analyse, register and stack the frames captured in each AVI file. There are various good free programs that can do this for you, including RegiStax, AutoStakkert and AviStack.
We’ll be using AviStack for the bulk of the processing and RegiStax to perform wavelet sharpening on the results. For more on this, read our guide to wavelets in RegiStax or how to stack DSLR images of the Moon.
The analysis step determines the quality of each still frame and then ranks them in order of how good they are. A user-set quality threshold then determines how many of the frames are used.
The frames that are above the threshold are ‘registered’ (aligned) to one another. These are then ‘stacked’ (averaged) to produce a final image.
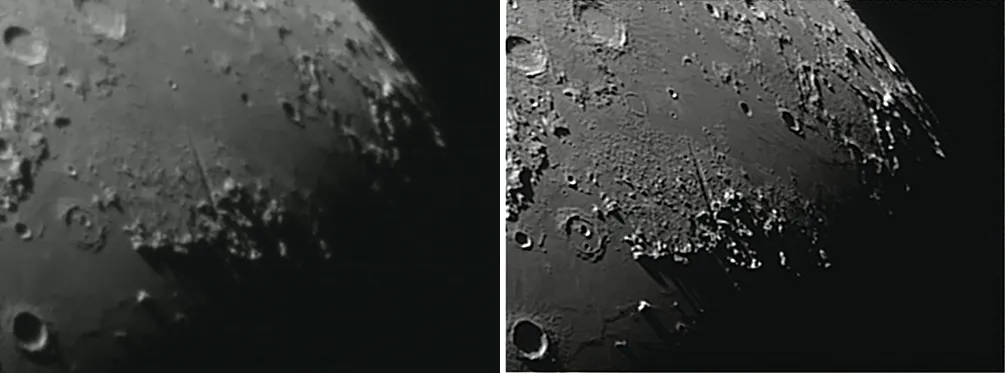
The higher the quality threshold, the fewer frames will ultimately go into the stack. This will result in the sharpest output, but with fewer frames to average, noise is more noticeable.
Set the quality threshold lower and there will be more frames to average, resulting in a smoother, less noisy result. But using lower-quality frames reduces overall image sharpness.
It’s a good idea to perform a number of test runs using AviStack if you’re not familiar with the program.
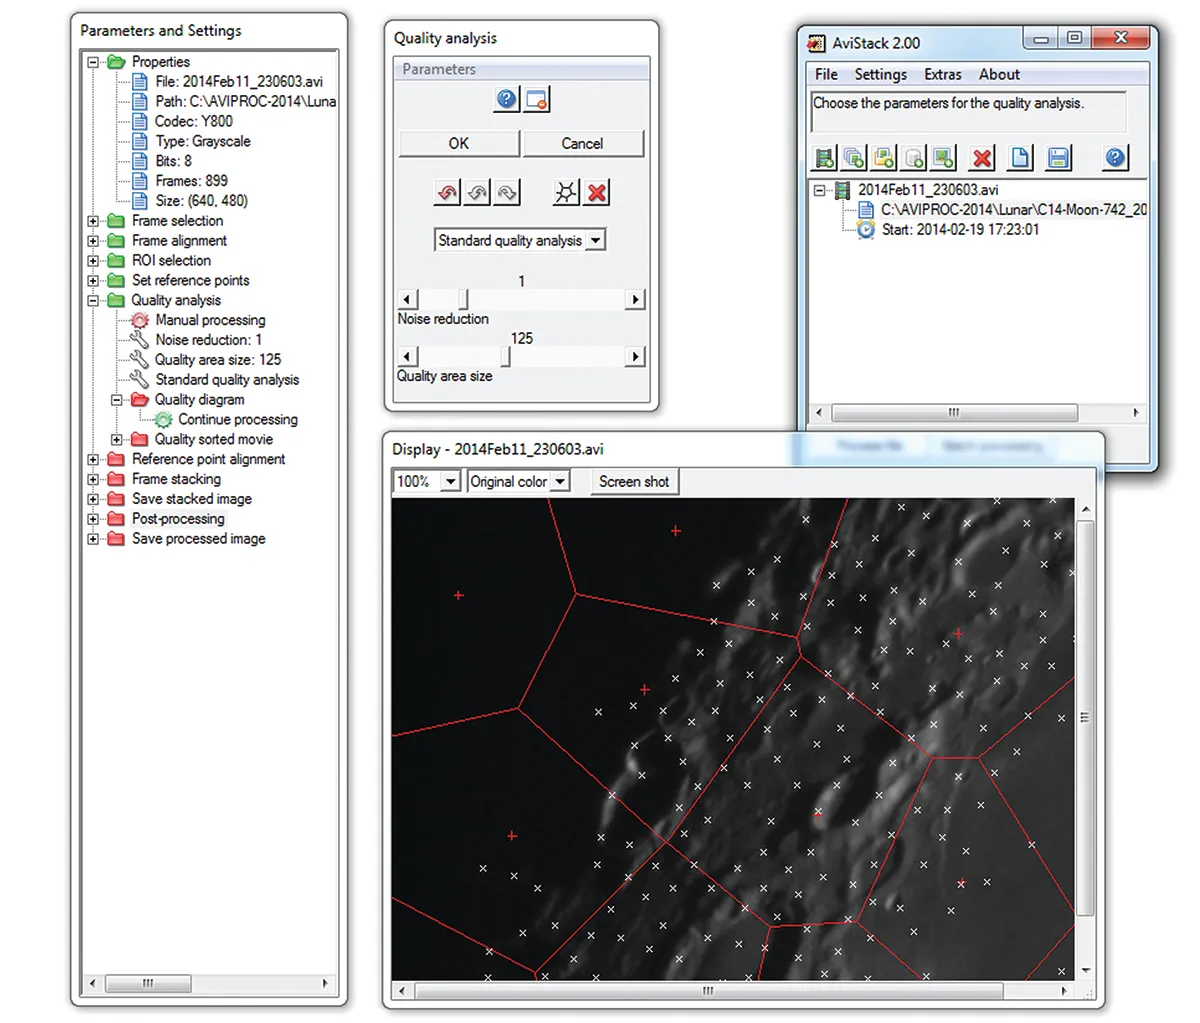
There are a lot of settings that can be configured. These are shown in a separate window and can be viewed by expanding the tree list.
Double clicking on a parameter section, for example ‘Frame selection’, will bring up a control window allowing you to adjust the settings. You can toggle between automatic and manual processing by clicking on the gear icon below the section header.
Setting the toggle to ‘Automatic processing’ lets AviStack make decisions for you, which can be useful if you’re not sure what you’re doing.
AviStack has a great batch-processing mode that can work on large numbers of AVI files unattended. The end result is a single distilled image for each AVI capture.
Various output formats are available, but we recommend PNG as this is a lossless format that many editing programs and file viewers can easily display.
Other lossless files can be used, but how easy they are to view and manipulate varies. Avoid formats such as JPEG that use ‘lossy’ compression – these discard data to make files smaller.

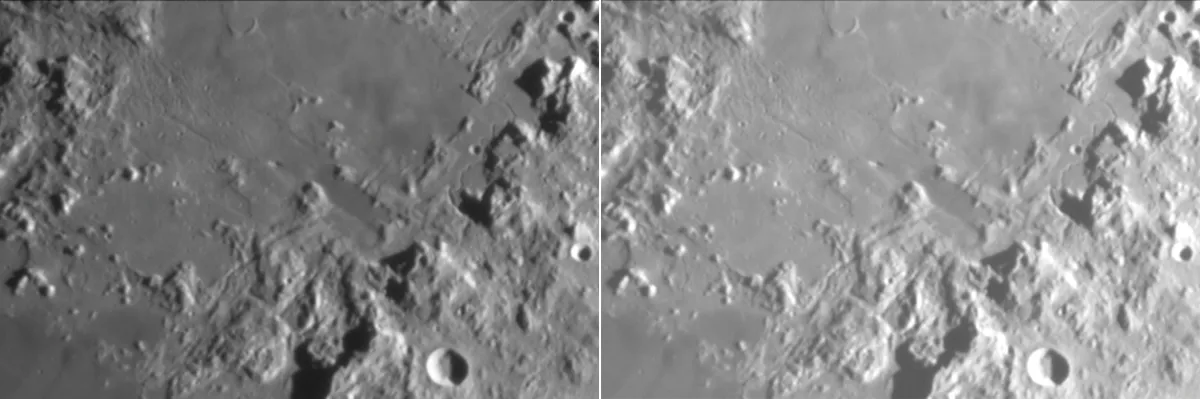
Following the step-by-step guide below, the initial process delivers results with no sharpening. To the eye these will look blurred, so to address this we’ll apply the excellent wavelet sharpening function in RegiStax.
Sharpening lunar images needs to be done with great care – it’s easy to get carried away and push it too far. If in doubt, leave the image up on your computer screen and walk away from it for a while.
When you come back, your initial reaction will be a good indicator as to whether you’ve taken things too far. If you’re creating your mosaic at low magnification, a gentle tweak on the first slider is all that’s normally required.
The most exciting part of mosaicing is building the final image. There are free programs that can do this automatically, such as Microsoft’s Image Composite Editor (ICE).
Building the mosaic manually is more time-consuming, but ultimately a more rewarding experience.
Doing it yourself can also help to avoid the errors that can creep in when you let automated programs carry out the process.
Process your lunar image, step-by-step
Load
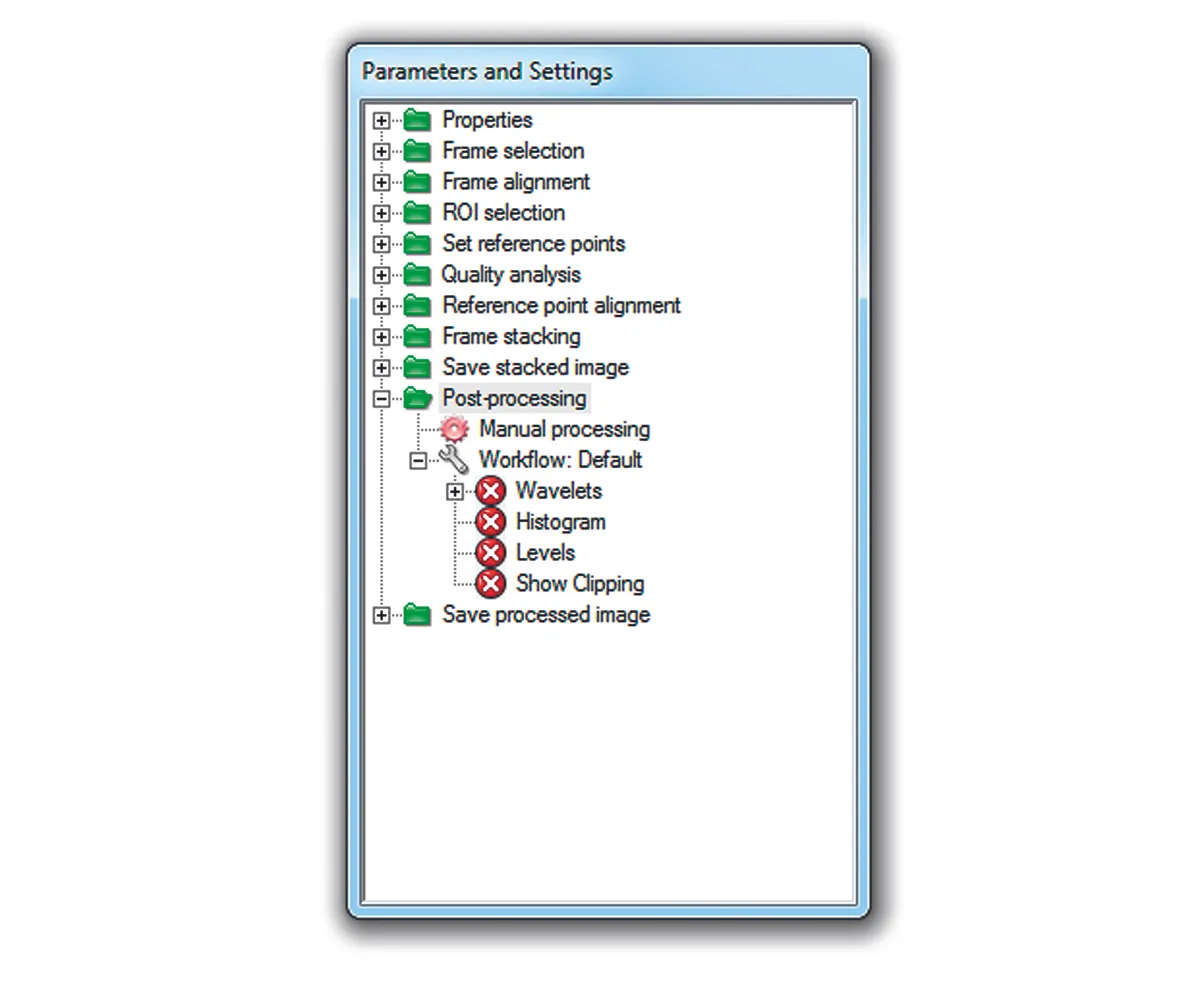
Load a single AVI into AviStack. If you’re processing it manually, select Settings > Processing > All Manual from the menu. If not, click on All Automatic. Expand the Save Stacked Image section and check Manual processing is set. Click on Automatic processing if shown. Expand the Post processing section and select Manual processing. The four options below should be deselected.
Save
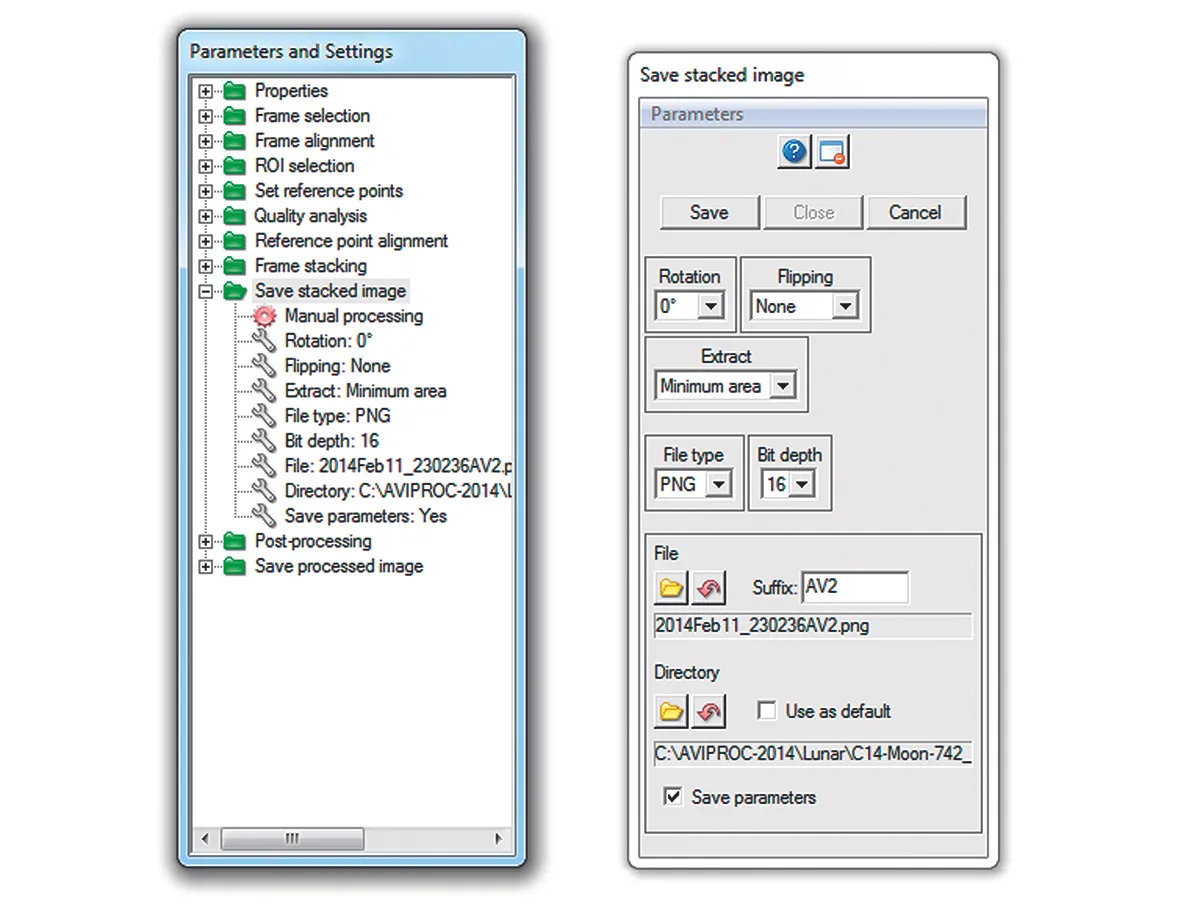
Click on Process File. In the Save stacked image window (right) select PNG as the file type and pick a folder to save it to. Make sure Save Parameters is ticked before you save. Hit Cancel when the Post processing window appears. Check if the result needs wavelet sharpening (see step 5). If not, repeat and adjust parameter settings in a manual run using the help options to assist.
Batch Process
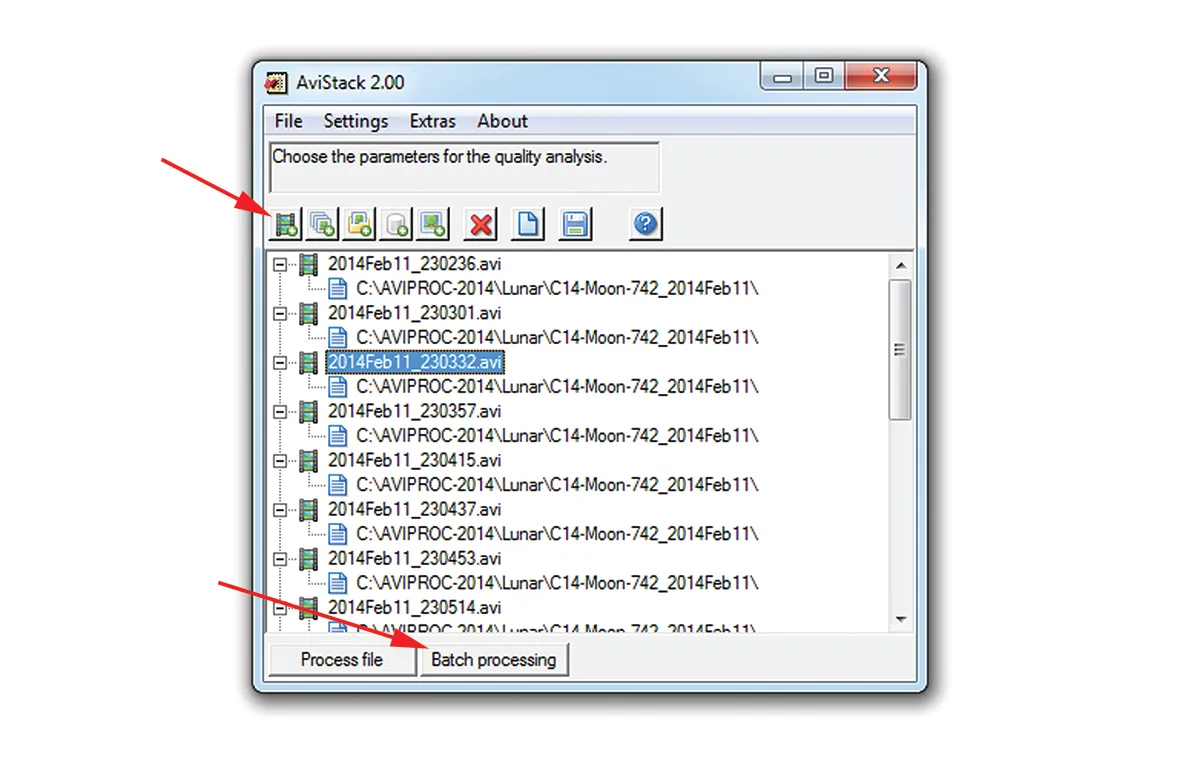
That’s your first processed file complete. The settings for this file will be used for the batch processing run. Click Add Movies and select all of the files to be processed, then click Open. Finally, click Batch processing and let the program run through each file, saving the results as per the settings you chose in the save stacked image box in the previous step.
Keep the originals
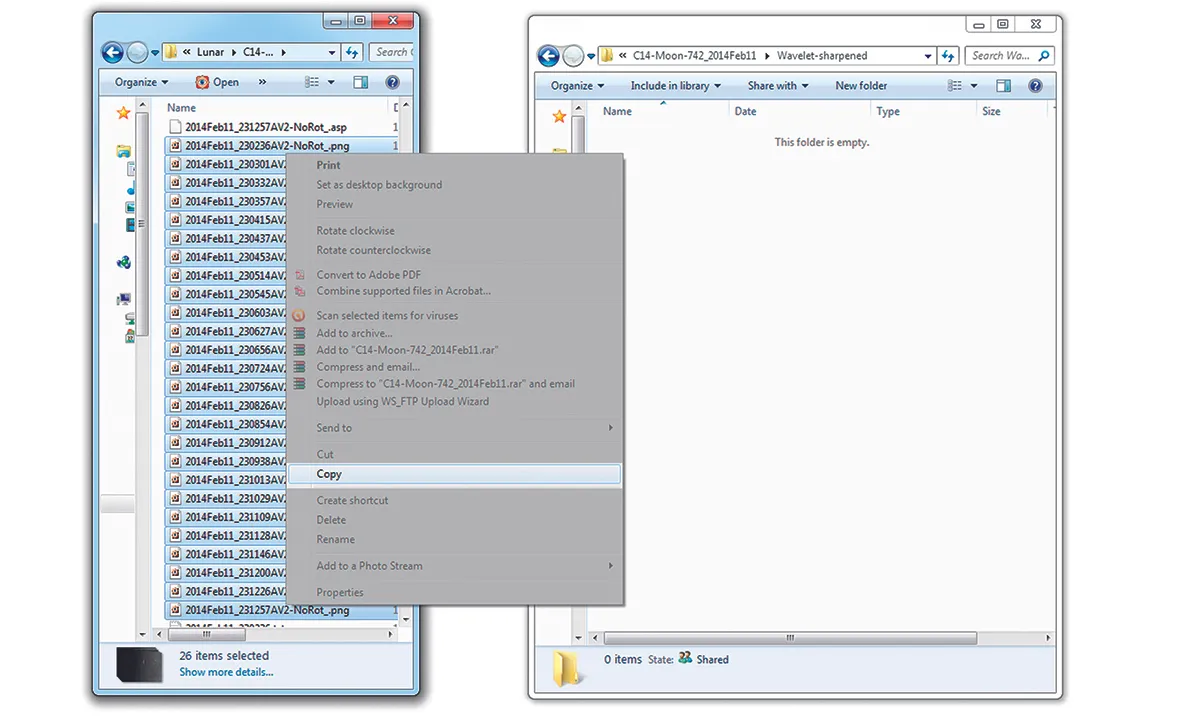
Once you have all the AviStack-processed PNG results, copy them to a new folder called ‘Wavelet-sharpened’. These are the files you’ll edit in RegiStax, but leaving the originals untouched means you can rework them if new techniques become available. Once you have your final results, the originals can be discarded if you need the disk space.
Sharpen
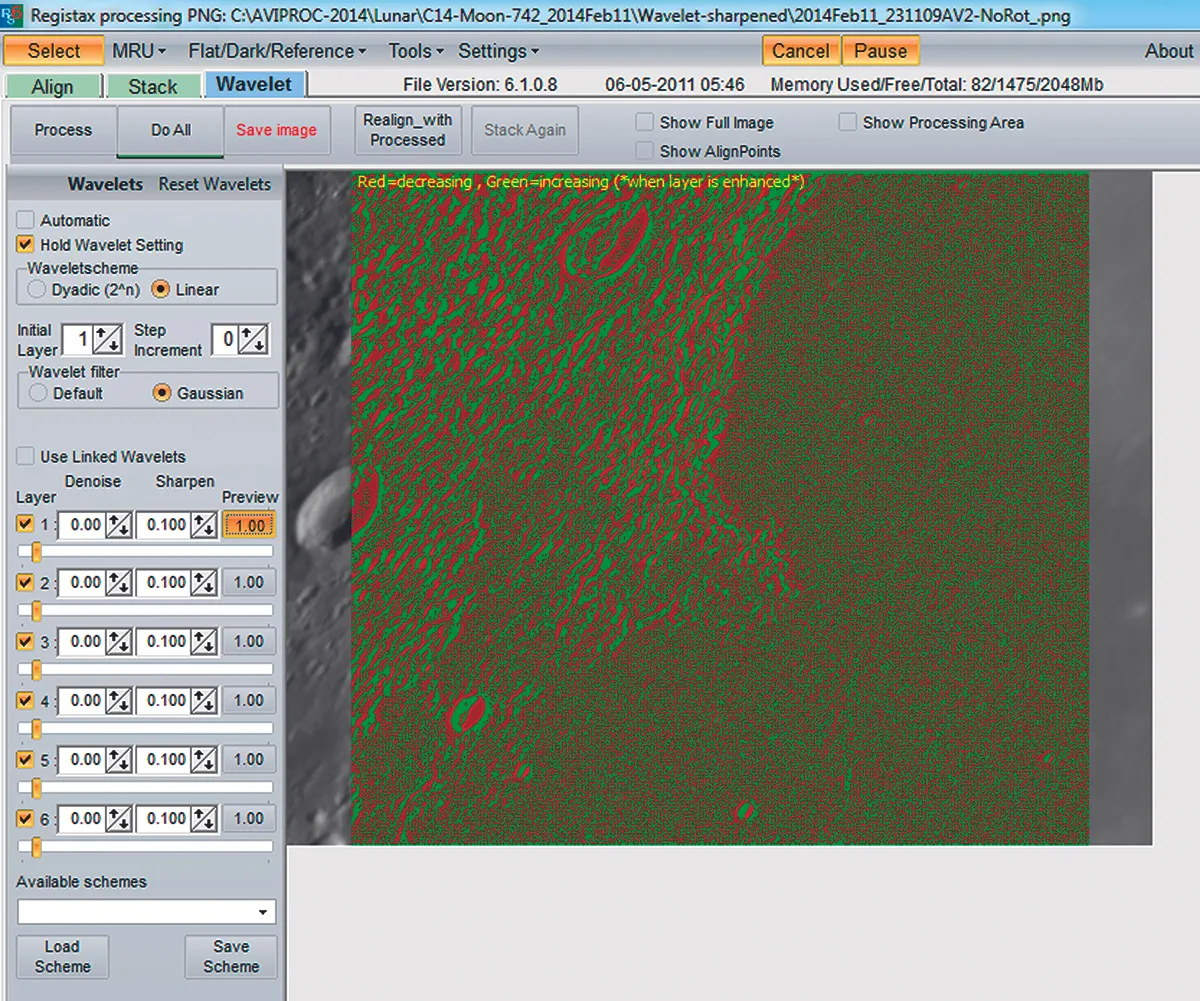
Run RegiStax and click Select. Change Files of Type to match the format of the processed images (in this example, PNG). Load the first image. With the Wavelet tab selected, click on the preview buttons to see which details will change. Use the slider that shows the finest detail that isn’t just noise grain. Adjust the sliders to sharpen the image to taste.
Begin the mosaic
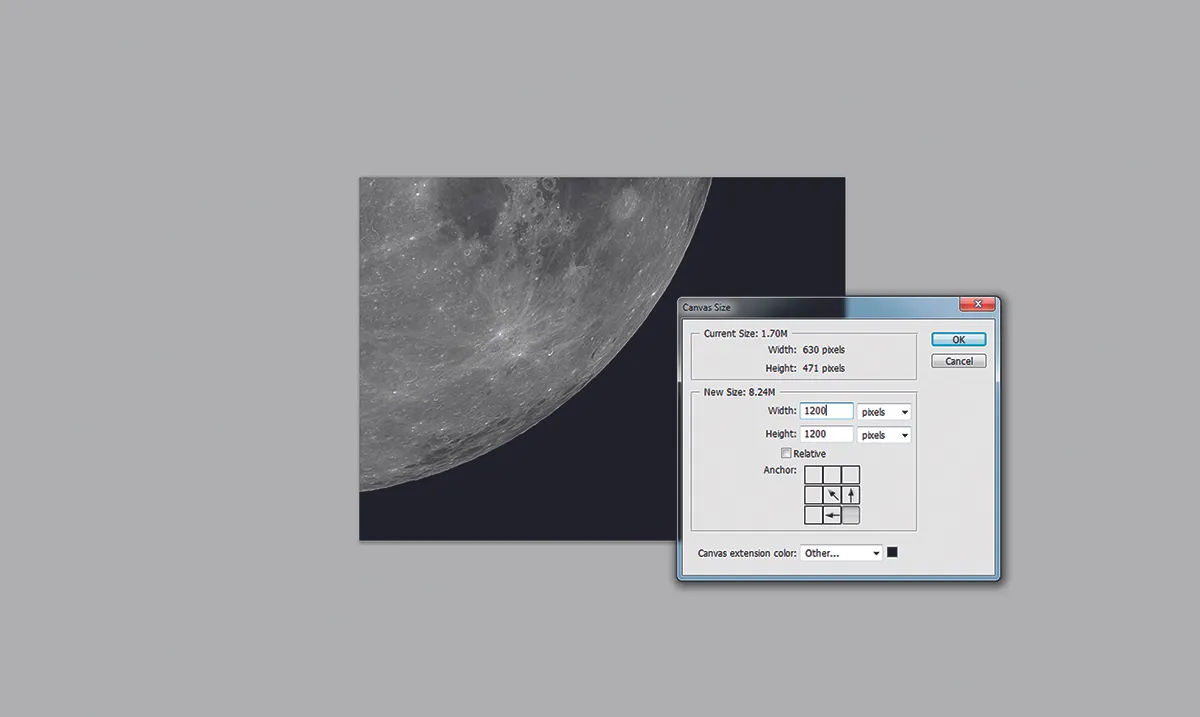
Wavelet sharpen all of the images, saving each when done. Next, load the first image into a program such as Photoshop or GIMP and crop any unwanted edge artefacts. Estimate how big the canvas needs to be to hold all the panes and resize it. Don’t worry if you get it wrong as you can adjust it later. Select a black background for the new canvas.
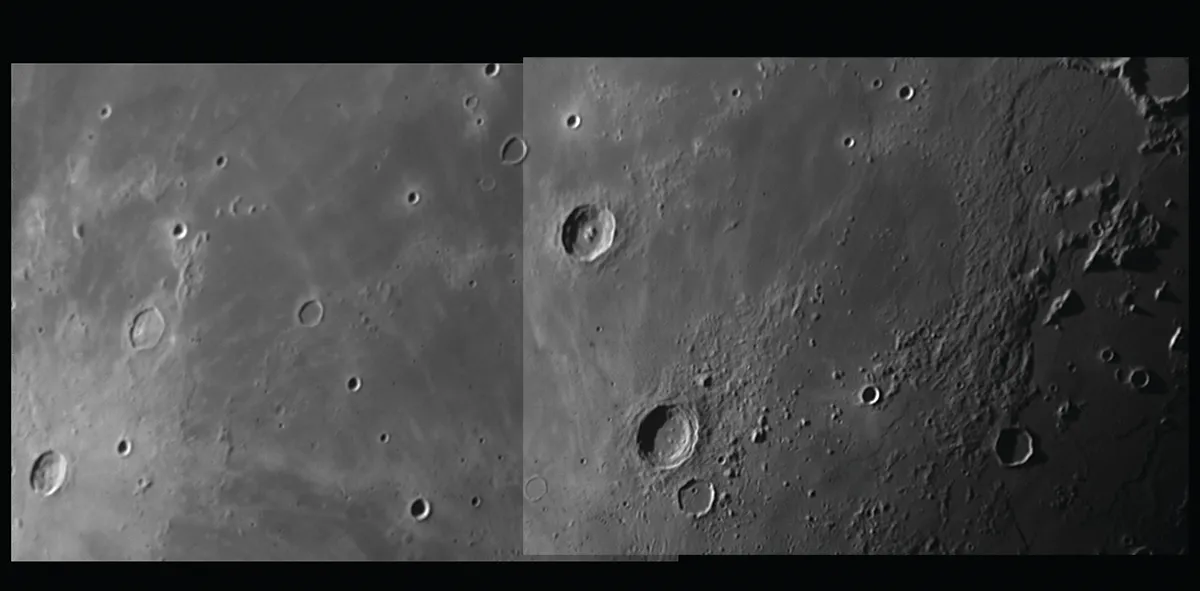
Building your moon mosaic manually
If you followed our step-by-step guide above, your base image will contain a single, finished pane and your canvas will be big enough to take the rest. Load the next frame in the sequence and draw a selection box slightly smaller than the frame edge.
Apply a 5-10 pixel feather to the selection. Copy the selection and paste it into the base image.
Use the arrow keys to align the pane with the lower image. Toggling the visibility of the pane on and off will help you align it accurately.
Small variations in tone between the pasted and base images can normally be dealt with by gently tweaking the curves tool (see our guide to Photoshop Levels and Curves). You should apply the adjustment to the centre of the curve.
For larger variations, raise or drop the brightness of the image first to get it closer to where you want it, then use the curves tool to carry out fine adjustments.
The feathered edges of the pasted image pane should make any straight edges hard to see.
If some are still obvious, set the eraser tool to 10% and gently rub it over any visible joins; this should hide them.
For very large mosaics that stretch your computer’s memory, assemble a batch of panes and then save the layered image to a file called ‘mosaic-001’.
Flatten the image and continue loading with the next set of frames. When you get to a similar stage as before, save as ‘mosaic-002’ and flatten.
Repeat until the whole mosaic is complete. Doing this means you can go back and address any major problems.
When you’re finished, flatten the image and save it with a file name of your choice. A gentle tweak of brightness or contrast, or a small adjustment using the levels and curves tools, can help to finish off your masterpiece.
It takes a bit of work to build such a mosaic manually but once it’s done, the feeling of satisfaction will be immense…unless you’ve missed a bit of course!
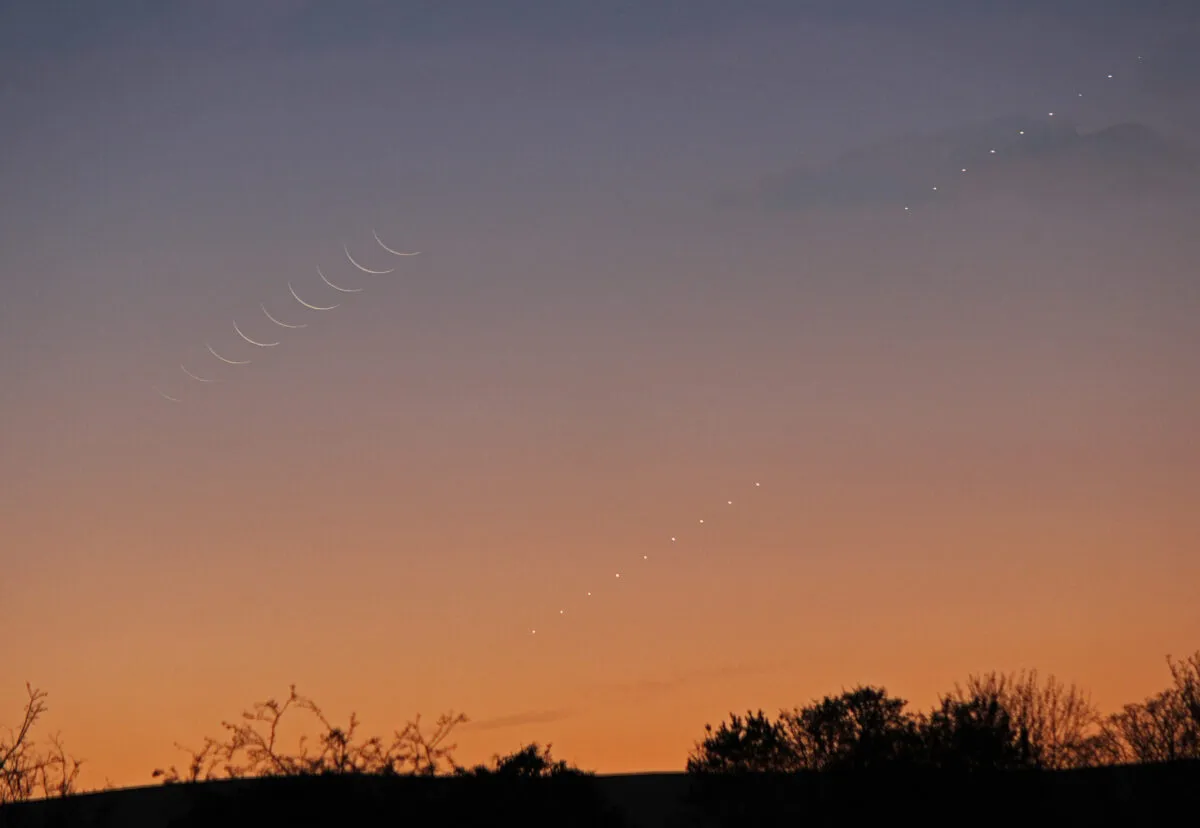
How to photograph a thin, morning crescent Moon
A morning crescent Moon is a great target to photograph. The morning crescent represents a time when we’re seeing the illuminated portion of the Moon’s globe apparently diminishing in size: a waning crescent Moon.
An evening lunar crescent represents a time when we’re seeing the Moon’s phase growing: a waxing crescent Moon.
The term ‘young’ or ‘old’ when used to describe the Moon’s age refers to where the Moon sits in its 29.5-day synodic month – the complete cycle of phase of the Moon as seen from Earth.
This period is defined to reset at new Moon (age equal to 0 days), and grow thereafter, resetting to zero again at the next new Moon.
A young lunar crescent is one that's less than a few days old. An old lunar crescent is one which is further in the synodic month than a few days before new Moon.
Photographing the Moon under dark-sky conditions is fairly straightforward. Such a Moon is easy to locate and focus on because it’s bright against the dark sky.
Old or young crescents present as thin slivers of illuminated lunar surface and, for this reason, appear less bright than they would in their fuller phases.
Thin crescents occur when the Moon is near to the Sun in the sky and this also hinders visibility, the crescent being easily lost against the bright twilight backdrop.
As avid Moon-watchers will know, the Moon is often visible during the day.
Here we have a problem: in order to photograph such a Moon well, it’s essential to achieve sharp focus.
Being so thin, even a small deviation from the true focus position of your camera lens or scope may cause the Moon’s light to spread into a blur that is lost against the background sky.
One way around this is to pre-focus at infinity the night before. For a camera lens this requires it to be set to manual focus before carefully focusing on a distant object, such as a bright star or planet.
A piece of low tack electrical tape can then be used to carefully ‘lock’ the lens’s focuser ring in place, hopefully holding it secure in readiness for your next thin Moon attempt.
This technique doesn’t always work. Variations in temperature during the day or inadvertently knocking the focus ring, even while stuck down, may cause a change in focus.
It’s better to focus on something a long way off before your attempt on the Moon. For waning crescents that appear in the morning sky, this will mean getting up early to take advantage of a dark pre-dawn twilight sky using a bright star or planet for focus.
For waxing crescents, the situation is trickier. Focusing on the Sun is the better option, but this requires the use of a white light solar safety filter on the lens or scope to keep things safe.
As ever, remember to follow solar safety precautions and never look at the Sun directly with the naked eye.
Once focused, the hard part is done and by following our guide steps below, you’ll be able to grab yourself an ultra-thin Moon. Once you’ve caught one, you’ll be hooked to try for more!
Equipment for photographing a thin crescent Moon
- DSLR camera
- Tripod
- Shutter-release cable
- Lens with a focal length between 200-1,000mm
Photographing a thin crescent Moon, step-by-step
Step 1
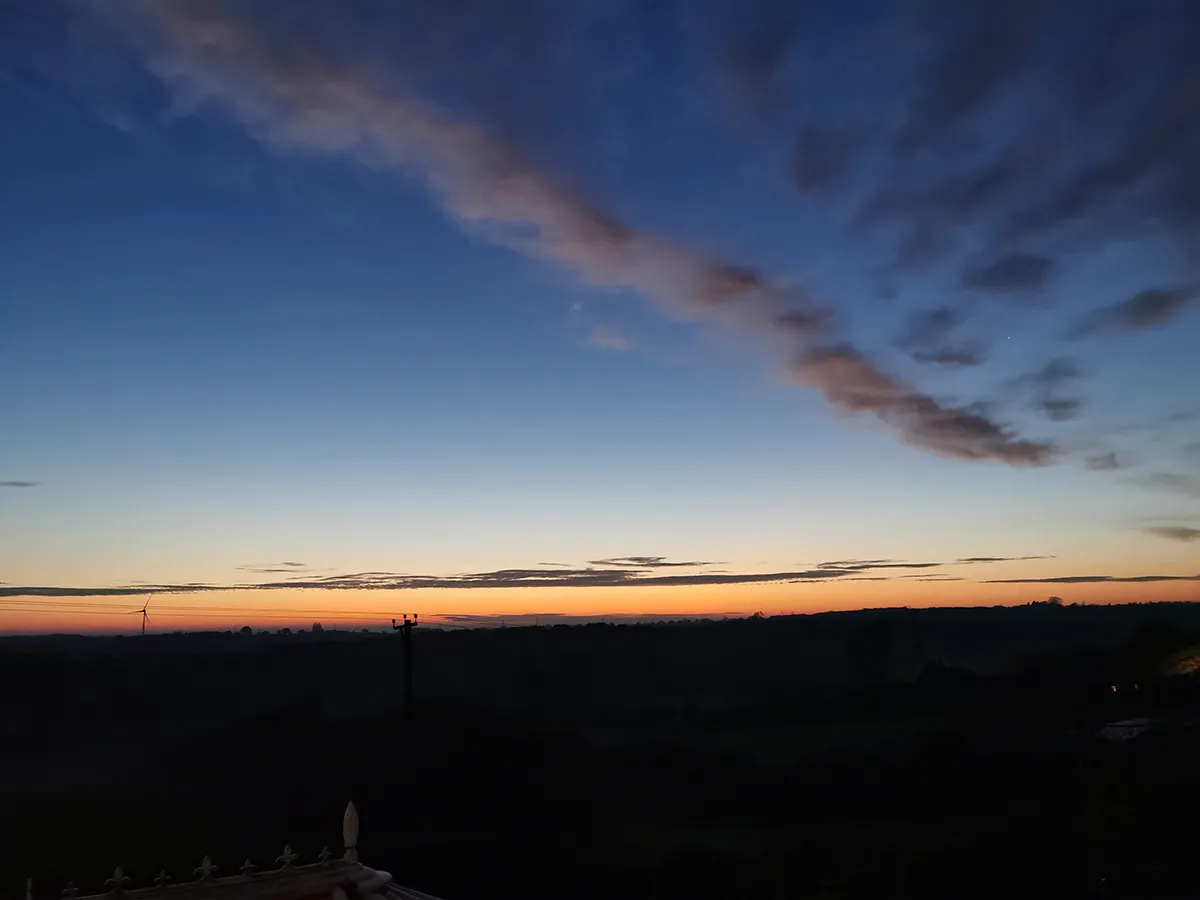
Homework is important for thin Moon attempts. Determine where the Moon is relative to the Sun and work out where it will be relative to the horizon after sunset. Choose a shooting location where the horizon appears low and unobstructed. A clear sky is best, as haze or low cloud will hide the crescent from view.
Step 2
If you plan to use a lens, choose one which will show a good crescent. This typically means something with a focal length starting around the 200-300mm mark. A 1000mm setup (typically achieved using a telescope) will give you a good crescent size. A focal ratio between f/9 and f/16 is ideal.
Step 3
Keep ISO in a low range of 100-1600. Start low and increase for evening sessions, as the sky darkens over time. For morning sessions, start high and lower the ISO as sunrise approaches. See opposite for how to focus accurately. If you can see the Moon on the back of the camera, use that to ensure the focus is sharp.
Step 4
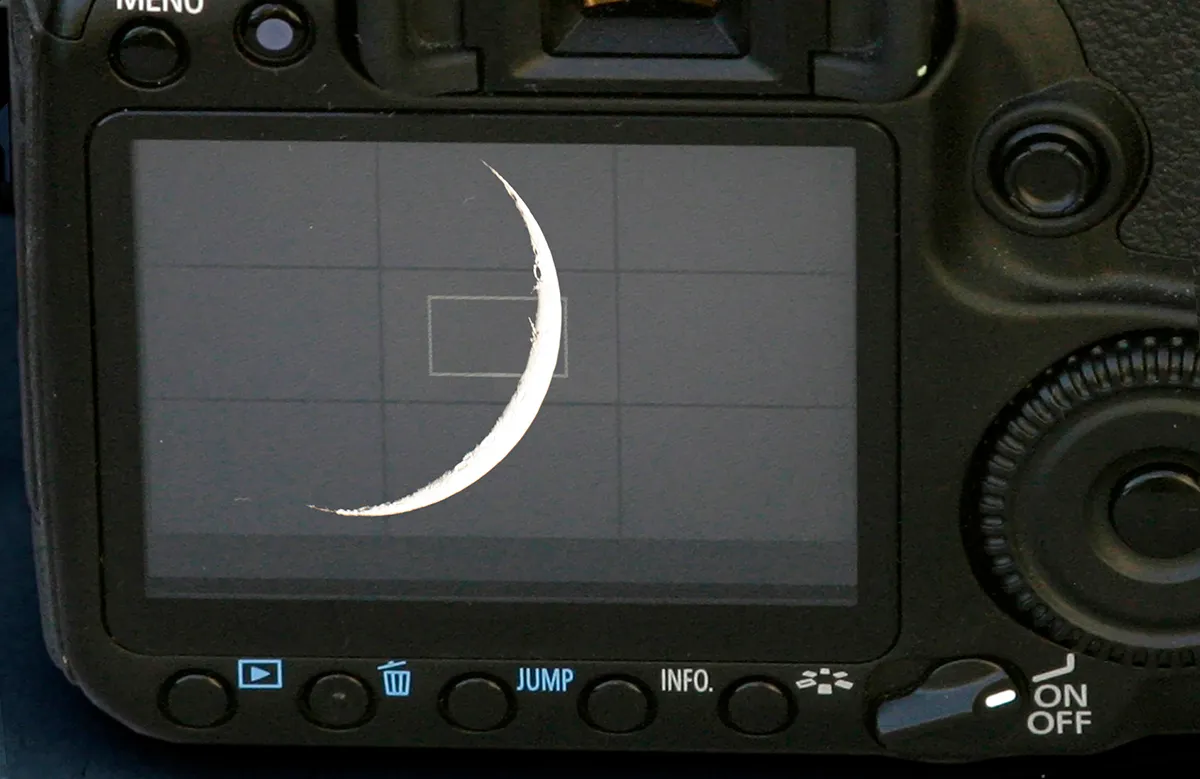
Line your camera up so the Moon is in view. There’s a chance you may not be able to see the crescent visually if it’s very thin. If so, you’ll need to judge where to point your camera relative to the horizon and rely on it being able to record the crescent. Take an image using a test exposure of 1 second.
Step 5
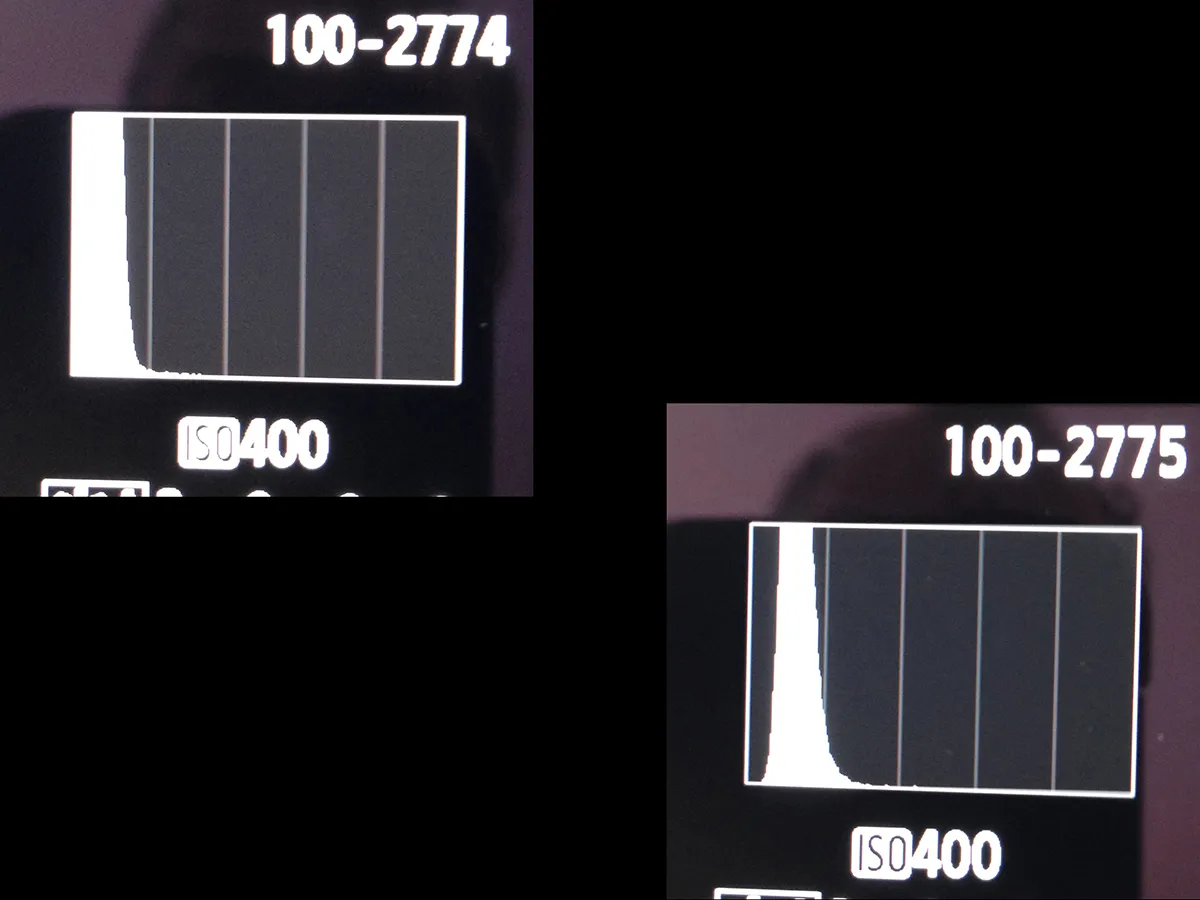
Examine the result using your camera’s histogram display. If the graph is stacked hard to the left or right, you’ll need to adjust exposure. If it’s too dark, you’ll need to increase the exposure and/or ISO; if it’s too light, you’ll need to decrease the exposure and/or ISO. Aim to get the peak within the left-right limits of the graph.
Step 6
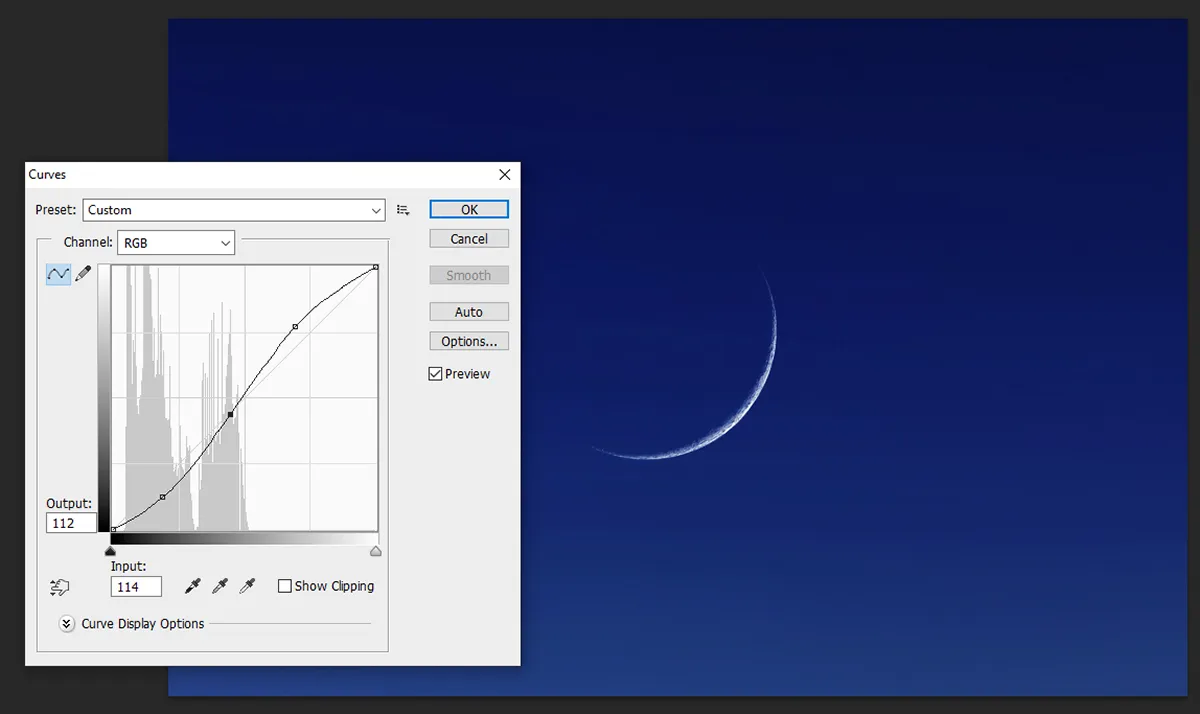
Load the results into your image editing software. A tweak to the brightness and contrast settings may help bring out the faint lunar crescent. Alternatively, open the curves tool and place an anchor in the centre of the adjustment line, then adjust the curve’s shape to become more of an ‘S’ to improve its visibility.
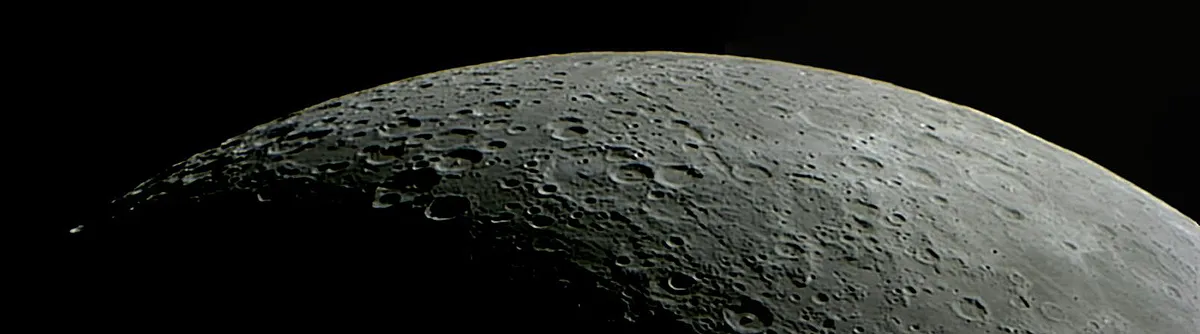
Photograph craters on the Moon
The Moon is a pockmarked lump of rock, battle-scarred from a multitude of past impacts. Some of these were so large that they deformed the lunar crust, depressing and cracking it so the resulting depressions infilled with lava.
These huge basins form the lunar seas or lunar maria, and they can be extensive in area.As well as the large basins, there are many craters of all shapes and sizes that make great imaging targets.
Photograph Moon craters with a smartphone
The larger lunar craters can be imaged with basic kit like a smartphone. All you need to do is to point the phone’s camera down the eyepiece of a telescope.
Known as afocal imaging, this technique produces good results, often exceeding the results that used to be produced by coupling a DSLR to a scope.
As afocal imaging requires you to point your scope at the Moon, a tracking drive is recommended as it alleviates the need to continually shift the scope’s position to keep the Moon in view. You’ll have enough to do lining up the camera.
Focus is critical and it needs to be done for corrected vision. If you wear glasses, focus with them on. Use a low- to mid-power eyepiece and centre the Moon in the field of view.
Next, activate your smartphone’s camera. Most camera apps have a pro or manual mode that allows you to control the camera settings, which is great if you’re feeling confident.If not, leave the camera on automatic.
The Moon is bright enough to activate the camera app’s auto-settings and 75% of the time the values selected will work just fine.
It helps to develop a lining-up technique. One way is to hold the phone’s camera some way off the eyepiece, or you could build your own smartphone holder (see image below).
Have a look at what else is available in our guide to smartphone astrophotography gadgets.
You’ll need to be able to see the eyepiece with a bright light (the Moon) coming from it. Then, slowly but surely, move towards the eyepiece keeping the bright area in view.
It can take a while to get this right, and bear in mind you need to a) keep the camera flat to the eyepiece and b) eventually press the shutter button.
The second step is easier if you use a remote shutter release. A smartphone’s wired headphones often mimic this action; plug them in and press the volume up button.
Photograph Moon craters with a planetary camera
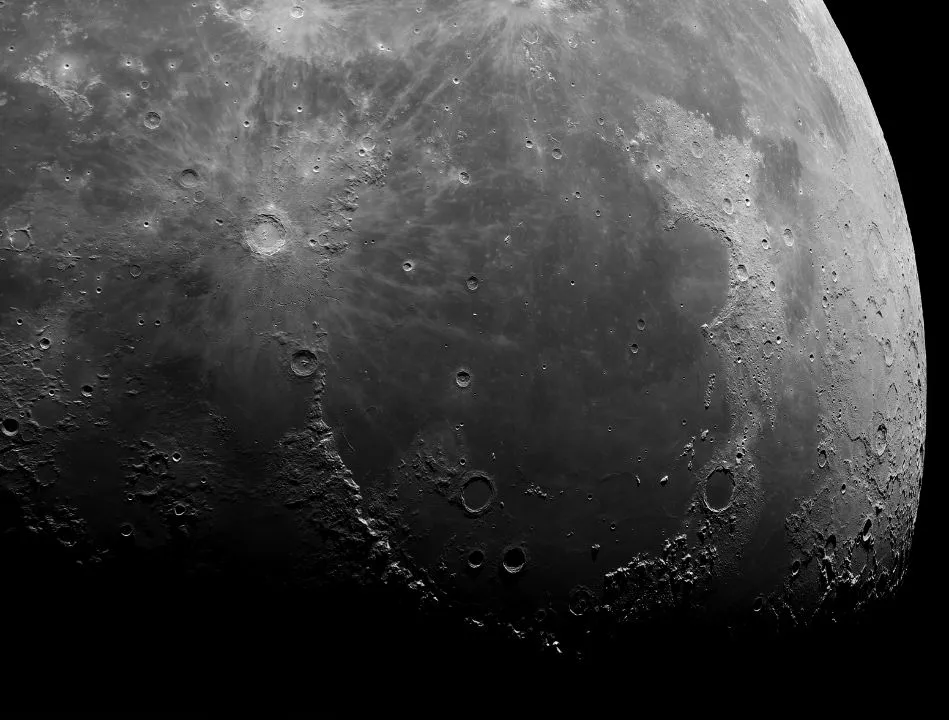
The best crater images are obtained using a high frame rate planetary camera attached to the eyepiece end of a telescope.
There are certain techniques that will give you optimal results, and we’ve shown some of these in our step-by-step guide below.
How small you can go in terms of crater diameter is determined by the size of your scope: the greater the aperture, the smaller the feature you can resolve.

The stability of the atmosphere will also have an effect, the best results being achieved when seeing is steady. Forward planning can help here (see below, step 4).
With so many lunar craters to choose from, this project is a great chance to get acquainted with our nearest neighbour in space using whatever equipment you have to hand.
For weekly Moon phase times and dates delivered directly to your email inbox, sign up to the BBC Sky at Night Magazine e-newsletter.
Photograph craters on the Moon: step-by-step
Recommended equipment:
- Telescope on a tracking mount
- Smartphone for afocal imaging
- DSLR/MILC camera
- High frame rate planetary camera
- Optical amplifier
- Red or infrared pass filter
Step 1
The simplest method for imaging the Moon with a scope is to point a camera down the eyepiece using the technique of afocal imaging (as described above), which works well for smartphones. Getting everything lined up can be tricky, so practice is advised. Also, it’s best to image the Moon when it’s not close to full phase.
Step 2
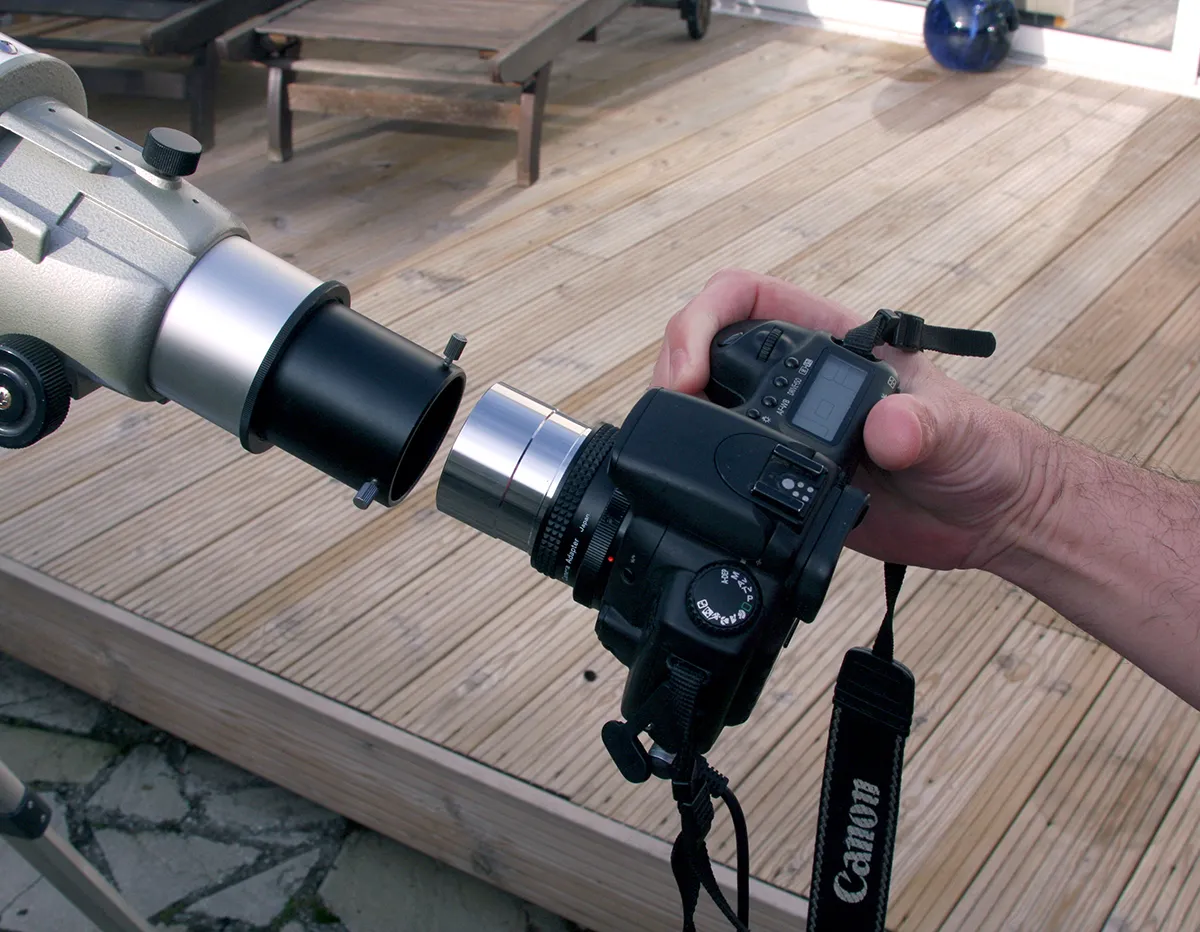
If you have a DSLR or MILC camera, fit an adaptor onto the connecting ring of the camera’s body – where the lens would usually connect – and attach an eyepiece barrel for insertion into your scope. A 2-inch barrel will avoid light cone clipping, which can lead to vignetting (a darkening at the edges) in images.
Step 3
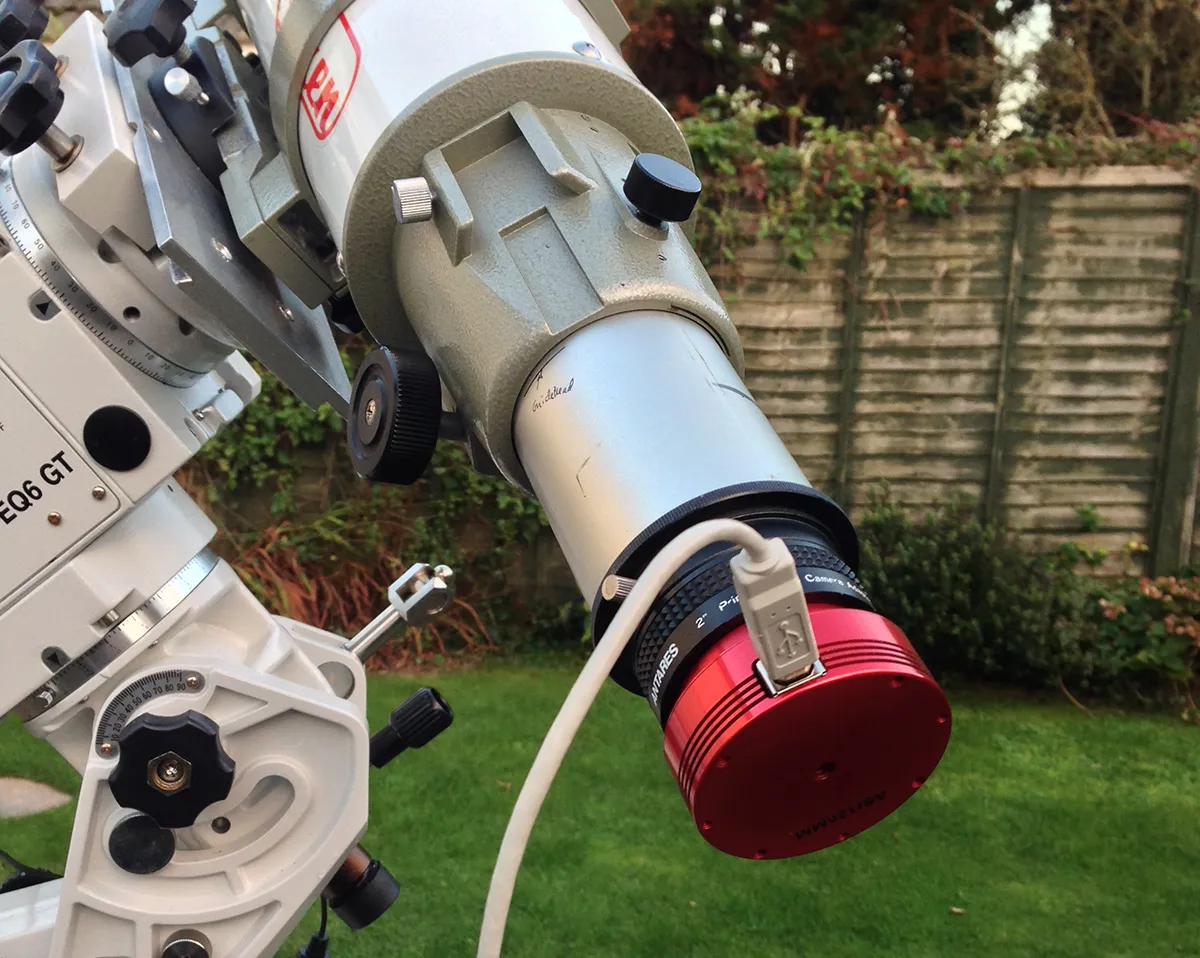
For high-resolution crater imaging, a high frame rate planetary camera is best. Controlled by an external computer such as a laptop, modern high frame rate cameras can typically capture from many tens to hundreds of frames per second. This helps to combat seeing-related issues, such as atmospheric distortions.
Step 4
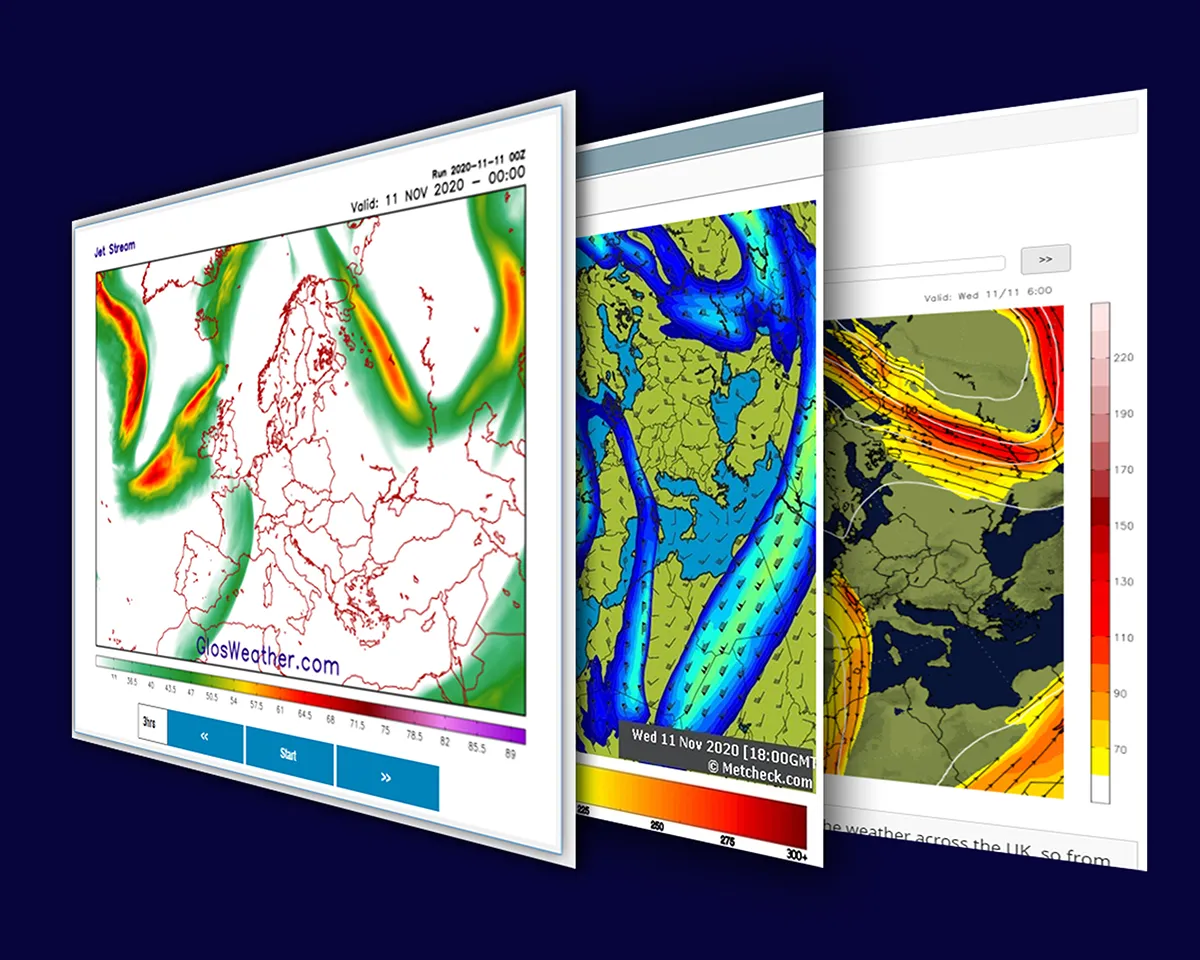
Bear in mind that seeing degrades with low altitude and the Moon appears highest when due south. As wind direction affects low-level seeing, note the seeing for different wind directions to predict when conditions may be steady. To avoid the jet stream use a forecast service (Google: ‘jet stream forecast’).
Step 5
Use a Barlow lens or other such optical amplifier to increase the image-scale. The optimum focal length to aim for under average seeing conditions is given by 825 x Ps, where ‘Ps’ is the size of your camera’s pixels in microns, Under good to excellent seeing use 2060 x Ps. Use an optical amplifier to get you close to these values.
Step 6

Longer wavelengths are less affected by seeing. Imaging with a mono camera through a red or infrared pass filter may produce steadier results. Some colour cameras have excellent infrared sensitivity and can be used this way too. Aim to capture at least 1,000 frames. Process in a stacking program and tweak the result.
Have you managed to capture a beautiful image of the Moon? We'd love to see it! Send it to us via contactus@skyatnightmagazine.com or get in touch on Facebook, Twitter and Instagram.
