
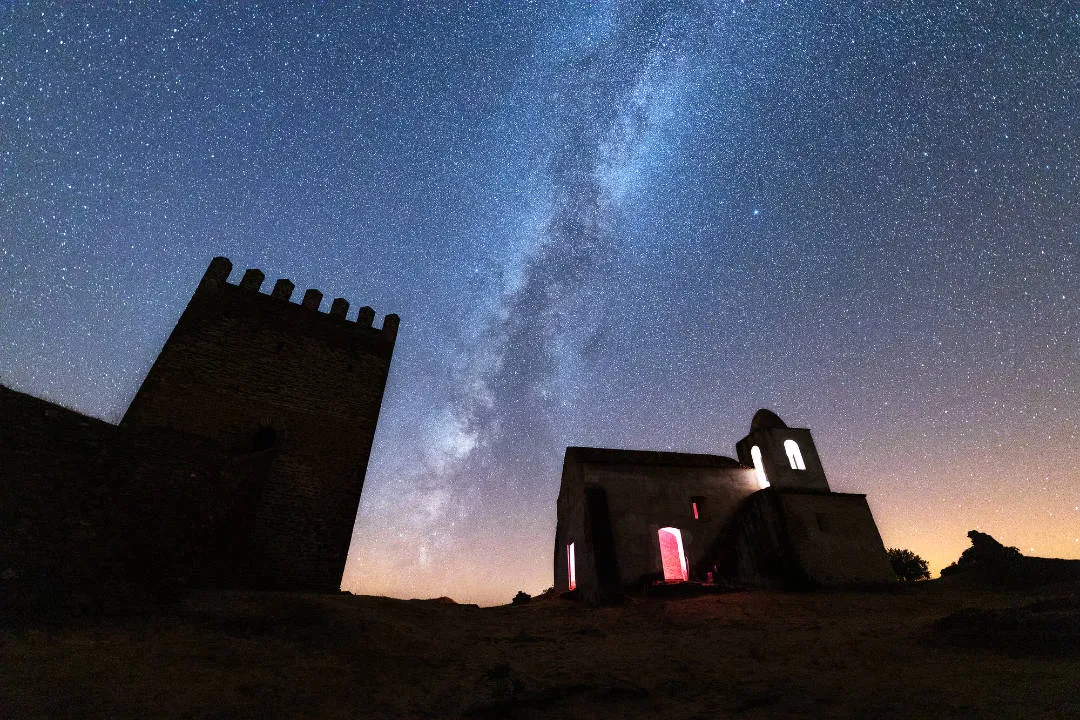
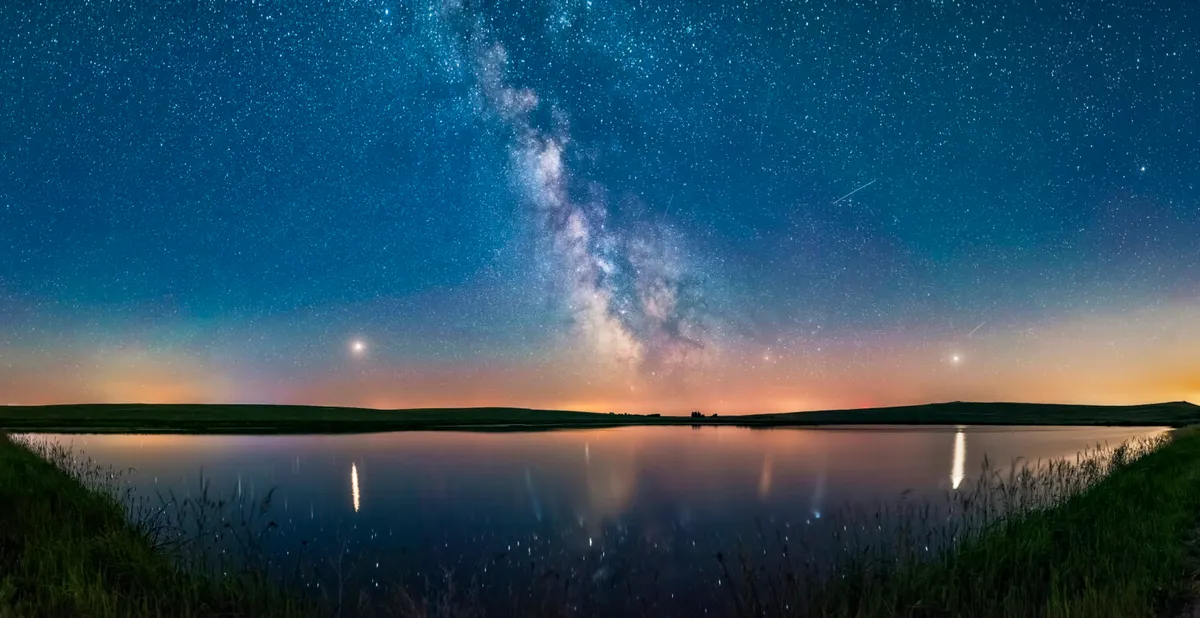
The sky at night is one of the most alluring sights, inviting observers to imagine what is happening out there far away around a distant star, or to ponder the chances of life existing elsewhere in the cosmos.
Astronomy gives us the skills we need to observe these stars, constellations and planets with the naked eye, or to use binoculars and telescopes to observe deep-sky objects like nebulae, galaxies and globular clusters.
Thanks to centuries of scientific study we now know the answers to many – though most certainly not all – of the questions the cosmos poses.
More astronomy advice

However, when it comes to how we see the vastness of space from our own planet, we’re on a pretty sure footing, and this is what we'll be looking at in this beginners' astronomy guide.
Firstly, you need to prepare for your first night under the stars.
Sign up to receive the BBC Sky at Night Magazine e-newsletter.
First night doing astronomy
When you start thinking about astronomy, your mind can end up anywhere – you could speculate about life in the Universe, future human missions to Mars, or the creation of gold in a supernova explosion (that’s the cataclysmic ending event for a star much larger than the Sun).
Maybe you’d simply like to find your way around the night sky, or possibly your enquiry is more philosophical, such as: what’s it all about?
Now that last one remains a mystery, but the point just before about getting to know the stars is much easier to tackle.

For astronomy beginners, it’s possible that the best starry views you have encountered so far were when you were on holiday.
I certainly know that Mediterranean skies, for example, seem that much darker, with the stars shining brighter than at home.
There’s also an issue here that when you’re on holiday, you’re more relaxed and therefore have more time to gaze skyward, so that’s actually a good time to get to know the night sky.
The brightest stars
Many of us live in a town or city with much light pollution, which does indeed give the sky an orange wash. In fact, I learnt the night sky from a fairly polluted area.
Strangely, this can help: here the fainter stars are not visible, which leaves only the brightest and best of the bunch, which tend to be the ones that outline the constellations.
So where do you actually start if you find yourself with a clear night?
All the stars in every direction we look in have been grouped into areas known as constellations.

There are 88 in total, but some are easier to see and indeed form ‘signposts’ that can be used to find many others in different parts of the sky.
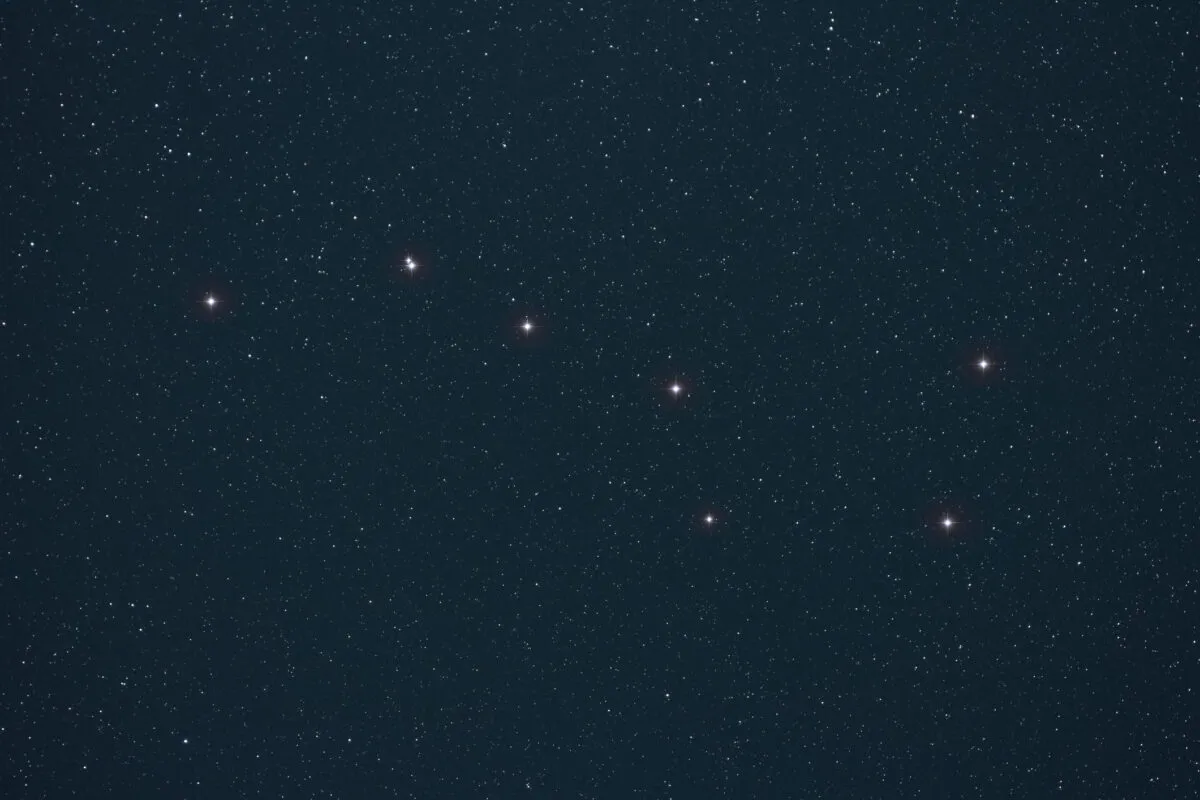
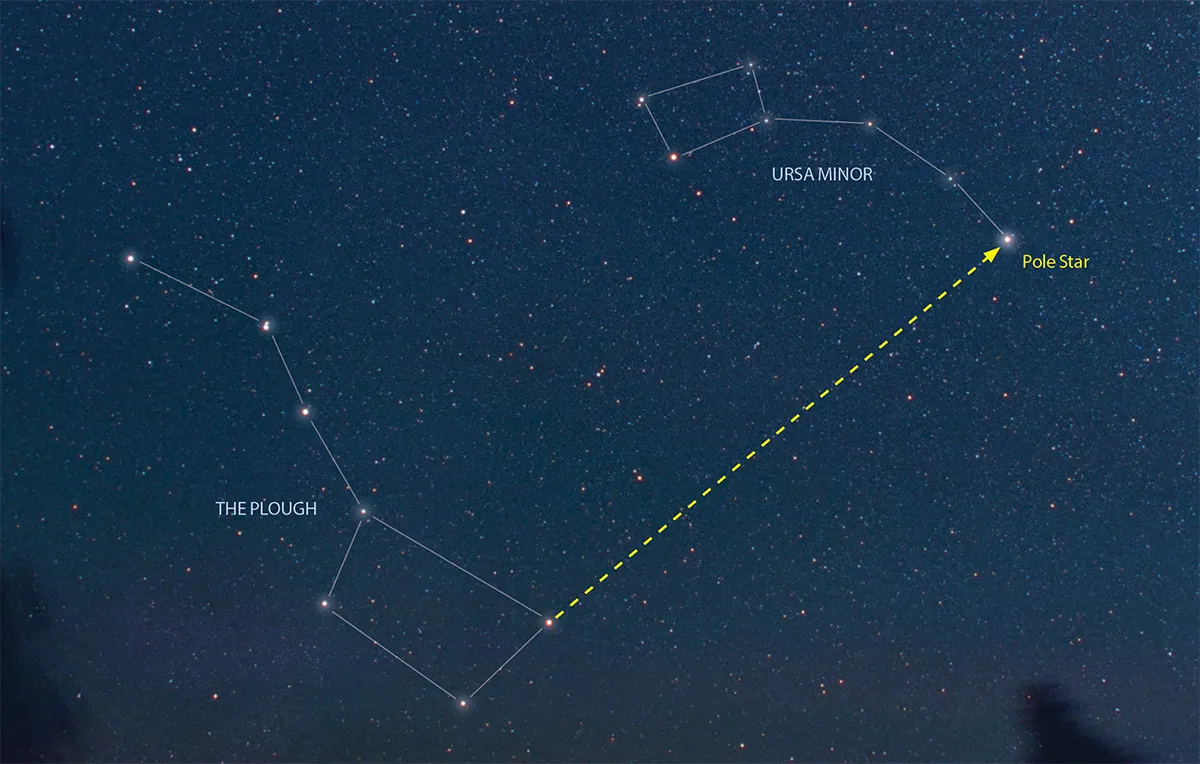
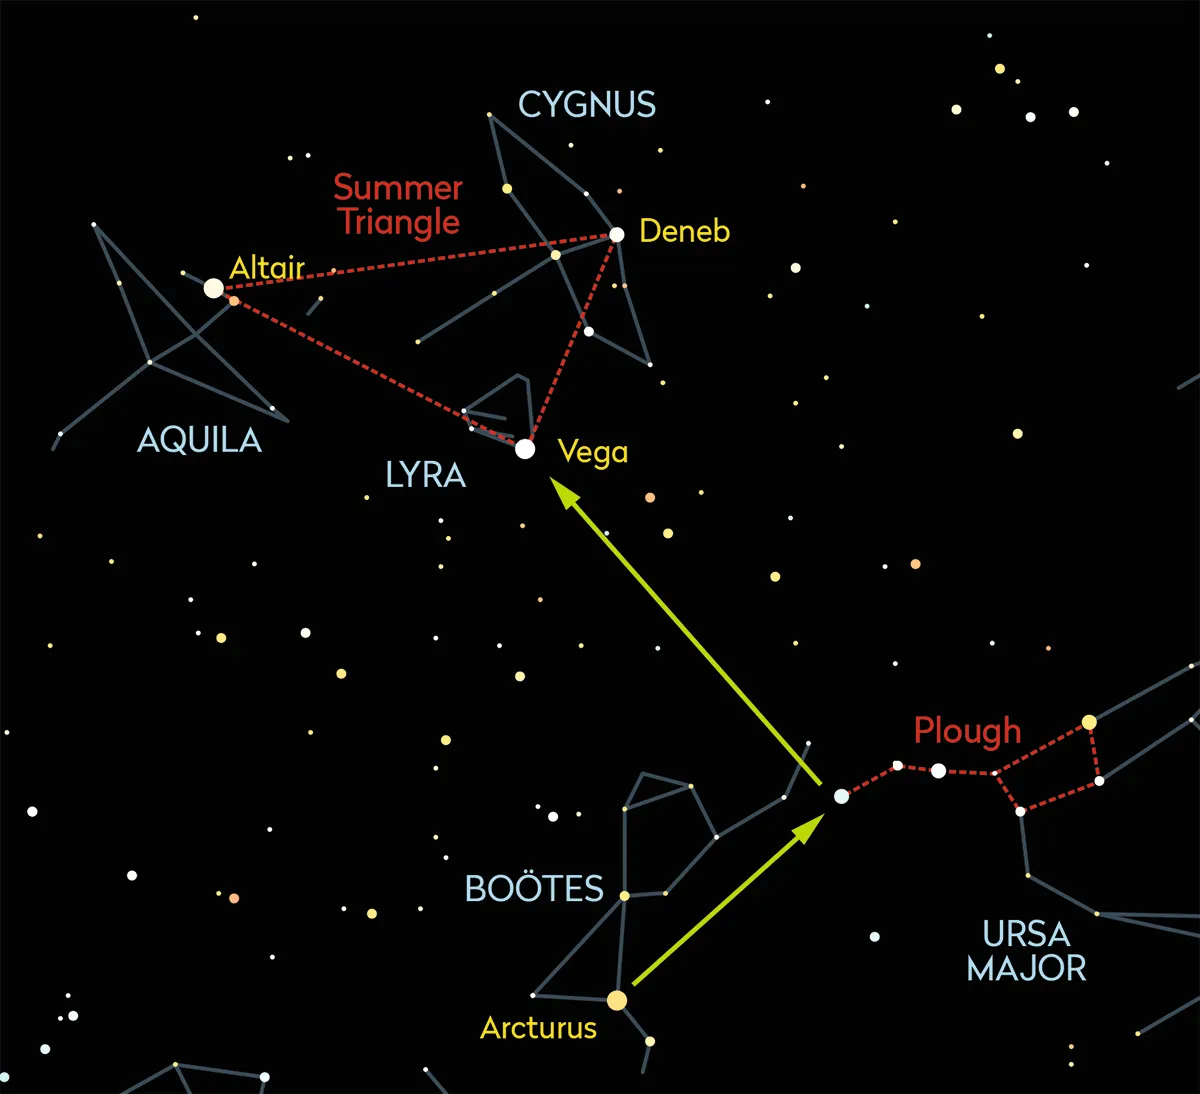
The place to begin if you live in the mid-to-high latitude northern hemisphere, which includes the UK, is a group of seven stars known as the Plough (or the Big Dipper in the USA).
The reason for telling you about the hemisphere is that you’ll find that these fairly bright Plough stars never go below the horizon.
Hence you will always be able to see this group if it is a clear night, no matter what time of year it is.
Locate the Plough
To locate the Plough, you just need a knowledge of where north is from where you are looking.
Simply speaking, that is off to the left of where the Sun rises, or to the right of where the Sun sets.
The highest the Sun gets in any day is due south, so of course north is opposite to this. Alternatively, you can always use a compass!
Now we have to contend with the rotating and moving Earth. Just as the Sun rises, moves over the sky and sets, so many of the stars do the same thing at night – though not all.
Some stars stay up all night long, including the Plough.
As the Earth itself moves around the Sun we also see a slight shifting of stars night-by-night, which means some constellations enter and leave our skies over the course of a year.
Once again, the Plough is always there 365 days a year, due to its location and our location on Earth.
Which all leads to it being a most handy pattern to learn, and from which to launch your stargazing quest and get to know the starry skies.
For example, you can use the Plough to help you find the North Star. Do this, and you will have performed your first star-hop.
Get your eyes used to the dark - you'll see more stars!
You’ll notice your pupils are larger in dark conditions to let in more light, and smaller on a bright sunny day so as not to dazzle you.
This is actually only a small part of what your eyes are up to. Basically, eyes adapt to whatever the lighting conditions are.
Let’s take an example: a room at night with the lights on. It all looks fine because your eyes have set themselves to work in whatever light there is around.
Now turn the lights off and the first thing you’ll notice is that the room appears almost black for a short time.

Your eyes, sensing the lack of light, have gone into dark-adapting mode – your pupils grow to let in more light and then the all-important chemical changes begin to switch on the low-light-intensity ‘rods’ which fill the backs of the eyes, so you can see more.
For more on this, read our guide to averted vision.
This process actually takes around an hour, but a good proportion is complete within 10 minutes or so.
In other words, to see the best of the faint night sky, shield your eyes from bright lights for a good few minutes before you start stargazing.
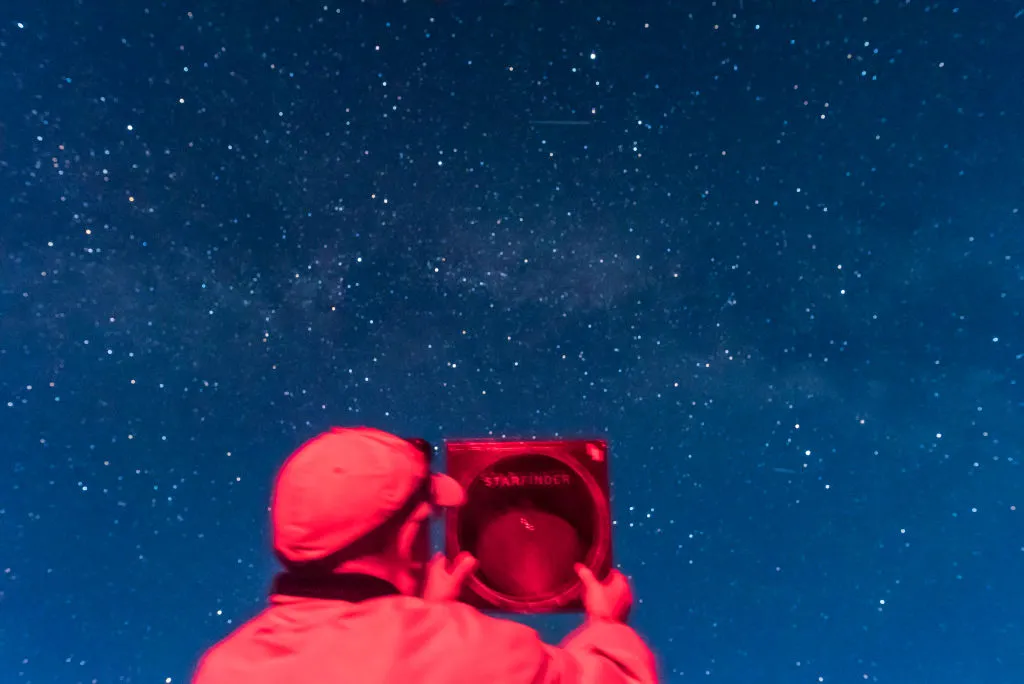
Plus, make sure you cannot see any bright lights while you are observing. If you need to find your way, use a red light torch, and if you need to consult your phone, be sure to turn your smartphone screen red.
Red light is an astronomer's friend: it won't ruin your dark adaption as much as white light.
7 tips for astronomy beginners

Be prepared
The more you can set up before it gets dark the better. Leave items such as maps and binoculars by the back door.
Keep warm
It can get quite chilly outside, so take out or wear a coat, maybe a hat, and some gloves.
Keep comfortable
Standing and gazing up can be a strain on the neck – using a deckchair is a good solution.
Find your observing site
Check that where you are observing is free from light pollution, but also free from holes, dips, low walls or anything you could trip over in the dark.
Let your eyes dark-adapt
Give yourself a good 20 minutess (for starters) for your eyes to get used to the night sky – you’ll see many more stars.
Use red light
To preserve your dark-adapted eyes, only use a torch covered with a red plastic filter, or invest in a dedicated red light torch. Similarly, turn your smartphone screen red.
Use a celestial guide
Everyone has to start somewhere! A good way of learning your way around the night sky is to use a star chart, planisphere or smartphone astronomy app (paying attention to point 6, of course!)
Observing the stars

Occasionally the night sky just sparkles, and it’s a terrific sight. When there’s been a rain shower or something has cleared the air of all the dust, the stars look really amazing.
Nights like these can be truly memorable, and reveal the full beauty and majesty of the Universe, or rather, a small part of it.
At such times we seem to see loads of stars and the best ones stand out even more than usual.
This effect can even happen in a built-up area where, with this clearer air, the streetlights do not have so much to illuminate and so there is less light pollution.
One thing is instantly apparent, and that is the brightness of the stars.
There are a few that are very bright, some medium ones and heaps of fainter stars that are more difficult to discern.
Brightness and magnitude
How bright a star looks is called its ‘apparent visual magnitude’. You may see this written as ‘apparent magnitude’, ‘visual magnitude’ or just ‘magnitude’. You may also see it abbreviated to ‘mag.’.
What’s strange about magnitude scales is that the numbering system is back to front – the brighter the star, the lower the number it is given.
So a star of mag. +2.0 is therefore brighter than one that’s mag. +5.0.
This means that a first magnitude star is 2.5 times brighter than a second magnitude star, and so on, right up to around 100 times brighter than a 6th-magnitude star.
However, the scale doesn’t bottom out at one. To make things even more interesting, a star can have a magnitude of zero, which would be a pretty bright star; objects that are brighter still are given a minus number.
For example, the planet Venus, when at its brightest, appears at mag. –4.7. This is why positive magnitudes are marked with a ‘+’ sign, to remove any ambiguity.

Sliding back down the scale – getting fainter – we return to mag. +6.0.
This is typically the limit of what you can see with the naked eye; anything dimmer and it’s likely that you’ll need a pair of binoculars or a telescope to see it.
In actuality, this depends on your eyes: some people have no trouble seeing down to mag. +6.5 or lower.
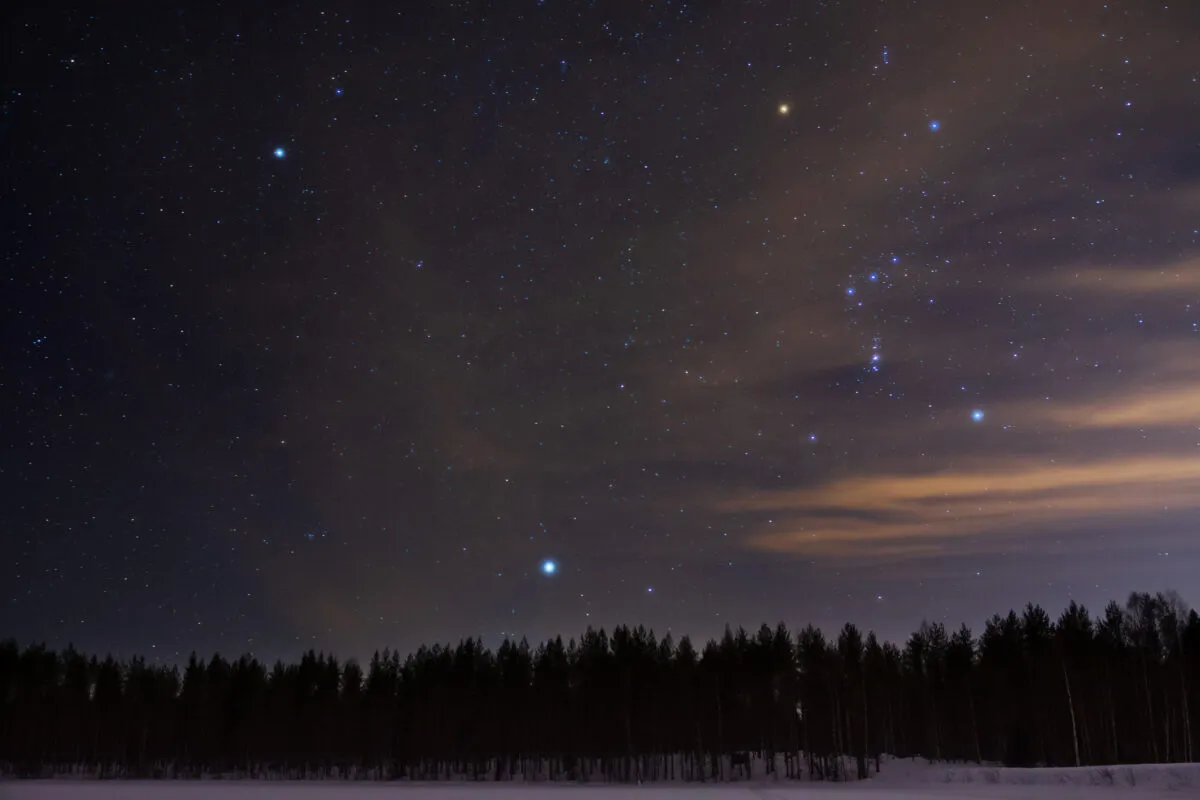
The brightest star in the night sky is Sirius, the leading star in the constellation of Canis Major, the Great Dog.
Its visual magnitude is a dazzling –1.5. Compare that with Polaris, the North Star, in the constellation of Ursa Minor – its magnitude is just +2.0.
With practice, it is possible for the eye to spot differences of one-tenth of a magnitude between stars – now there’s something to try of an evening.
Spotting the brightest stars
A good way for beginners to get started in astronomy is to locate some of the brightest stars in the night sky.
By doing so, and by really considering exactly what you're looking at and how you located that star, you'll begin to learn your way around night sky, including which constellations are visible at which times of the year, and how the jigsaw puzzle of the celestial sphere all fits together.
See if you can spot these bright stars in the night sky
Sirius
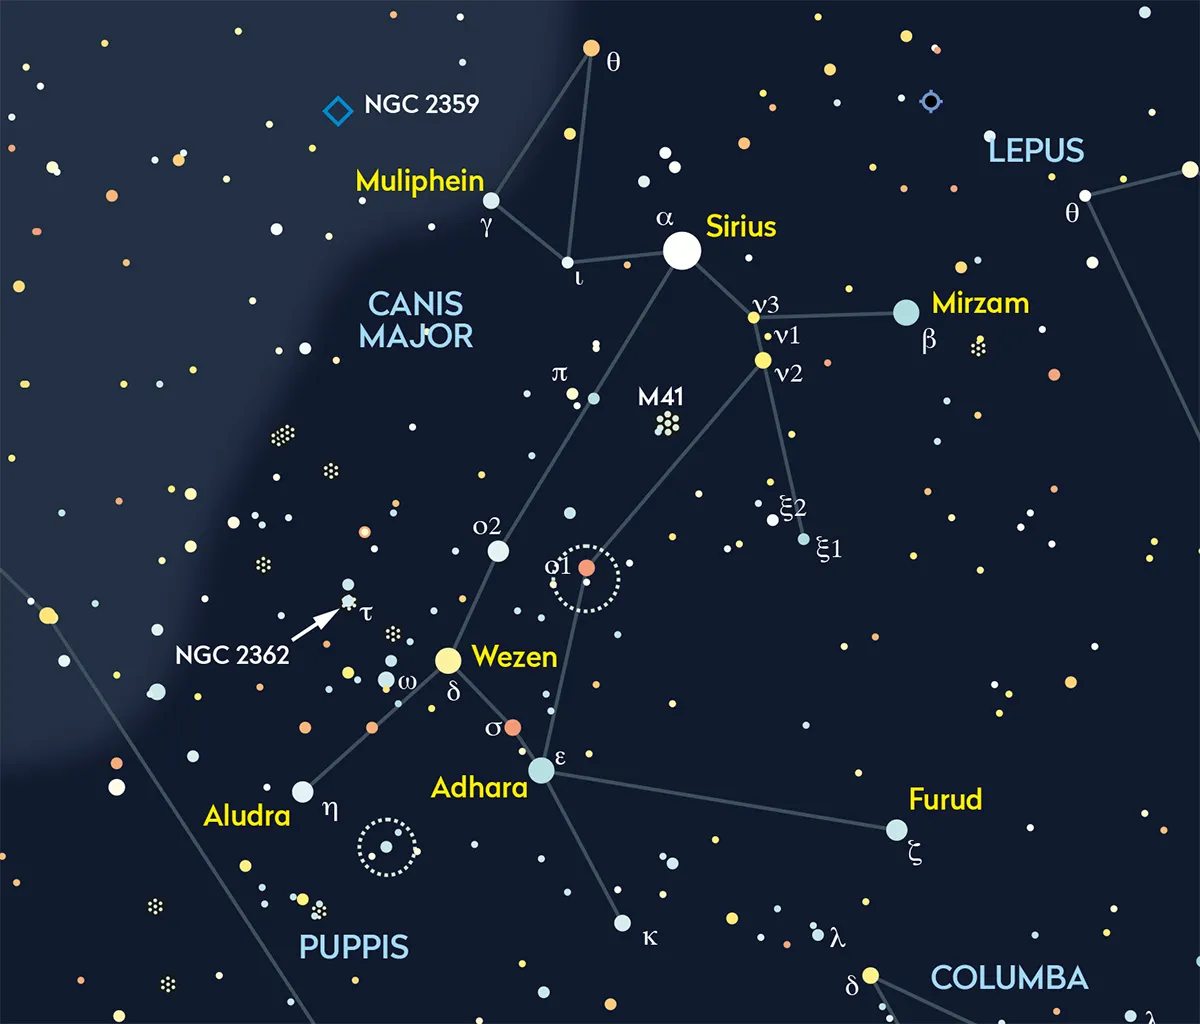
- Magnitude: –1.5
- Constellation: Canis Major
Arcturus
- Magnitude: 0.0
- Constellation: Boötes
Vega
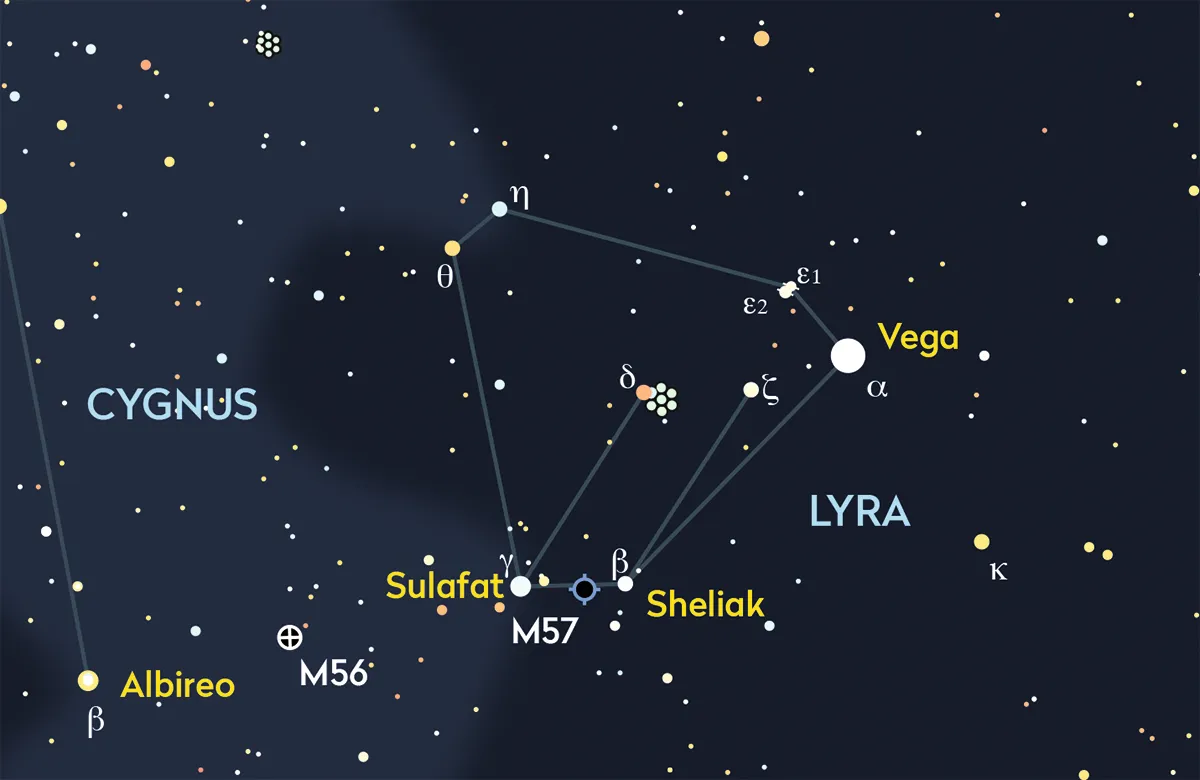
- Magnitude: Variable 0.0
- Constellation: Lyra
Capella

- Magnitude: +0.1
- Constellation: Auriga
Rigel
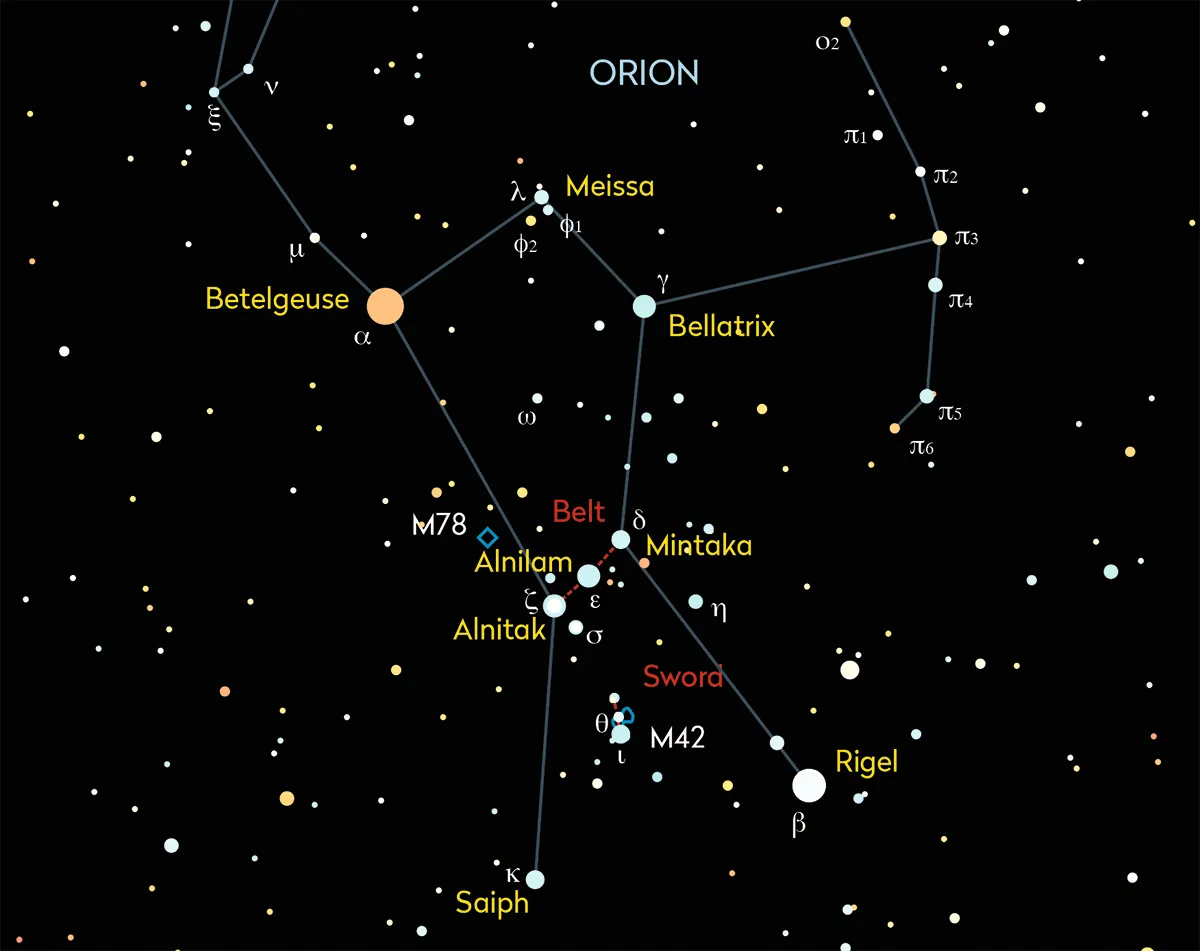
- Magnitude: +0.1
- Constellation: Orion
Procyon

- Magnitude: +0.4
- Constellation: Canis Minor
Achernar
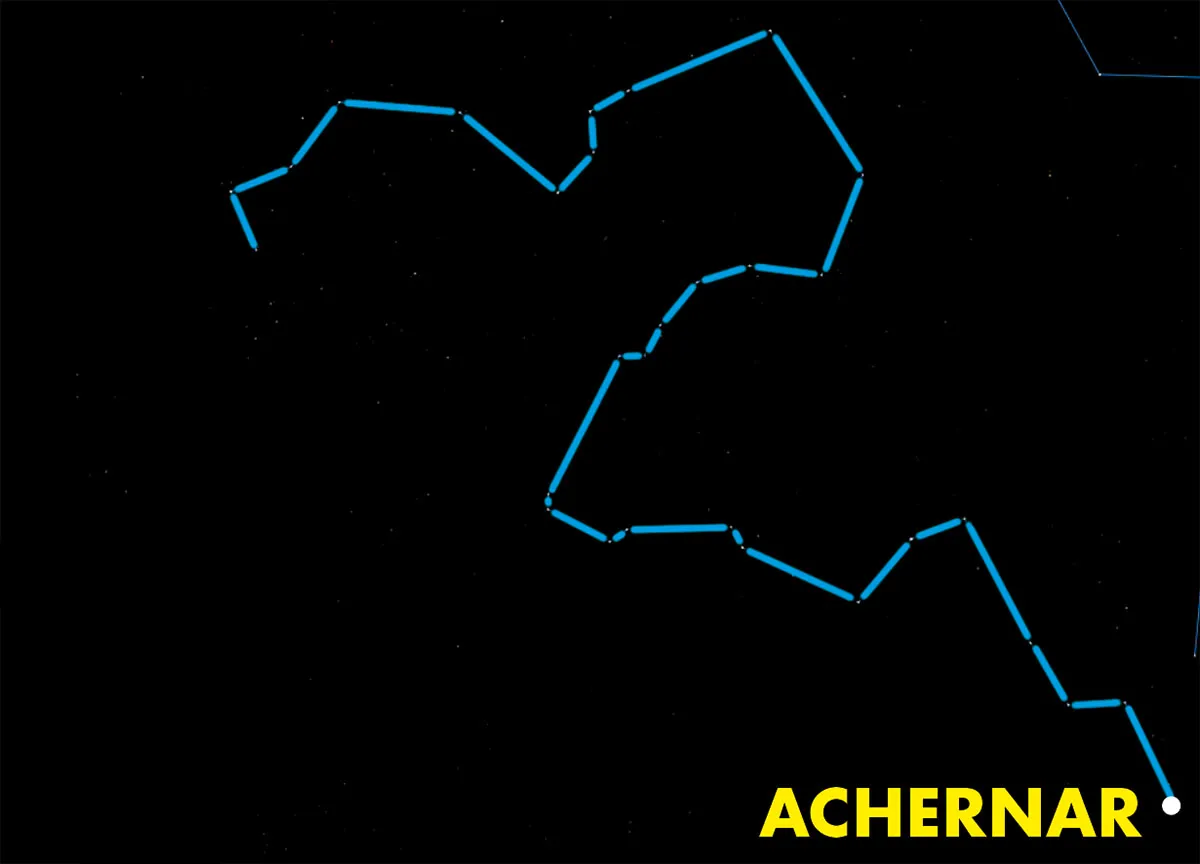
- Magnitude: +0.5
- Constellation: Eridanus
Betelgeuse
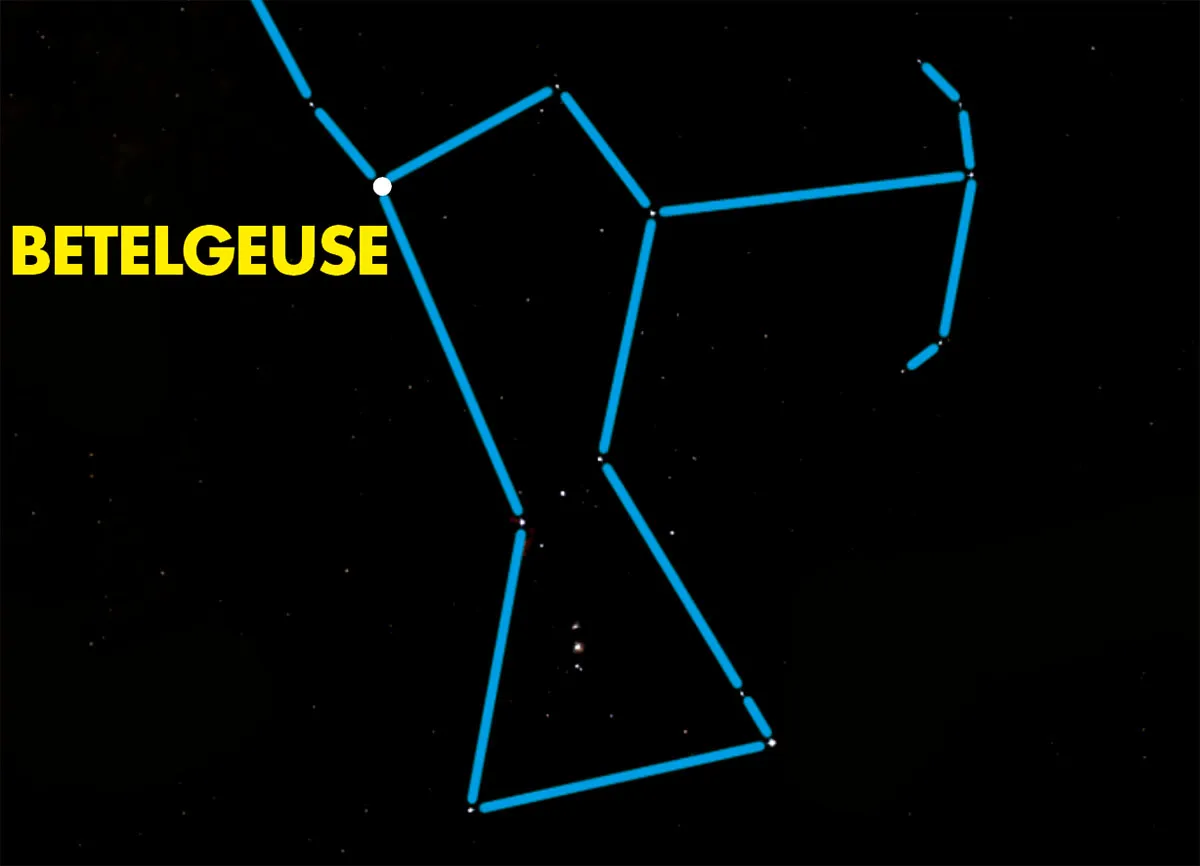
- Magnitude: variable +0.6
- Constellation: Orion
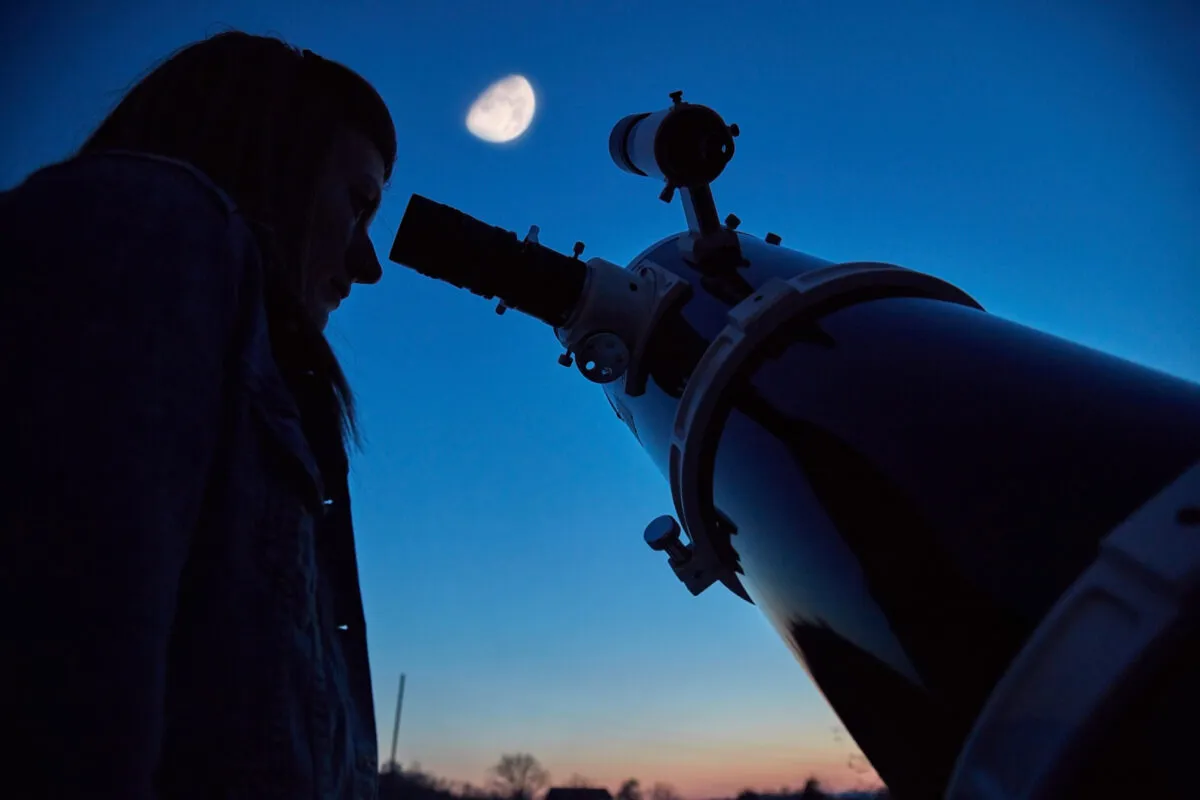
Observing the Moon
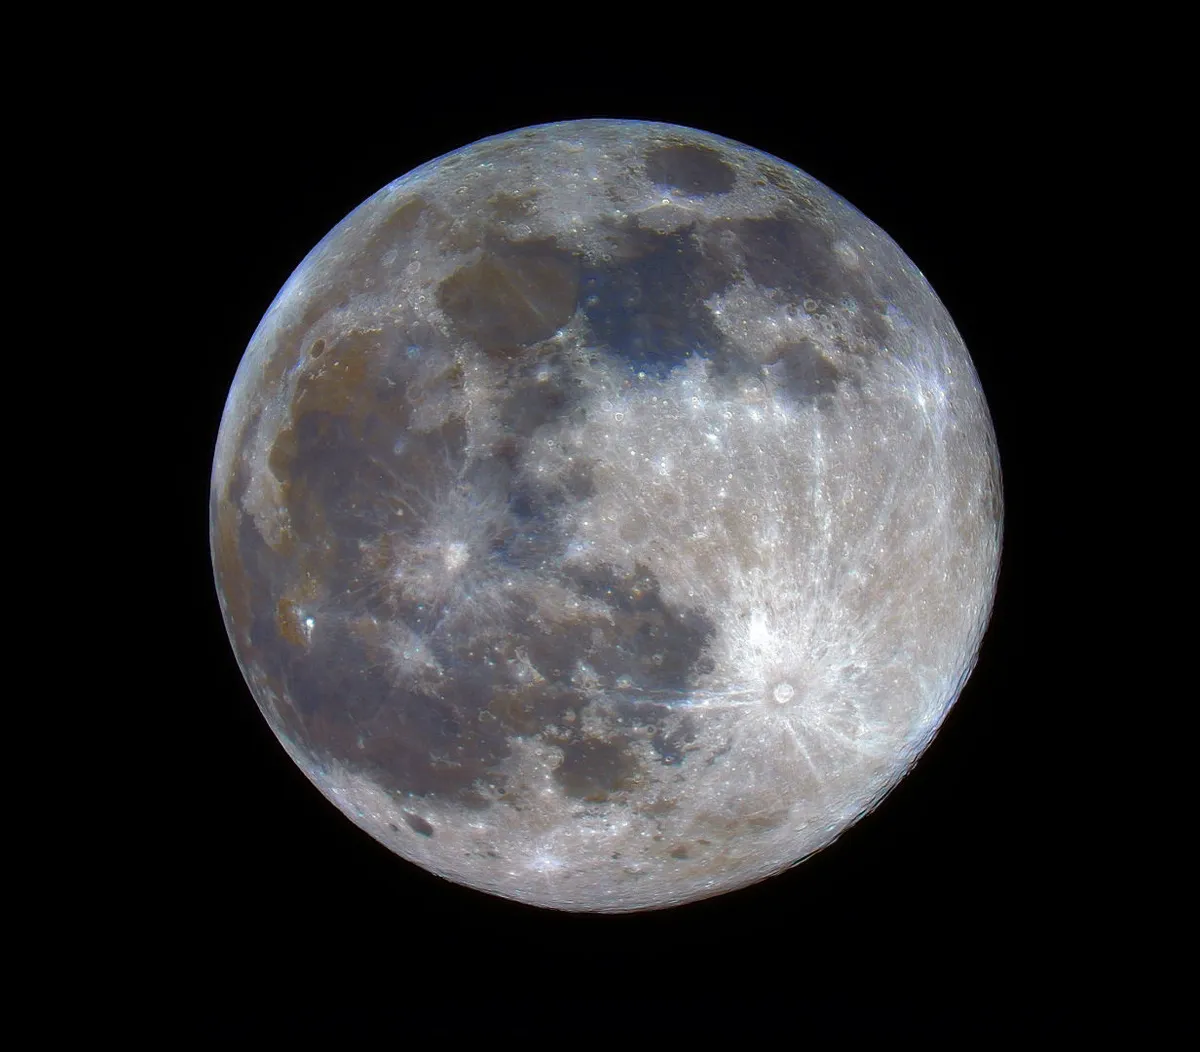
Once you've worked your way around the night sky and observed stars and constellations, you can turn to something a bit easier: the Moon!
The same side of the Moon always faces Earth, which means it's a constant, reliable companion and a great object to observe with your naked eye, with binoculars or a small telescope.
Spend time discovering the lunar maria, observing the phases of the Moon and see if you can spot some of its incredible clair obscur effects such as the lunar X and lunar V.
There's plenty to see on the Moon. For more advice read our guide on how to observe the Moon, and the best features to see on the Moon.
Observing the planets
Planets like Mercury, Venus, Mars, Jupiter and Saturn can get bright enough to easily see with the naked eye, outshining many of the stars in the night sky when they're at their best.
But the difference between the planets and the stars from an observing perspective is that the planets are less reliable, and won't appear at the same time every year in the same way the stars and constellations do.
Planetary observing requires a bit more planning, as you will need to know which planets are visible at which times during a specific year.
Keep up to date by visiting our page all about what's in the sky tonight, and get to know terms like opposition and the ecliptic: these will help you become an expert planet spotter.
For more info, read our guide on how to find planets in the night sky.
Using binoculars for astronomy
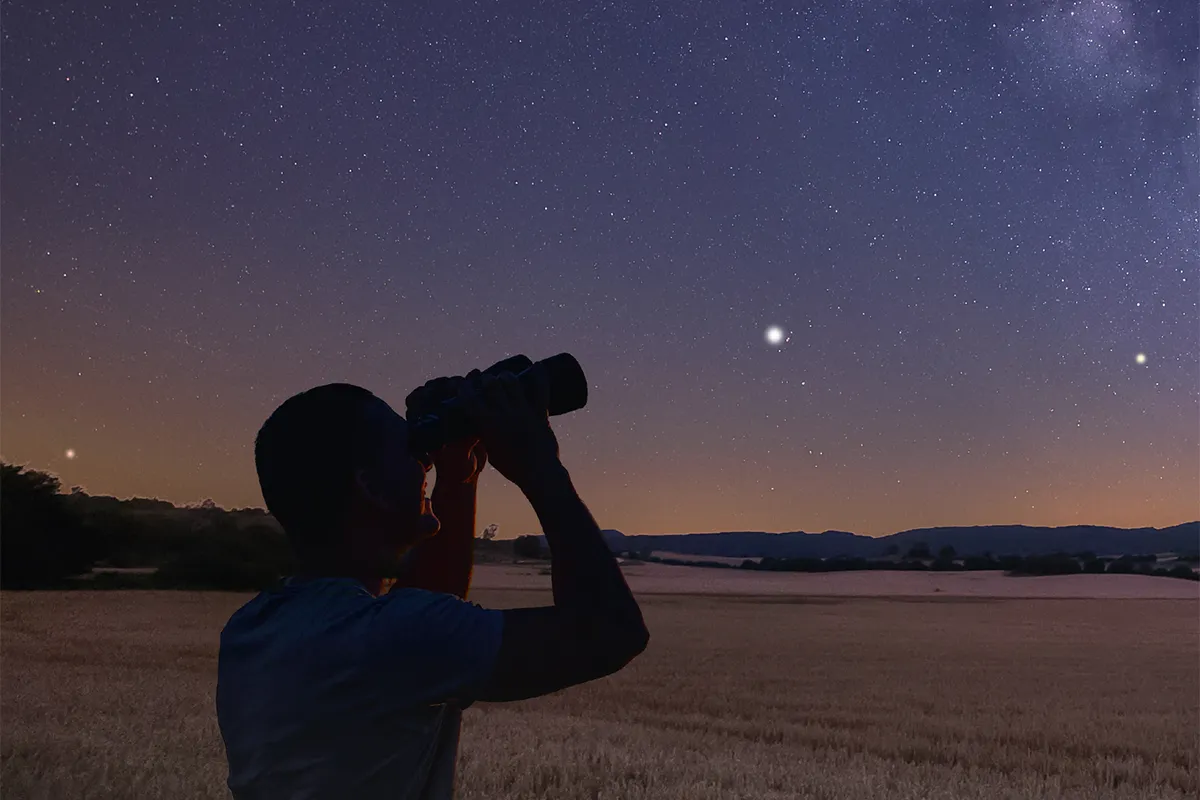
Binoculars are a great tool for any observer, and many of us have binoculars tucked away in a cupboard, used in some past age to watch that friendly robin perching photogenically on a nearby post box.
What what about using them for space?
If you don’t have a pair, then ask a friend, a relation, a next-door neighbour – some will turn up somewhere.
The fact that you may not need to pay anything at all in order to help your astronomical pursuit is what makes binoculars so good.
The overriding factor is doing something, so unless the binoculars are truly useless, like the cheap plastic ones that come in a children’s spy kit, give them a go.
I thoroughly recommend binoculars for any night-time starry skies adventure, whether you’re a beginner or are pretty advanced.
If you’re out learning the constellations for the very first time, then a glance through correctly adjusted binoculars will only tempt you to continue the journey.

Some people may suggest that you should wait until you know your way around the sky without any optical aids before moving on to equipment, but in reality,the more you are able to get in the stargazing mix, the better.
What binoculars do, of course, is make things bigger. With their big lenses, they magnify what you’re looking at by grabbing more light than your eye ever could.
Binoculars can be heavy, so holding them up may give both your head and arms some fine aches.
Add in the magnification factor, and you’ll find that it’s not an easy task trying to hold them still enough for the image not to wobble all over the place.
Simple things will help in overcoming all of this: rest your arms on a fence or wall if there is one nearby, or observe from a deckchair to support your neck.
Some binoculars can also be fitted to a tripod (with an adaptor), which is another solution to the wobbly field of view.
What to see with binoculars
The Moon
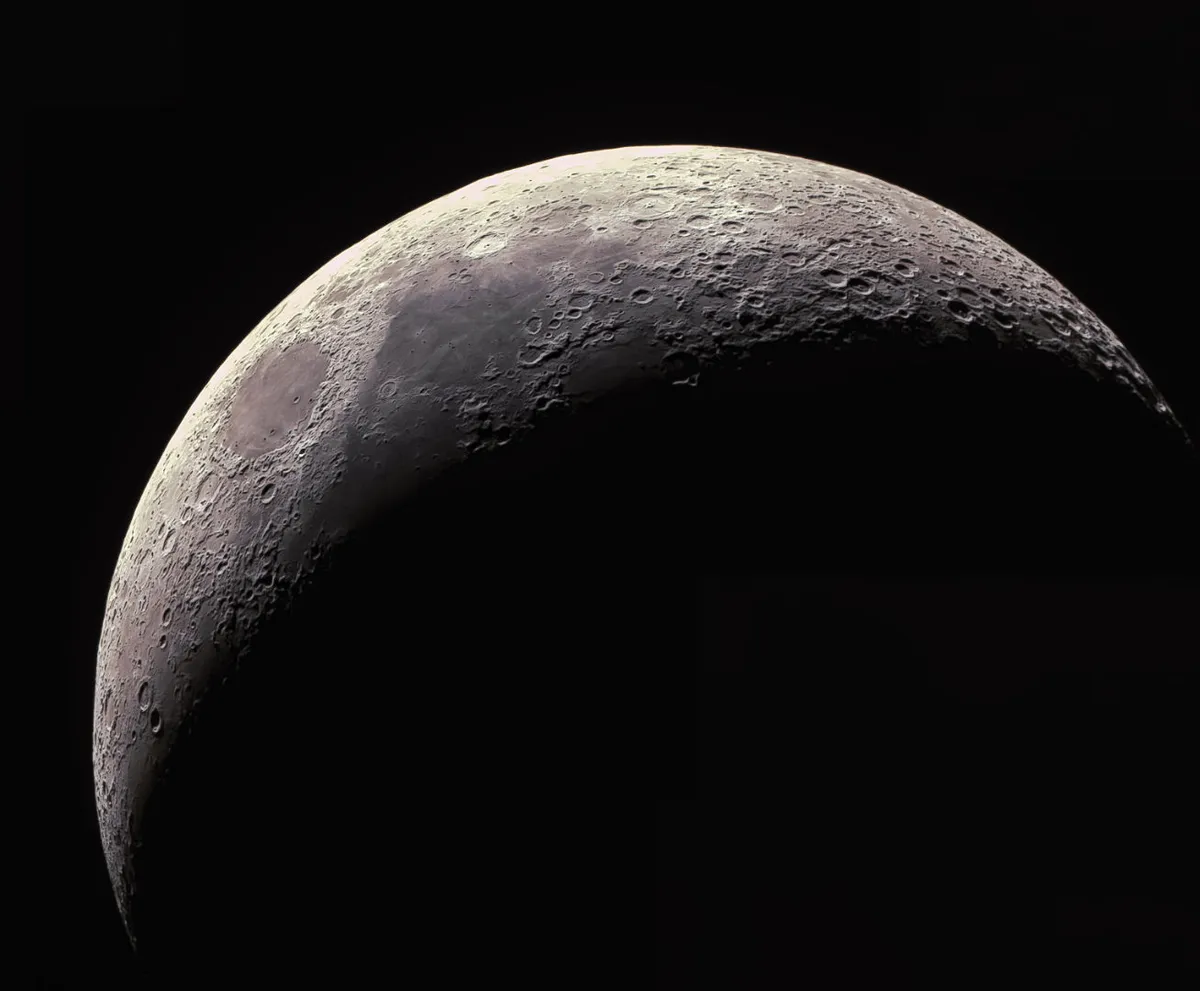
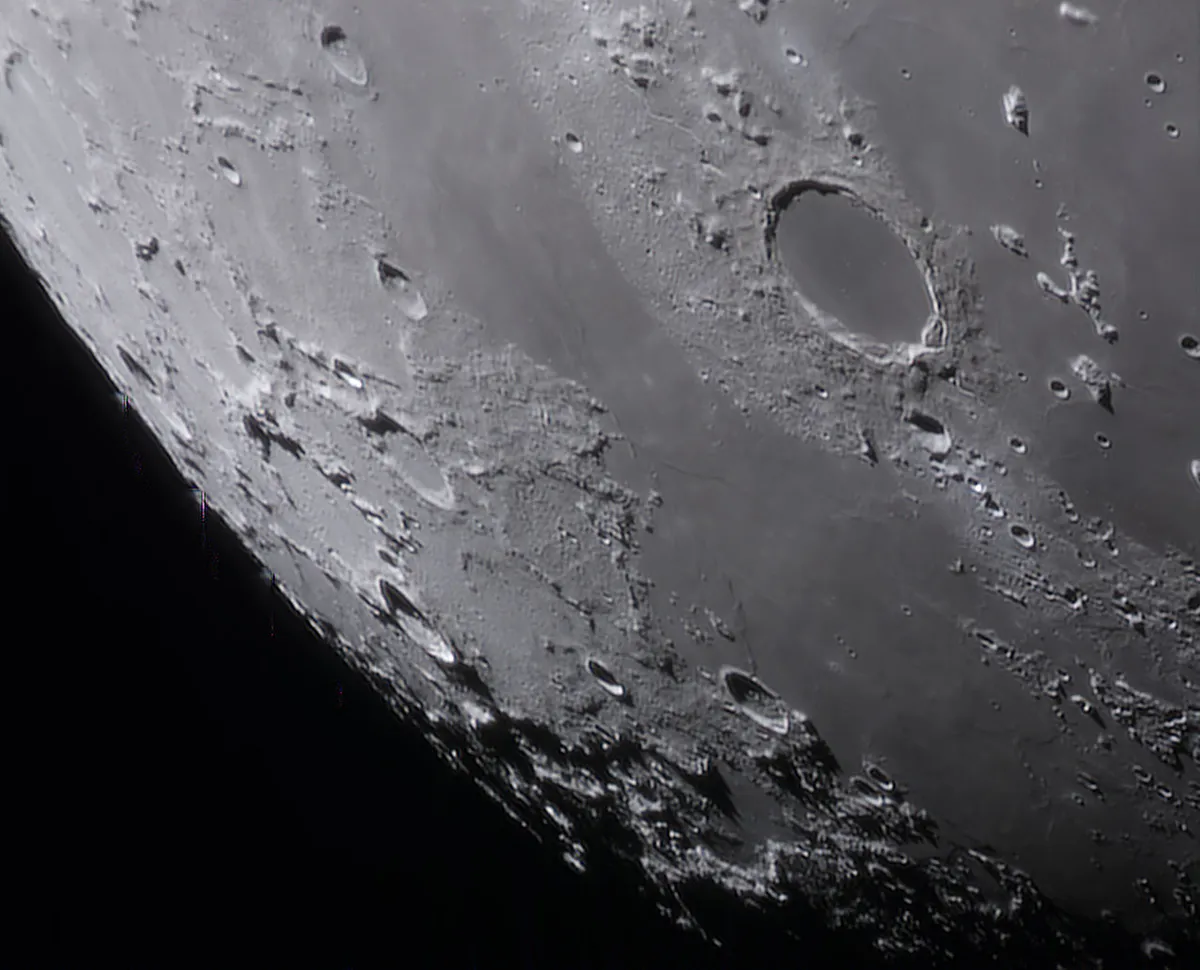
The Moon is a must. The eye shows light and dark areas, and several splats of impacts around craters, but binoculars reveal the craters themselves.
Then there’s the mountainous terrain, all brought into great relief by highlights and shadows created by the Sun’s light.
The best time to look at the Moon is between the crescent phase and the gibbous phase, when the Moon is more than half but less than fully lit up.
Orion Nebula

If you look at the Orion Nebula with your eyes, all you’ll see is a small smudge below the three belt stars of Orion (and if light pollution is bad where you live, sometimes not even that).
But train your binoculars on it, and it will look like a delicate semi-circular curving structure with a bright centre.
This is a stellar nursery made up of dust and gas, where more than 1,000 stars are currently being created.
The Pleiades

Next, find the Pleiades in Taurus, one of the finest star clusters in the sky. To the eye, this looks like a close family of 6 or 7 stars (though some people can see 12 or more), but with binoculars this number increases to around 40.
Galilean moons
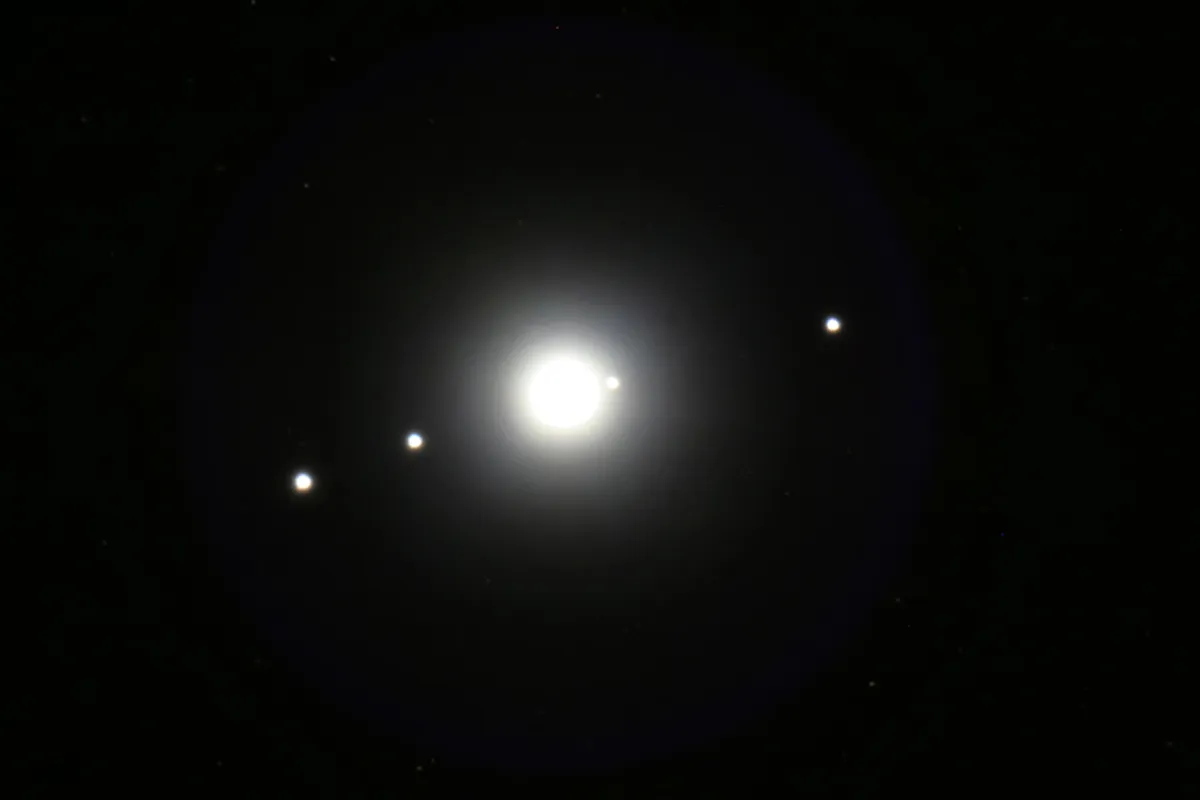
Finally, would you believe you can see another planet’s moons? Jupiter’s four main moons, Io, Europa, Ganymede and Callisto - known as the Galilean Moons - will look like four little points of light through binoculars.
Because the inner moons orbit in just a few days, it is possible to see some movement in the system over the course of a few hours.
As for the planet itself, this just looks like a star when you see it with your eyes, but with binoculars you’ll be able to see it as a disc of light – very exciting the first time you see it!
For more advice, read our guide to stargazing with binoculars or read our pick of the best binoculars for astronomy and the best budget binoculars.
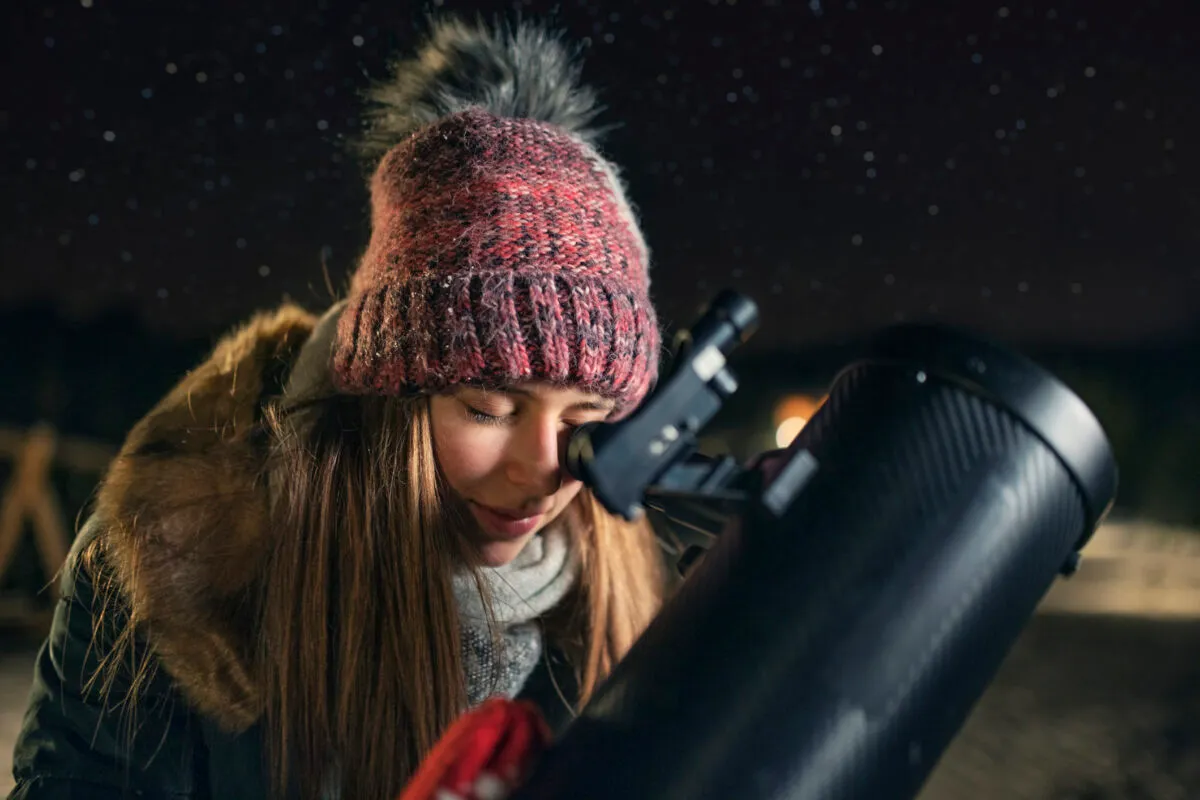
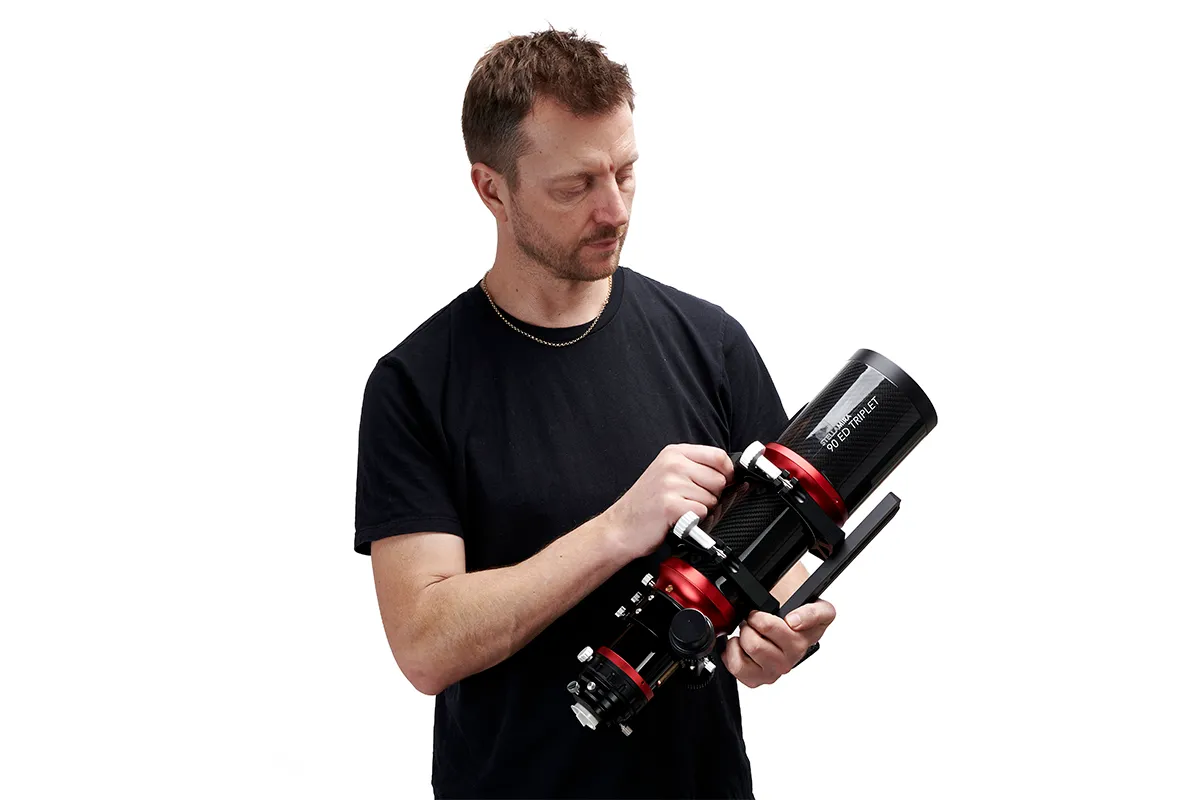
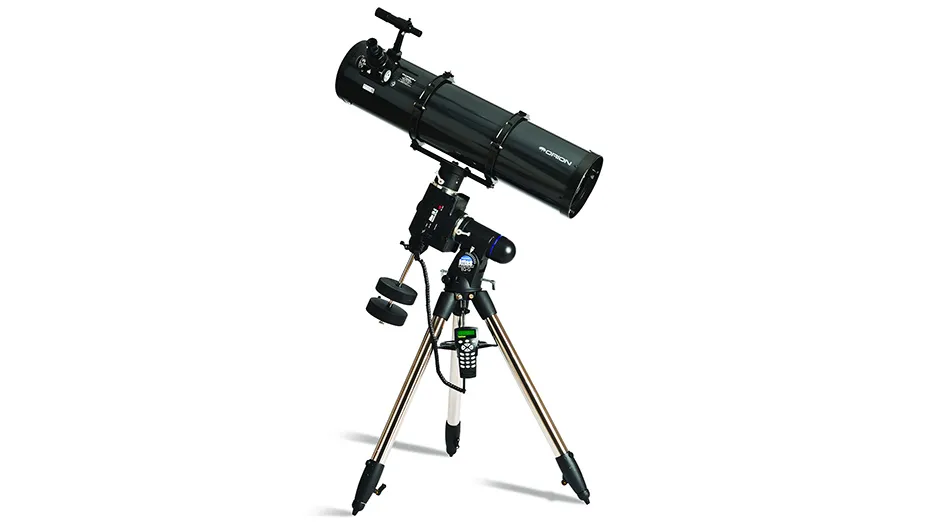
Using a telescope for astronomy
I have known many people who have decided astronomy is for them, and before doing anything that I’m about to describe below, out they go to buy a telescope that’s entirely inappropriate.
Predictably, it just sits around not doing much before it’s sold on eBay.
‘Inappropriate’ in this case means a scope that is the wrong size, shape or weight to make it useful to the owner.
You may want a light, small scope that’s easy to plonk on the garden table and impress party guests with fine views of the Moon.
Or you may want something more sturdy that can track the stars as they move across the night sky, so you can photograph that distant galaxy ‘Slight Fuzz 7HX-67F’.
But the two are quite different beasts, and if you go out and make a purchase without doing a little bit of homework first, it’s unlikely you’ll end up with the best scope for you.
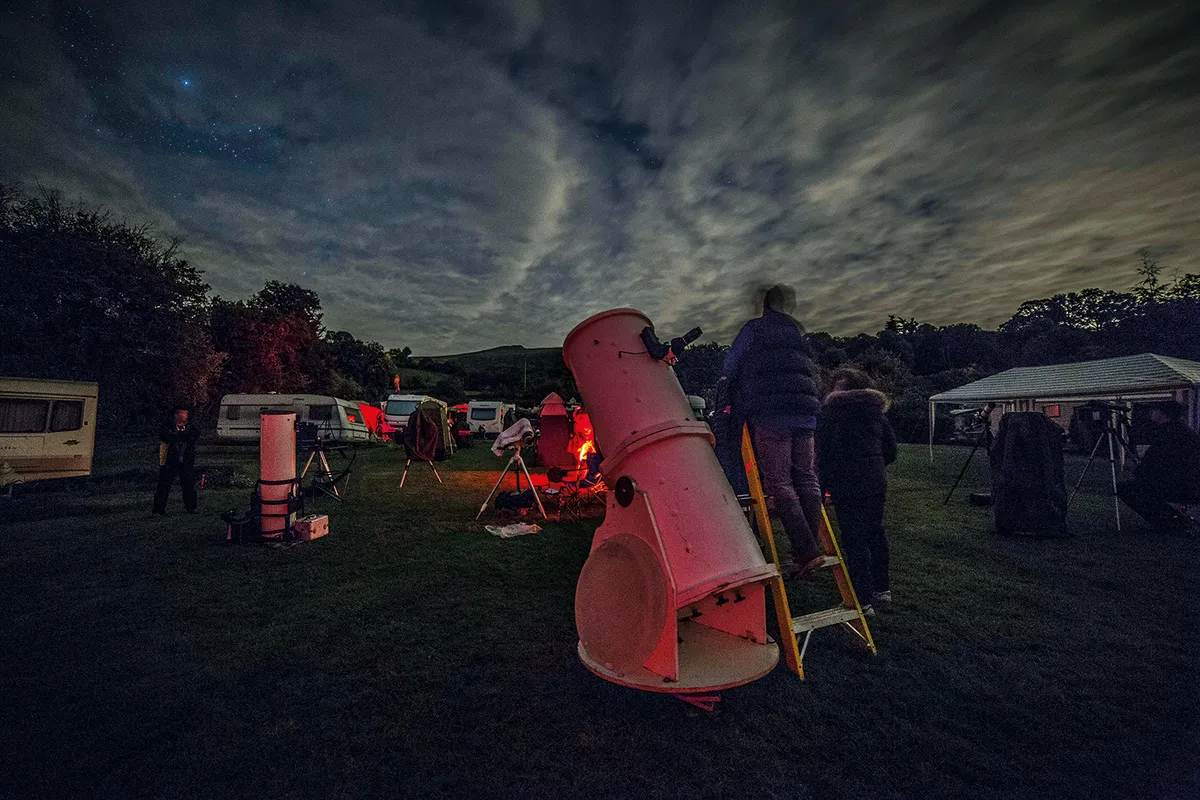
So what do you do if you want a telescope? One of the best ideas is to visit, if not join, your local astronomical society.
Many members will be very keen amateurs who’ll not only show you a variety of scopes during one of their observing evenings, but if you do buy one, will be able to help you work out how the thing actually works.
Another place you can go to see a range of scopes is a recognised telescope dealer. Nearly all of these suppliers have staff who know what they’re talking about and will be able to offer advice.
It’s worth pointing out that the reverse is also true: if the shop selling telescopes also sells kettles and soft furnishings, then it’s very likely the sales team are not themselves dedicated to astronomy, and they probably won’t be able to answer any questions you might have.
Anyway, after all that, what exactly does a telescope do? Basically, it captures more light than your eye – just think about the much larger diameter of a telescope tube compared to the pupil of your eye.
By ‘playing’ correctly with this large amount of light, the fainter objects of the Universe can be revealed to us, and objects that are too small can be magnified so we can see incredible details, such as craters on the Moon.
Whatever you do, never buy a telescope that sells itself on how much it magnifies – there are many more important things to consider.
Most of the sky’s fine sights can be seen with quite low magnifications, by which I mean less than 75x. Telescopes that have statements on the box like “Enter space with this 300x magnification!” should be avoided.
Another critical consideration when you’re deciding what to buy is the telescope’s diameter.
More correctly, this is called the aperture size – of the lens in the case of a refractor telescope, and of the mirror in the case of reflectors.
In either case, the larger the lens or the mirror, the more light the instrument will be able to capture, and the more you can magnify.
Not surprisingly, the cost goes up as the various bits get larger.
So go back to the dedicated suppliers who will consider your needs, your ability and your budget before giving you expert advice on what to buy.
More advice

Different types of telescope
Refractors
Pros
- They are robust – a knock won’t do any harm.
- They need very little maintenance apart from a dust once in a while.
Cons
- Many cheap models are poorly made in terms of their lenses, eyepieces and mountings.
- Lenses suffer from ‘chromatic aberration’, where stars have a faint halo of colour around them. Some more costly refractors correct this by using a secondary lens.
- Larger refractors (100mm and up) are quite heavy.
Reflectors
Pros
- Size for size, these are cheaper than refractors. Dobsonians – large reflectors on simple mounts – are particularly good value for money.
- Larger reflectors are still relatively light in weight.
Cons
- Big knocks will send the mirror out of alignment, and it will then need careful recalibration.
- Tend to suffer from ‘coma’, which makes stars around the edge of the view look triangular
What next?
If you're really ready to get started in astronomy, before you make your first purchase, it pays to do a bit of research.
Contact your local amateur astronomy society. Groups like these exist in virtually every town or city across the world, and are usually run by a friendly bunch of astronomy enthusiasts who will be glad to welcome newcomers and pass on their years of experience.
This is undoubtedly one of the best ways of getting into astronomy.
You could also attend a star party, where you're sure to meet like-minded people.
Find your nearest telescope supplier. It's usually best to avoid buying a telescope from a shop whose primary purpose is selling televisions and microwaves, as you might not be able to find someone to give you proper advice as to what you're buying.
You can also, of course, buy a telescope online and even get one secondhand. But if you're opting for the latter, be sure to read our guide on buying secondhand astronomy equipment.
And get yourself some good astronomy books, or even a star chart or planisphere. Don't forget to check your local library, or secondhand bookshop too. You might find you can avoid shelling out on expensive hardbacks.
Above all, make sure you enjoy yourself while out under the stars. Be prepared to take advantage of clear nights, as you never know when they'll come along.
Observe with friends and family, and discuss what you see, what you discover and what else you'd like to be able to spot in the night sky. You could even keep an astronomy log book to make a record of your journey.
Are you a beginner? Let us know how you're getting on by emailing us at contactus@skyatnightmagazine.com.

