In this imaging guide we'll reveal the best astrophotography targets for beginners.
There’s a long-standing debate among amateur astronomers: which is better, observing the sky with your eyes or capturing it with your camera?
It will always be a matter of personal taste, but the good news is that for anyone looking to try their hand at astrophotography, there’s never been a better time.
Whether it’s taking casual snaps of the stars or delving into more advanced techniques – what the seasoned called ‘imaging’ – this hobby has seen an explosion of popularity.
Increasingly ubiquitous astro-capable cameras and superb software have made astrophotography easier.
Want to try astrophotograpy? Here are 10 targets to get you started.
Deep-sky astrophotography Masterclass
Interested in astrophotography? Sign up for our Deep-Sky Imaging Masterclass and find out how to capture distant galaxies and nebulae.
Click here to book tickets for all three Masterclasses and save 20%
Simple targets for getting started in astrophotography
Nothing is easier than placing your camera or smartphone on a tripod and shooting away, as you’ll find with these entry-level projects.
The Milky Way
Capture the river of light that crosses the sky
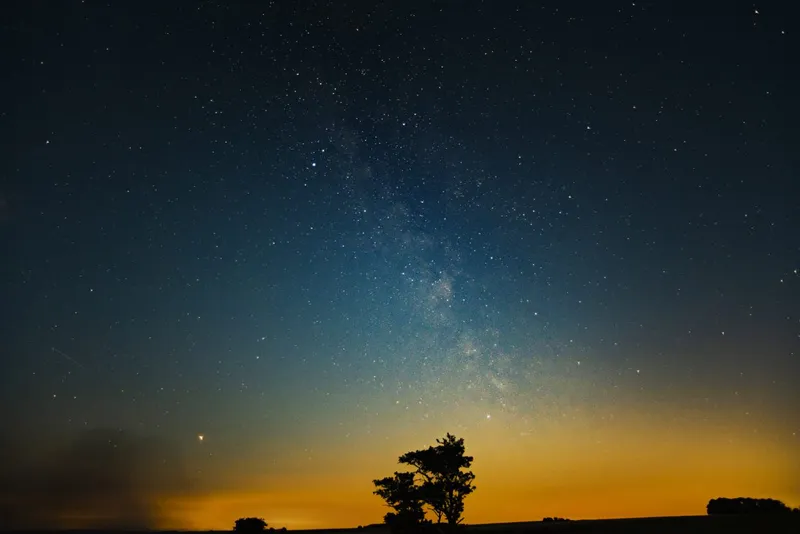
The warm nights of summer and the early autumn invite us to stay out and enjoy the splendour of the Milky Way.
Rich with the light of billions of stars, it’s a perfect playground for experimenting with your camera.
The Milky Way is one of the best astrophotography targets for beginners.
Investigate your lenses and choose a wide one with a fast maximum aperture, such as f/1.4, f/2.8 or f/4.
Angling your camera up to the sky, you should be able to see various brighter stars on its live view screen.
This will aid with manually focusing and with framing the Milky Way’s bright core.
With an ISO value of 800 or 1600, take exposures of 5–15 seconds.
Star trailing will become evident on longer exposures, but use the ‘500 rule’ to avoid the shot being spoiled.
The 500 rule in astrophotography states that your maximum exposure (in seconds) should be no more than 500 divided by your lens focal length in millimetres.
For example, with a 14mm lens don’t go longer than 500 ÷ 14 = 36 seconds.
If your camera has a crop factor (see your user manual), multiply the focal length by that first.
So for a 14mm lens on a DSLR with a 1.6x crop factor, the maximum exposure time becomes 500 ÷ (14 x 1.6) = 22 seconds.
For more info, read our guide on how to photograph the Milky Way
Meteors
Catching shooting stars is mostly down to serendipity, but you can give luck a helping hand
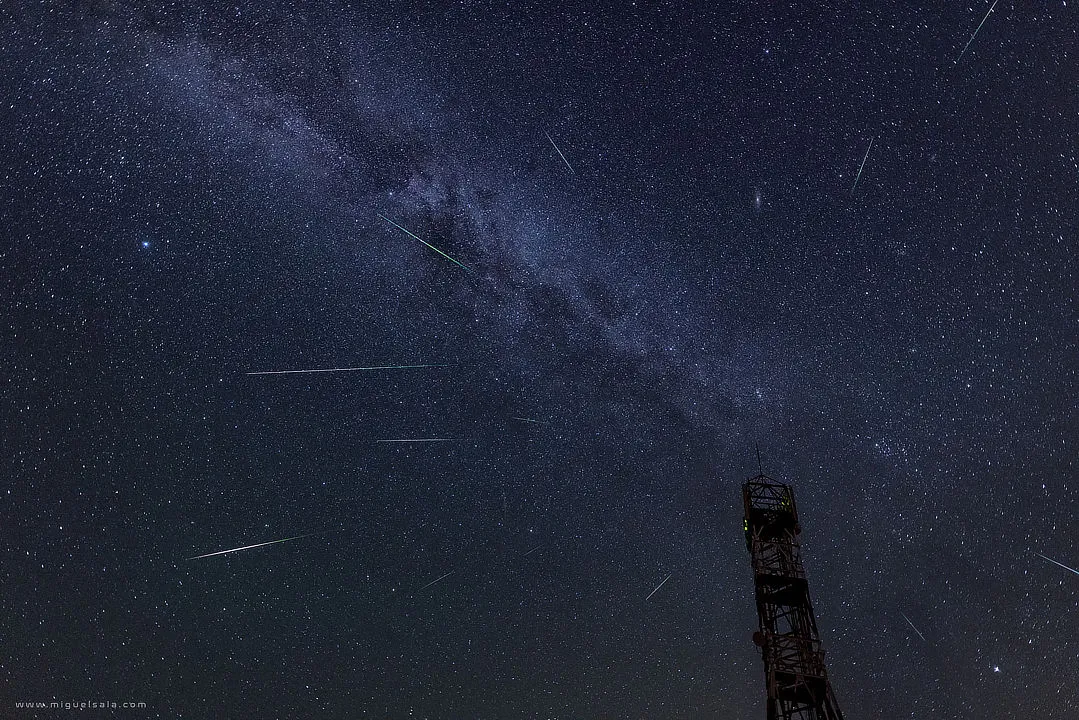
When photographing the night sky, it’s not uncommon to capture a streak of light.
Usually this is a satellite trail, but rarely you’ll encounter a natural streak – a meteor!
It’s mainly down to chance, but you can greatly increase your odds by shooting during a meteor shower and by taking a continuous sequence of exposures.
Using an intervalometer, or timelapse remote, you can set your camera going and enjoy the shower with your own eyes.
Later, skim through your images and see what you get.
Bright meteors, such as fireballs, will be hard to miss and often produce varicoloured trails as they travel through the atmosphere.
Your camera may have onboard noise reduction enabled – switching this off will minimise the gaps between exposures.
Of course, if like me you’re often terribly unlucky, you might not catch any meteors.
But your sequence of identical images can still be put to good use for creating star trails.
For more info, read our guide on how to photograph a meteor shower
Star trails
The arcs of passing stars are a great way to show the motion of Earth on its axis
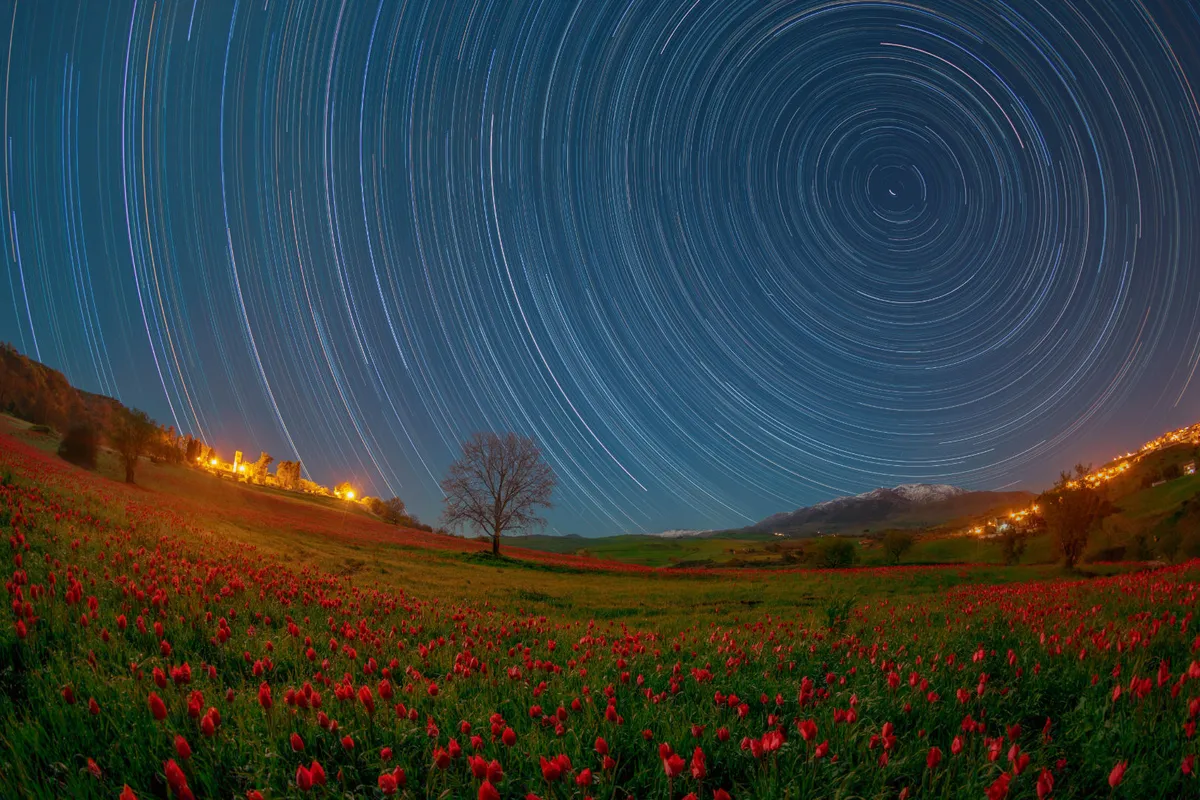
Whenever you try to shoot a meteor shower, you’ll end up with perhaps hundreds of identically positioned photographs, evenly spaced in time.
These are ideal collections from which to create star trail images.
Such beautiful works of art illustrate the rotation of Earth.
As each star in the sky traces its arc around the celestial pole, the effect becomes more dramatic when facing north.
Star trails also look fantastic in contrast with a perfectly still foreground, such as a building or rock feature.
There are two excellent, easy-to-use pieces of free software that turn your sequences into trails:
- StarStaX by Markus Enzweiler, which is available for macOS and Windows
- Sequator by Yi-Ruei Wu, which is available for Windows
For more info, read our guide on how to photograph star trails
The Moon and Earth
Shooting both the Moon and Earth requires a little balance
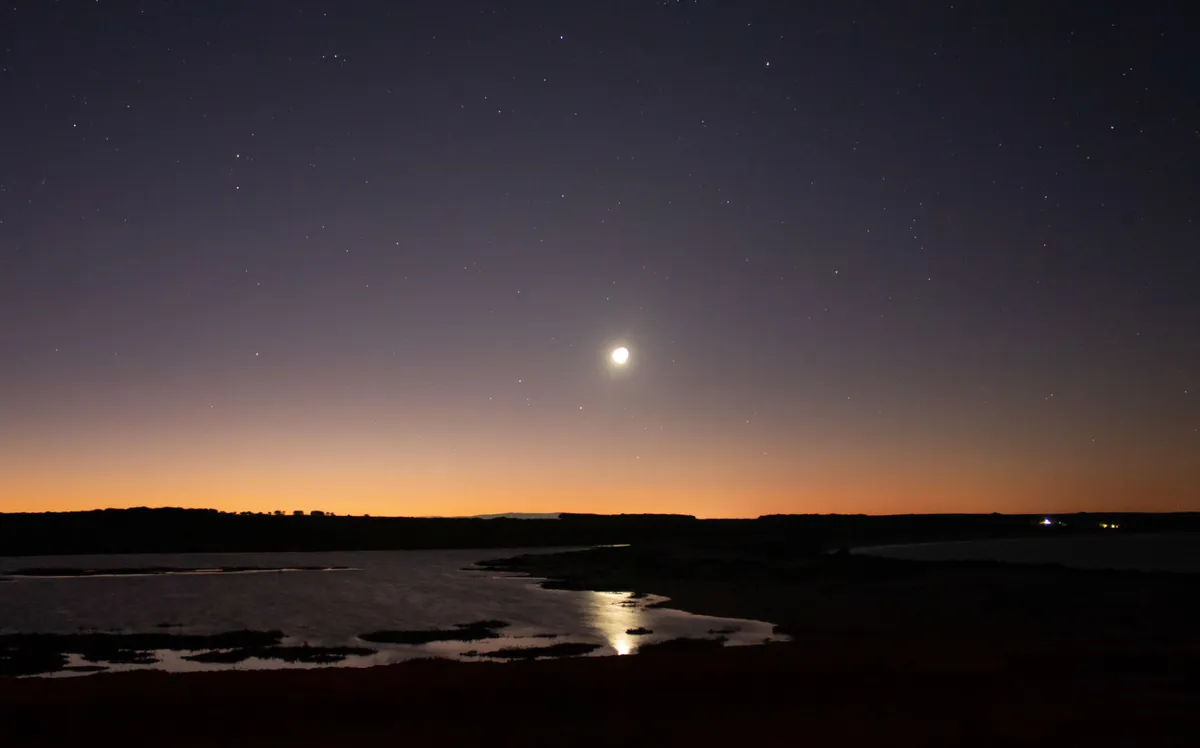
The Moon makes a gorgeous subject for photography.
The Moon is probably the easiest target in the sky, making it one of the best targets for astrophotography beginners.
Conspicuous and ever-changing, the Moon offers many avenues for creativity.
When the Moon is relatively low on the horizon, you can capture two worlds in one photo.
Capturing a simple nightscape with the Moon is a great option.
The Moon appears very small through wide-angle lenses; consider using your longest lens to see how much detail you can tease out.
The Moon shines in very bright contrast against a dark sky, which makes it challenging to frame among the stars.
Underexposed shots will show the Moon’s surface features but fail to bring out stars
Overexposed shots will recover stars at the expense of blowing out the Moon.
An exception is possible during a fine crescent phase, where long exposures can simultaneously reveal stars as well as the Moon’s faint night side, which is itself illuminated by the brightness of Earth.
For more info, read our guide on how to photograph the Moon
Going deeper
A tracking device is an essential upgrade for astrophotography, allowing long exposures and longer lenses to bring out fainter details
Star clouds in Cygnus
You can bring out even more detail by stacking together multiple images

The brightest region of the Milky Way is its core, but that only skirts our southern horizon; to us, the star clouds of Cygnus are more prominent.
Gazing at the northeast of the Summer Triangle, you’ll find yourself looking along the spiral arm we inhabit in the Galaxy.
A rich concentration of distant light paints the scene around the brilliant star Deneb.
On a tracking mount, use a fast telephoto lens to resolve the many stars.
This subject provides a good opportunity to try aligning and stacking multiple exposures to reduce noise in your image.
Try free stacking tools such as Siril (macOS, Windows, Linux) and DeepSkyStacker (Windows).
Even if you’re new to stacking, it’s worth taking lots of images of each deep-sky target.
You’ll be able to return to the data later on and produce better results with the benefit of your experience.
Jewels of Orion
The familiar constellation boasts a host of fascinating deep-sky objects
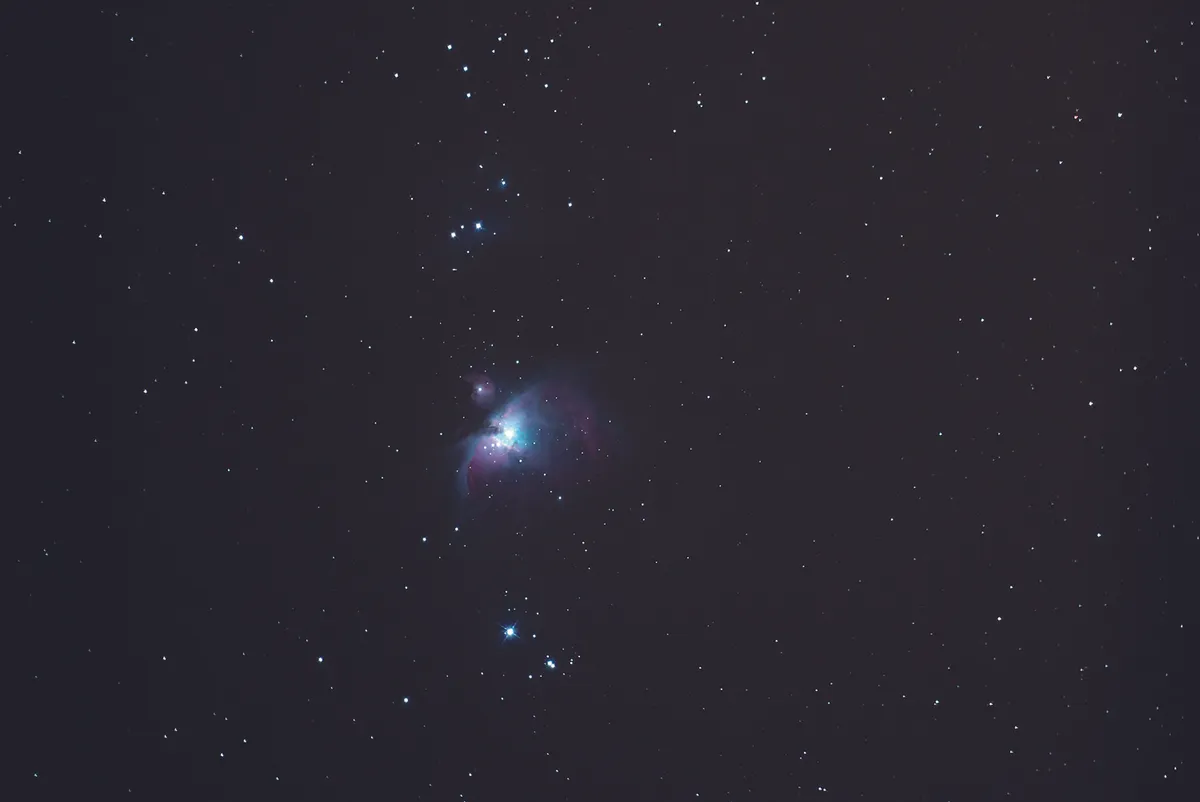
The mighty Orion is upon us soon as autumn rolls around.
A splendid tapestry of colourful stars and nebulous features, this constellation is home to a chain of objects called Orion’s Sword.
Among them is the Orion Nebula (M42), which is conspicuous in photographs.
Using a lens with a focal length of 50–70mm, you can generally frame the most interest parts of the constellation fully, while also resolving some of the details that make the Sword so special.
You may be surprised to see the iconic Horsehead Nebula (Barnard 33) clearly visible in your images.
Orion’s dramatic colours can be drawn out by stacking images, and correctly calibrated in tools like AstroPixelProcessor (macOS, Windows, Linux).
For more info, read our guide on how to photograph the Orion Nebula
Using a telescope and eyepiece
With a special adaptor, you can use your smartphone to snap quick shots through your telescope eyepiece
The disc of Venus
Smartphones offer a quick, easy way to capture our closest planet’s phases
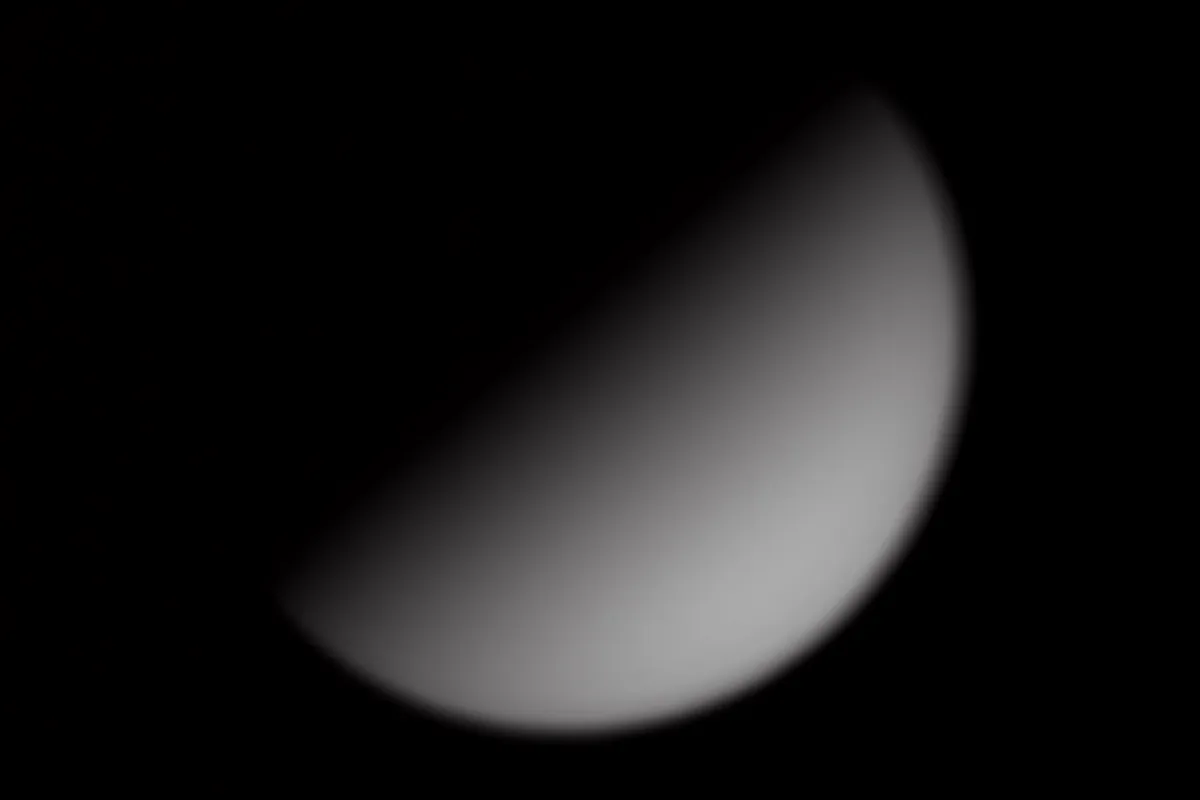
Our nearest neighbouring planet, Venus is a treat through a telescope.
As Galileo first discovered over four centuries ago, it shows changing phases as it orbits the Sun.
Among the planets, it can produce the largest and brightest disc as seen from Earth
It’s an ideal target for smartphone astrophotography practice.
Use a high-power eyepiece (at least 50x magnification) and ensure your telescope is focused by eye, then swap to your smartphone.
Your camera’s autofocus may not produce good results, and it may also struggle to expose correctly for the high contrast of the scene.
Consider using manual settings to control the exposure and focus - you may need to source an app to enable this.
You should also shoot in your phone’s raw image format where possible.
Naturally, touching the phone will cause the telescope to wobble.
So use a countdown timer, Bluetooth remote or – if your phone supports it – voice-activated shutter.
Jupiter and Galilean moons
Capture the movement of the four moons around the gas giant
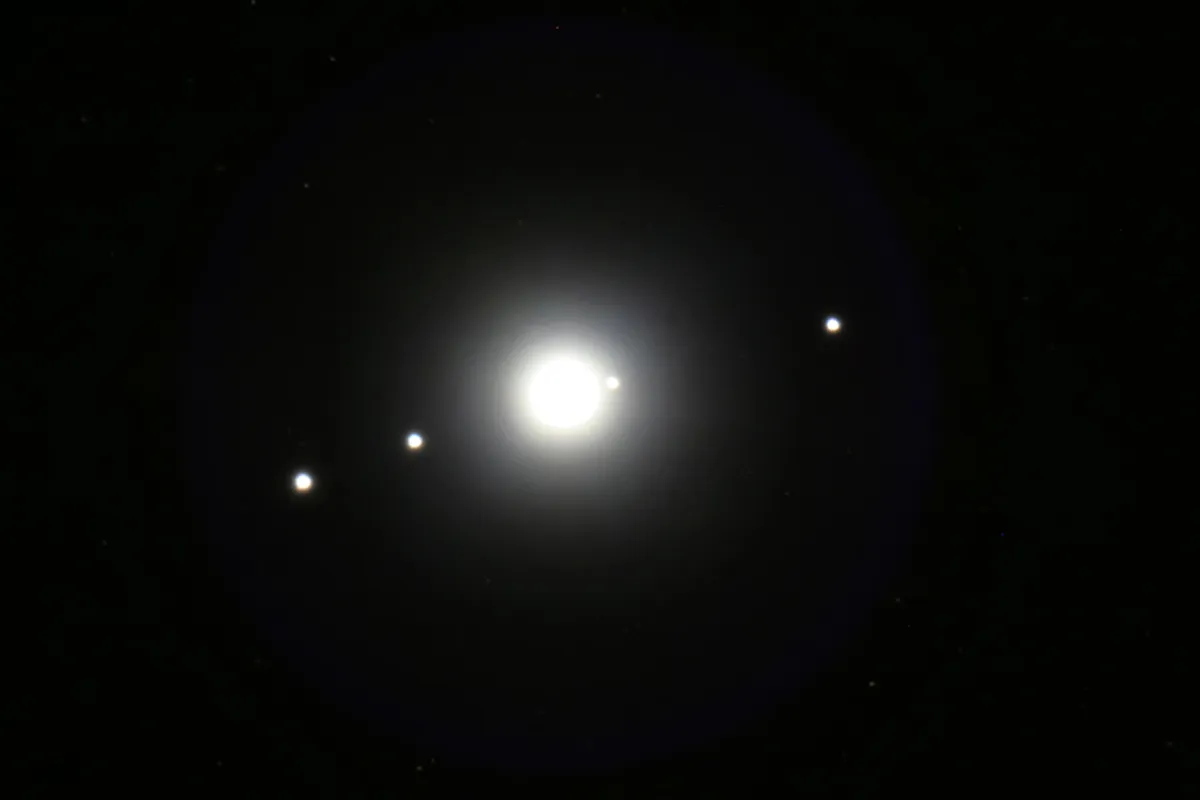
While Venus is essentially featureless in appearance (unless we use special filters and cameras), the Solar System’s largest planet, Jupiter, has a very interesting face.
Your phone’s camera, correctly exposed, can reveal cloud belts and larger storms including the Great Red Spot.
Perhaps more compelling, though, are the four large moons that accompany Jupiter – the Galilean moons.
At any given moment, up to four are visible flanking the planet
Though one or more are often obscured by the planet or immediately in front of it from our perspective.
Compared with Venus, you may find that longer exposures are needed to capture Jupiter
But these will be at most just a fraction of a second.
Keep shooting, too – the bluring effects of astronomical seeing will be evident at high magnification, so some shots will be sharper than others.
Using your telescope as a lens
Many telescopes can be transformed into a giant lens by attaching a camera – including DSLRs and mirrorless cameras
The Moon up-close
Combining your camera with a telescope can bring out a view of the Moon that’s usually hidden
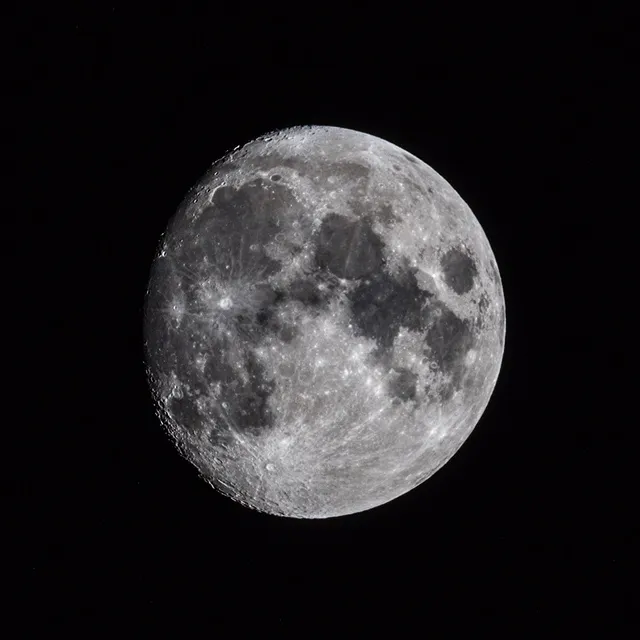
Even short telescopes are equivalent to powerful telephoto lenses, and longer scopes go far beyond the range offered by camera lenses.
A 1.5m-focal-length telescope, for example, can project the face of the Moon across a DSLR sensor, almost edge to edge.
With thousands of pixels sampling its rugged surface, remarkable details are revealed.
Owing to its brightness, the Moon is a forgiving target at such long focal lengths.
You don’t need tracking (although it does help) to achieve great results.
And it’s not just spatial details that come into view.
With high-resolution images of the Moon, we can draw out its subtle colours using image-processing software.
By enhancing the saturation and vibrance of the image, we can see the chemical variance of the lunar surface.
These colours are virtually imperceptible to the eye, even with a large telescope and lots of observing experience.
The Pleiades
With a powerful lens you’ll be able to capture many of the Seven Sisters’ siblings
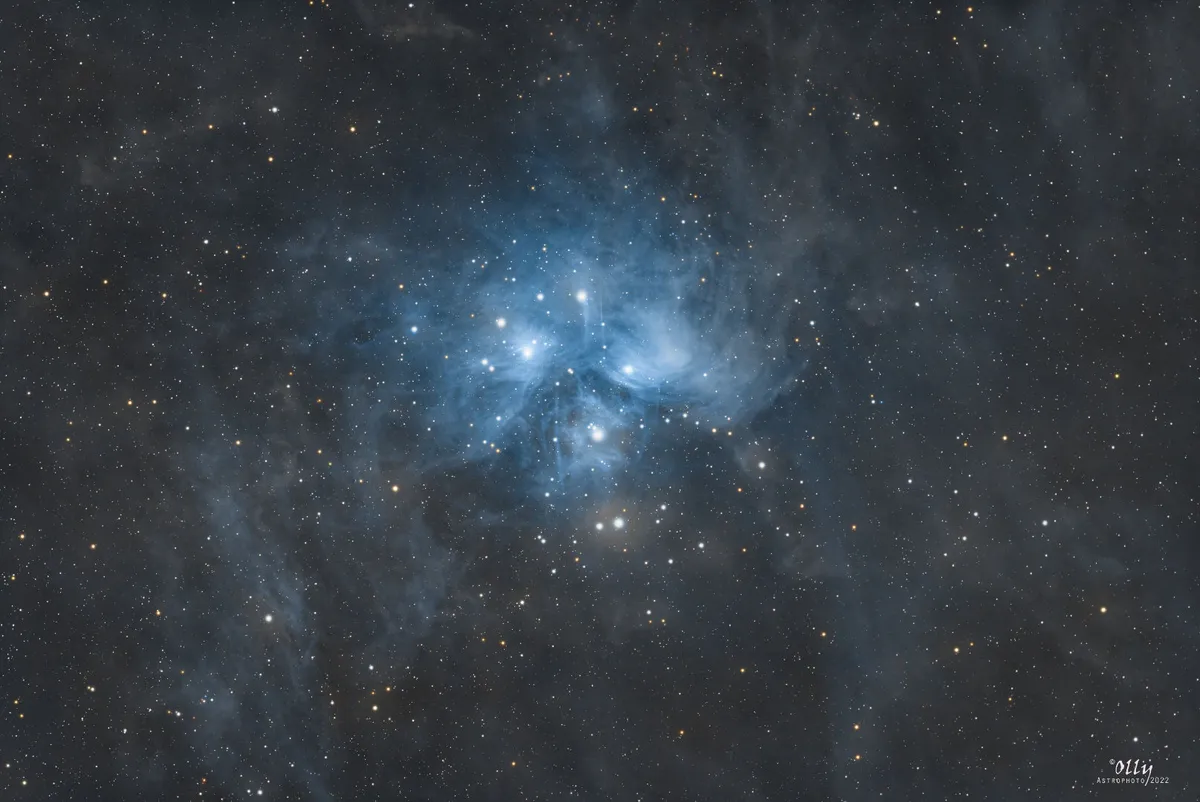
As with our earlier look at deep-sky targets, a properly aligned tracking mount is essential when using your telescope to capture the stars.
But the results are worth the effort.
Using a fast, widefield telescope, you can turn your camera into a powerful astro-imaging tool.
And the Pleiades star cluster is one of the best astrophotography targets for beginners to sharpen their imaging skills.
The goal is to draw out fainter members of the cluster, the rich, blue colour of its prominent stars and the delicate reflection nebula in its vicinity.
By practising your exposure stacking and image processing, you can turn out results that dramatically improve on anything offered by a single photo.
Errors in tracking are punishing, but the Pleiades is one of the brightest deep-sky objects.
And you’ll be able to get away with exposures ranging from 10 to 30 seconds, depending on your telescope’s aperture and camera ISO setting.
Have fun experimenting, and good luck with your first steps in astrophotography!
Have you captured a beautiful image of the night sky? Don't forget to send us your images.